• This email address is being protected from spambots. You need JavaScript enabled to view it.

Gaming.

Grand Master Extra Special Forces coat of arms

All articles regarding gaming in the forms of guides and builds for a wide variety of games.

Squad Logo

User Rating: 4 / 5

Star ActiveStar ActiveStar ActiveStar ActiveStar Inactive

This is a detailed guide for Squad Leaders who desire correct FOB placement, many guides have been misleading and violate basic military principles. No, this guide will not be giving locations where you must build your FOB but will cover the fundamentals of placing them for various functions they might offer on the battlefield. With well over 1500 hours of experience and author of a wide range of tactics and strategy's used throughout the worlds Armed Forces so I thought I drop my 2 cents on the subject. While I cannot teach leadership by simply writing a wall of text I could offer some insights from a military mind regarding the placement of FOBs in Squad. It is all about having fun so wasting time losing rounds sounds like a bad idea, to begin with.

The basic idea of the 3 types of FOB's you normally use and see in Squad.

Defensive FOB:

Used only for the defence of a capture point, they usually consist of multiple fortifications in the forms of sandbags/HESCO Walls/Barrels and wooden walls.

Offensive FOB:

Used for a sustained assault on an enemy capture point that requires more than one squad. Usually when assaulting or expecting a fortified enemy position.

Support FOB:

These are placed away from any "known" routes the enemy might take to move about. Also commonly known as Mortar/TOW FOB's, they are an area denial tool or aid the defence or assault of capture points.

Screening:

Screening is a light infantry tactic that is performed by small teams or even single players denying the enemy an approach vector. Snipers and Riflemen with scopes are most suited for this task.

Defensive FOB's/Super FOBs

Defensive FOB's are there to hold a defensive capture point and act as a force multipliers. Usually manned and defended by a single squad or aided by a smaller squad. So the main assault can commence in full force with the most available manpower.

Both the Radio and Spawn bunker must be located near each other in a hard to reach/assault location. Putting the Radio in a building across the street and the spawn bunker on the other side is never a good idea since you will almost certainly get cut off from one or the other. Placing the radio further away is also never a good idea since you will have to commit troops to the defence of both location and the capture point itself. Always fight on 1 front even if that is a full circle over fighting 2 or 3 fronts that will most certainly end up being encircled as well. Also, defensive FOB's do not offer much of a location to hide a radio as the enemy will move about probing your defences and they will find that radio it will only be a matter of time.

You might find yourself more suited to the defence style then offence, either way, you will most certainly serve a purpose. But remember defence can be boring this might show by people wandering off or standing around. This is usually when an enemy strikes, keep your squad(s) ready and have them pay attention. Screening around a defence FOB never hurts but the FOB must be ready to withstand a sudden attack, therefore, should be manned at all times. Having your FOB on the capture point also makes it harder for your opponent to capture the point, it will take 3 players to start capturing an uncontested capture point, so if you are defending it takes X the number of squad members you have + 3 to start capturing.

Also important to consider is that not all locations are suited for a defensive FOB and are easier to attack than to defend. Some location offers such as Checkpoint that will allow for a consolidated defence so always avoid building a defensive FOB on these open locations. Multiple story buildings offer much greater defensive capabilities as you can defend in-depth and you will force the enemy to fight floor by floor.

As stated above defensive FOB's are only suited by location each location is different but a good defence is one that has depth. Multiple layers that the enemy has to go through to take out the FOB. Use HMG nests to cover streets or open fields to deny the enemy this approach and funnel them into a kill zone that offers you the defender the greatest advantage. Block of streets with defensive structures to funnel them into a narrow street etc. And remember to check your defensive structures by a squad member with a shovel so that they remain at 100% or check whether an enemy might be trying to tunnel through them.

Mortars are somewhat of a double-edged sword in this matter as they can drain your ammo quickly preventing your squad from picking up new grenades/ammo and bandages. As well as the HMG nests require ammo to operate. There are only 2 options really if you find yourself surrounded with little to no chance of getting supplies mortars are not a good option and they could damage your defensive as well if not operated properly. The other option is that you might only be attacked from a single side in this case you could risk a supply run to use mortars. In short when you can ensure a steady supply chain then yes, otherwise simply no.

The spawn bunker itself is best suited inside a building where it can not be directly engaged from the outside or mortar fire. Accurate mortar fire can destroy your FOB/spawn bunker, if you do find yourself in this situation tell people who spawn in to build with their shovels so the spawn bunker remains at full health. Place defensive structures to deny the enemy a direct/indirect fire or even direct access to shovel the spawn bunker down. But again spawn bunkers are best placed out of harm's way, or they can be turned into a kill zone by your opponent.

The squad leader rally point is a good way of warning you of encroaching opponents. Using it as a back up rarely works out since you can find yourself surrounded and they will most likely despawn the rally point. Again this is a double-edged sword, if the FOB is overrun you might have an option to regain control but it could be lost during the encirclement. Using it as an early warning system means you have to buckle up as you could be losing both options to spawn in and might be in for a long walk.

Assault FOB.

For sustained assaults on a known fortified or expected fortified position. You can place more than one to rapidly capture points and/or to engage an opponent position from multiple directions. They also offer a reduced spawn timer over the rally point making it better suited for prolonged sustained assaults. An assault FOB has in its basic form 3 components, Radio, Spawn bunker and ammo crate.

Assault FOB are best placed away from the capture point you intend to assault. You want it to be hidden away from sight to prevent the enemy mounting an assault on your FOB tieing down friendly troops that could be used elsewhere. A nice deep ditch, thick woodland or some buildings to hide it, try not to place any defence as they might be noticed giving away your FOB location. In this case, you can attempt to hide the radio and build the spawn bunker on the edge of the deploy zone.
This would require your opponent to dig down the spawn bunker and then spend valuable time finding the radio. And if you do find yourself in the position of the spawn bunker being taken down you can rebuild is elsewhere in the deploy zone if you have the build points to do so.

Another tactic is to spawn in on the bunker move in a direction and deploy the squad rally point if multiple squads do this from multiple directions it will be much harder to find the assault FOB. Take in mind the added seconds of spawn time there for you will need to learn more on your medics to keep squad members in the fight. But it will prevent giving away the direction of your assault FOB since you will not move directly from the spawn bunker to the capture point. Also, take in consideration here that the enemy might funnel you into a kill zone from that direction then as well. Multiple squads should ALWAYS attack from multiple directions whether you have a FOB or not so your opponent needs to defend in multiple directions splitting up firepower as well. Clusters of players also tend to make a nice mortar target even more so when they know you are constantly pushing from the same direction.

When you do find yourself in the position where your opponent might have spotted your FOB you could opt to put in some defences or even HMG nests to cover the assault. Or in even more dire situation dig it down and use a new location or build FOB. Never build mortars on your FOB because they will give away the general direction of your FOB. The same goes for TOWS, 500 ammo per shot and a nice long wire that will give away the general direction of your FOB. And assault FOB's tend to have long supply chains as well that results in 1 team member running dedicated supplies for longer travel times. Leave mortar support to a defensive FOB if they can spare the ammo or a Support FOB.

Support FOB's

Support FOB's are there for the sole purpose of raining down an ungodly firestorm upon your opponents. They aid in the defence or assault of friendly squads and also make a great area denial tool. Also, a repair station for friendly vehicles could shorten the reloading and repair time. They are placed away from defensive or offensive capture points using long-range fire. Usually on high ground with a clear sight of the surrounding area. A typical support FOB will have a TOW launcher, HMG nests, spawn bunker, mortars and a repair station.

They are manned by smaller squads, with at least 4 people to a full squad if needed. Remember not to hog to much manpower away from any assault of defensive squads though. And you will need a dedicated supply truck and driver to keep feeding the FOB with ammo and build supplies. Best to have them easily accessible by road for the supply truck with easy to navigate roads. The shorter your supply chain, thus the travel time of the supply truck the better.

A well placed Support FOB will make it almost impossible if not impossible for your opponent to bring up vehicles. Mortars and HMG fire can aid in the assault and defence of capture point acting as a force multiplier. Breaking down any defensive barriers for a friendly assault squad, prevent supplies from reaching to front etc. If done correctly your opponent will have no other option then to mount an assault on your far away Support FOB this will take time, costs manpower that could be used for the defence or assault making it easier for friendly forces to hold an assault capture point. Defending a Support FOB is possible but can be difficult since you tend to operate with a skeleton crew in most situations. And most likely by then, your opponent will have figured out where you are and the best way to approach your location.

Important to note here is to coordinate mortar fire with friendly squads to prevent friendly fire. Call out for marks and have other squad leaders avoid those marks, with the addition of smoke rounds you can also obscure view making it easier for friendly forces to approach a position and capture it. So call out HE or Smoke, and make sure to call out "Rounds complete, 20 seconds". 20 seconds is the travel time of a mortar round, smoke, however, does no damage but make sure that everyone knows what rounds you are firing to prevent friendly casualties.

"What is the difference? - 7.62, NATO 7.62" -666- HisEvilness


User Rating: 5 / 5

Star ActiveStar ActiveStar ActiveStar ActiveStar Active

Tom Clancy's The Division guide to builds.

This is a quick guide for some builds I used when playing Tom Clancy's The Division. For the most part, I filed in the support roles since I was the only all-rounder and no one had good builds but I also was able to DPS and adjust being an offensive support player. This guide comprises of an Alpha Strike setup in different flavours, a Savage Firecrest build and a Medic build. All the builds feature a short intro with gear selection, perks than some footage of the build in action.

Alpha Strike.

M4's, LVOA-C and Famas with weapons damage talents


Savage Firecrest.

Primary Weapon: LVOA-C with damage weapon talents.

Secondary Weapon: Classic M44 with headshot and skill power weapon talents.

Combat Medic.

Main Weapon: Liberator with weapons talents to boost skill power.

Secondary Weapons: M60 E6 with weapon talents to boost skill power mainly used on NPC's.

These are all classic builds that have served me well when I was playing Tom Clancy's The Division.


RogueTech Banner

User Rating: 4 / 5

Star ActiveStar ActiveStar ActiveStar ActiveStar Inactive

This is a tips and tricks guide for RogueTech, a modded version of the BattleTech game covering inspired by the Mech Warrior universe. RogueTech adds a layer of difficulty to the original BattleTech game. Since so little information can be found, this guide is written with a range of tips and tricks to give new players a more leisurely start. Also included in this guide, are some mech builds with pictures and some build advice, in general, to illustrate design choices when building a mech. At the time of writing this guide, I have well over 600 in-game hours this covers the original BattleTech game and the RogueTech modded version of the game and thought I share my experience with the RogueTech community.

Where to start?

Initially, you will have to farm missions of 1 skull and lower to gain more equipment and C-Bills(in-game currency)as well as gaining reputation with all factions to gain access to higher tier missions. The mission part will be tricky in a sense you do not want to drop reputation with one faction to gain reputation with another faction. However, the easy workaround is that you gain more reputation than lose reputation when you do a mission to ensure that if you do a mission against a faction, your reputation does not dip too far before taking on a mission. Furthermore, you can do missions against the "Planetary Government" that will affect no reputation loss at all so ensure you do those missions first. In short gain reputation before losing reputation to unlock higher tiered missions.

I started in the Clan area as it gave me a small reputation boost and access to the Clan stores to get more Clan gear while doing missions at the same time and gaining some more clan equipment and mech parts through salvage. This allowed me to get ahead started early in the game and made my overall playthrough easier over beginning in the Inner Sphere.

Clan Gear.

Clan gear is in most cases best in the slot for all weapons and equipment, and it will use fewer slots and weigh less while having increased performance. This will allow you to fit more weapons and equipment, giving your Mech thus lance more damage output. At times Clan gear might give off more heat so make sure to balance those out with overall damage vs heat generation.

RISC Gear.

Is Innersphere experimental tech that offers even more benefits then Clan Gear, it is however scarce, and only appears as salvage always. RISC gear should be priority salvage even over mech parts since RISC gear is that rare. Due to the weight savings, this will make it easier to outfit medium and heavy mechs and will retain better damage output.

Prototype Heatsink Kit & Prototype Double Heatsinks.

These are by far best in cooling performance and allow you to build insane Omni Mechs(assault Class) with over 600 sustained damage. The Heat Sink kit converts all the Engine Heatsinks and Additional Engine Heatsinks into Prototype Heatsinks and allows you to install more Prototype Double Heatsinks. While they only sink -4 heat per turn, they also lower heat output from weapons by 4% per heatsink, increase your overheat threshold by 4 per Prototype Heatsink and your maximum heat by 4 per Prototype Heatsink. Therefore Prototype Heatsinks and Kits are a MUST salvage above everything else unless you already have more than 10 of each. Even just installing the Prototype Kit will benefit you by having the benefits mentioned earlier on the Engine Heatsinks saving you tonnage and slot space to fit more gear. I personally never use any other type of Heat Sinking than Prototype that is how good it is.

The Basics.

There are several ways to increase tour performance that do not involve direct damage output. E.C.M. and Sensors are very important and will help with your overall accuracy and prevent you from being jammed. Acid munition will help you increase damage output in the next round. And at the same time overheating a hostile mech with special incendiary munition can shutdown a mech and allow you to take it out via headshot. T.S.E.M.P., Chaff L.R.M., and Chaff countermeasures will debuff targets even further while T.A.G., NARC launchers and L.R.M. Narc will aid in detection and counter E.C.M. As well as limb mods that that either decrease recoil, increase accuracy and improve melee and stability damage dealt and last, are Stealth systems combined with E.C.M. will make it harder to be hit and detected. 

ECM & Sensors.

There are various Sensors and E.C.M. suites that will Buff your Mechs and Debuff the enemy Mechs. Buffs come in forms like increased sensor detection range, Increased visual range, Lower sensor signature for making it harder to be electronically detected, Increased sensor checks to counter stealth and E.C.M., as well depending on the suite you can get a UAV, C3 Master/Slave functionality, etc. The Debuff comes in the form jamming enemy sensors checks decreasing detection or prevent detection altogether. Listed below are my four go-to E.C.M. and Sensor suites.

  • Guardian E.C. M(C): -2 Accuracy debuff, 2 Sensor buff for friendlies, 2 Sensor debuff.
  • NOVA CEWS(C): 10% Increased sensor range, 10% Visual range, +1 Resolve gain per turn, -1 Accuracy debuff, 1 Sensor buff for friendlies, 2 Sensor debuff, C3 Networking.
  • WatchDog Suite(C): 20% Increased sensor range, 15% Increased visual range, +1 Defense, -50% Electronic signature, 2 Sensor buff for friendlies, 3 Sensor debuff, 3 Additional sensor checks, UAV with a 4 turn cooldown.
  • Warfare Suite: 15% Increased sensor range, 20% Increased visual range, -1 Accuracy debuff, -10% Electronic signature, 3 Sensor buff for friendlies, 2 Sensor debuff, 2 Additional sensor checks, UAV with a two-turn cooldown.

The whole purpose of this equipment is to make you harder to hit while making it easier for you to hit your opponent and finding units that might be in stealth mode and sharing all that data among friendlies. Do not underestimate jamming mostly when some medium mechs can close in and can only be spotted when in visual range but then it is too late they can field alpha strikes over 300 damage that will kill most Heavy Mechs and severely damage Assault mechs.

Special Munitions.

There is a wide range of special munitions in RogueTech, but I only prefer to use some since the pros and cons of most munitions do not make up the redux in damage output. A by far must is the acid munitions you can use on S.R.M.'s or Mortars, and I only use S.R.M.'s or Mortars for the most part to round of some D.P.S. and add acid attacks. The difference between the S.R.M.'s and Mortar is that the Acid attack stacks on the S.R.M.'s but does not appear on the Mortar furthermore the Mortar adds an acid debuff for 20% but does not stack while the S.R.M. acid munition only adds 1% debuff per missile but does stack. The 2nd munition to recommend is the Incendiary munition. Still, I only use this in specialized builds that are fully geared towards overheating targets I will cover that more in-depth later on in this article. And the 3rd option is either an increase in accuracy for long-range of stability damage in short-range builds. For long-range L-K LRM missiles that have increased accuracy, Deathfire L.R.M.'s do increased damage and stability damage, and Thunder/Thunder Augmented L.R.M.'s lay mines handy when taking on light mechs. And for short-range, the Tandem S.R.M.'s are great vs light, and medium mechs and Deathfire S.R.M.'s as the L.R.M. counterpart does increase damage and stability damage. But selecting those munitions will depend entirely on your build and lance setup.

L.R.M. Munitions.

  • L-K LRM: +1 Accuracy, +35% Intercept chance by A.M.S.
  • LRM [INC]: +1 Heat - 2 LRM Damage.
  • LRM DF:  +50% LRM Damage +1 Stability Damage -40% Range, -1 Accuracy.
  • L.R.M. Thunder: -3 L.R.M. Damage, 1 Mine per missile.
  • L.R.M. Thunder Augmented: -3 L.R.M. Damage, 2 Mines per missile.

S.R.M. Munitions.

  • SRM AX: +1% Damage for 2 turns and does stack.
  • SRM Tandem: +4 Damage to internals, -4 SRM damage.
  • SRM DF: +50% SRM damage, +2 Stability damage, -1 Accuracy.

Haywire(TSMEP) & Chaff.

Haywire and chaff will debuff enemy mechs and will include one or more of the following, impaired movement, accuracy, heat management, sensor strength, and visual range. This can be very helpful to decrease damage output, taking on higher difficulty missions. It can also aid with farming for mech parts and equipment if you use the heat management debuff paired with incendiary munitions to force a shutdown and then take out the Mech with a headshot allowing the entire Mech to be salvaged. Another great application is for melee mechs that do not need weapons as they are centred around melee damage thus closing in and applying debuffs and then going in for the melee kill the next turn is very useful.

Haywire: 4 different equipment types can apply this Debuff to enemy mechs but vary in strength.

  • T.S.E.M.P. Cannon: 30 Heat, 60% Movement reduction for two turns, -3 Accuracy for two turns, -80% Heat management for two turns, Uses support weapons hardpoint thus fires in melee attacks.
  • NARC Haywire: 0 Heat, 15% Movement reduction for two turns, -1 Accuracy for two turns, -20% Heat management for two turns, Use support weapons hardpoint utilizing the NARC Launcher an ammo based weapon but does NOT fire in melee.
  • Taser: 10 Heat, 40% Movement reduction for two turns, -2 Accuracy for two turns, -50% Heat management for two turns, Uses ballistic weapon hardpoints utilizing the Taser an ammo based weapon and does NOT fire in melee.
  • IATM EMP: 10% Movement reduction for 2 turns, -1 Accuracy for 2 turns, -10% Heat management for 2 turns, IATM munition and stacks up to 6 times.

Chaff: 2 different munitions that apply a debuff of varying strength to an enemy mech.

  • Chaff CounterMeasures: -1 Accuracy for two turns, -30% Sight reduction for two turns, -60% Sensor strength for two turns, Area of effect weapon, Uses internal munition storage, Uses support weapon hardpoint thus fires in melee attacks.
  • LRM Chaff: -1 Accuracy for 2 turns, -20% Sight reduction for 2 turns, -30% Sensor strength for 2 turns, LRM munition can be fired indirectly.

T.A.G. & NARC.

 T.A.G. & NARC beacons allow for more significant target acquisition for the entire lance and work regardless of the usage of C3 networking, best-used with spotting/recon, and melee mechs and is especially useful to support L.R.M. builds.

  • T.A.G.: +7 Sensor checks counter E.C.M., +1 Accuracy 2 turn duration, 15% Increased electronic detection for two turns, 15% Increased visual detection for two turns, Uses support weapon hardpoint but does not fire in melee.
  • Light T.A.G. (C): +8 Sensor checks counter E.C.M., +1 Accuracy 2 turn duration, 20% Increased electronic detection for two turns, 20% Increased visual detection for two turns, Uses support weapon hardpoint but does not fire in melee.
  • NARC Beacon: +8 Sensor checks counter E.C.M., +1 Accuracy 2 turn duration, 25% Increased electronic detection for two turns, 25% Increased visual detection for two turns, Uses support weapon hardpoint but does not fire in melee.
  • NARC I-Beacon: +12 Sensor checks counters E.C.M., +1 Accuracy +2 Missile Accuracy 2 turn duration, 35% Increased electronic detection for two turns, 35% Increased visual detection for two turns, Uses support weapon hardpoint but does not fire in melee.

Limb Modifications.

There is a wide range of limb modifications that aid with accuracy, recoil management, melee damage and perks like C.A.S.E. and damage reduction. I wouldn't say I like using all of them since some of them would involve taking internal damage. However, recoil management can be instrumental on Ultra A.C., and Rotary A.C. builds as well as they suffer the most from Recoil over P.P.C. and Gauss weapons. Accuracy helps with any build but is best served in long-range builds, Omni Mech prevents the usage of A.C. type, and P.P.C. type weapons thus are ill-suited for long-range builds. Melee mods are suitable for your melee builds and should only be used to unique purpose build melee mechs. Listed below is a range of mods I frequently like to use.

Weapon Mods: 

Adds one or more of the following specs in various degrees, Recoil Reduction, Increased Accuracy, Increased Firing Arc. However, they take up slots space and will also come at a tonnage price.

  • Omni Pod Lower Arm: +1 Accuracy, +10% Melee damage, but cannot be used with Ballistic or P.P.C. weapons.
  • Weapon Mount: +* Accuracy depending on the mod quality, -* Recoil depending on the mod quality, +*% Firing arc depending on mod quality, -* Melee accuracy depending on the quality of the mod, Uses the lower limb slot +1 extra slot.
  • UpperRecoil: +* Accuracy depending on the mod quality, -* Recoil depending on the mod quality, Uses the upper limb slot.

Melee Mods:

Adds one or more of the following specs in various degrees, Melee Accuracy, Melee Damage, Stability Damage, reduced Melee Damage taken.

  • Upper Spiked: -*% Melee damage taken depending on mod quality, +*% Melee damage depending on mod quality, CASE protection.
  • Lower Melee: +* Melee accuracy depending on mod quality, +*% Melee damage depending on mod quality, +*% Stability damage depending on mod quality.
  • Leg Spiked Boots: +* Melee accuracy depending on mod quality, +*% Melee damage depending on mod quality, +* Base melee damage depending on mod quality.
  • Hands Melee: +* Melee accuracy depending on mod quality, +*% Melee damage depending on mod quality, +*% Stability damage depending on mod quality.

Blades, Claws, and Shields:

Adds a big bonus to melee some of these come pre-attached with the Mech and offer an even better bonus in a melee centric mech. They can be fitted on the specific limb it is designed for and only take up slot space below a list of some of my favourite mods that can be equipped additional to pre-attached melee mods.

  • Claws: +2  Melee accuracy, +40% Melee damage, +10 Base melee damage, +25% Stability damage, +50% Critical chance, replaces the mech hand actuator.
  • Retractable Blade: +2 Melee accuracy,  +15% Melee damage, +5 Base melee damage, +10% Stability damage, +25% Critical chance, replaces the mech hand actuator.

Melee Mods slot specific:

These melee mods will use a support weapon slot and add more melee damage as well as in some cases being able to fire outside and inside melee attacks. They take up a support weapons slot and slot space on the Mech.

  • T.S.E.M.P.: 5 Damage, 30 Heat, Haywire E.M.P. nerfs movement, accuracy, and heat sinking on target.
  • Chainsword: 5 x 12 Damage, 5 x 7 Stability damage, + 2 & +1 Melee accuracy, 20% Critical hit chance.
  • Hammerfist: 3 X 25 Damage, 3 x 10 Stability damage, +1 Melee accuracy, +10 Stability Damage.
  • Plasma Lance: 50 Damage, 25 Heat, 15 Stability damage, + 1 Melee accuracy, x2 Critical hit chance, +5 Base melee damage.
  • Wrecking Ball: 60 Damage, 60 Stability damage.
  • Flail: 3 x 35 Damage, 3 X 25 Stability damage, +1 Melee accuracy, 120% Critical hit chance.

Stealth.

Stealth systems are an armour mod that makes it harder to be detected either electronically and or visually and always requires an E.C.M. module to be installed. Very useful for brawler and melee builds to face tank hostile mechs. However, armour repairs are very expensive as well as the system generates heat and also increase the generation of weapon heat. Of all the stealth systems to prototype systems are of the highest quality and offer the greatest bonus.

  • Null Signature System(NSS): 30% Sensor stealth, 5 Stealth charges, +2 Defense medium-range, +4 Defense long-range, +6 Defense extreme-range, -70% Sensor signature, +15% Weapons heat, +10 Heat per turn, Electronic stealth only.
  • Void System: 20% Visual stealth, 6 Stealth charges, -70% Visual signature, -15% Sensor signature, +10% Weapons heat, +10 Heat per turn, Visual stealth only.
  • Signature Damper: 60% Sensor stealth, 2 Stealth charges, +1 Defense medium-range, +2 Defense long-range, +3 Defense extreme range, -35% Sensor signature, +5% Weapons heat, +3 Heat per turn, Visual stealth augmentation adds Electronic stealth to Visual Stealth systems like the Void System.
  • Active Camouflage: 30% visual stealth, 4 Stealth charges, -40% Visual signature, +10% weapons heat, +5 Heat per turn, Sensor stealth augmentation adds Visual stealth to Electronic stealth systems like N.S.S.

Lances & Mechs.

In this portion, I will cover various builds and lance setups to give you some inspiration for your playthrough in RogueTech. There will be a range of builds to cover all your needs but you, of course, iterate upon this and tinker on your builds. Also important to note here is that I only save up mechs that are the max tonnage in their weight class, so 35-ton parts for light mechs, 55-ton parts for medium mechs, 75-ton parts for heavy mechs and 100-ton mech parts for the assault mechs. For the end-game in RogueTech, I only use one medium lance, one heavy lance and two lances of assault mechs. Tonnage selection per class was merely based on the max amount of gear per mech class, so I was able to fit the max amount of equipment. 

Melee Builds.

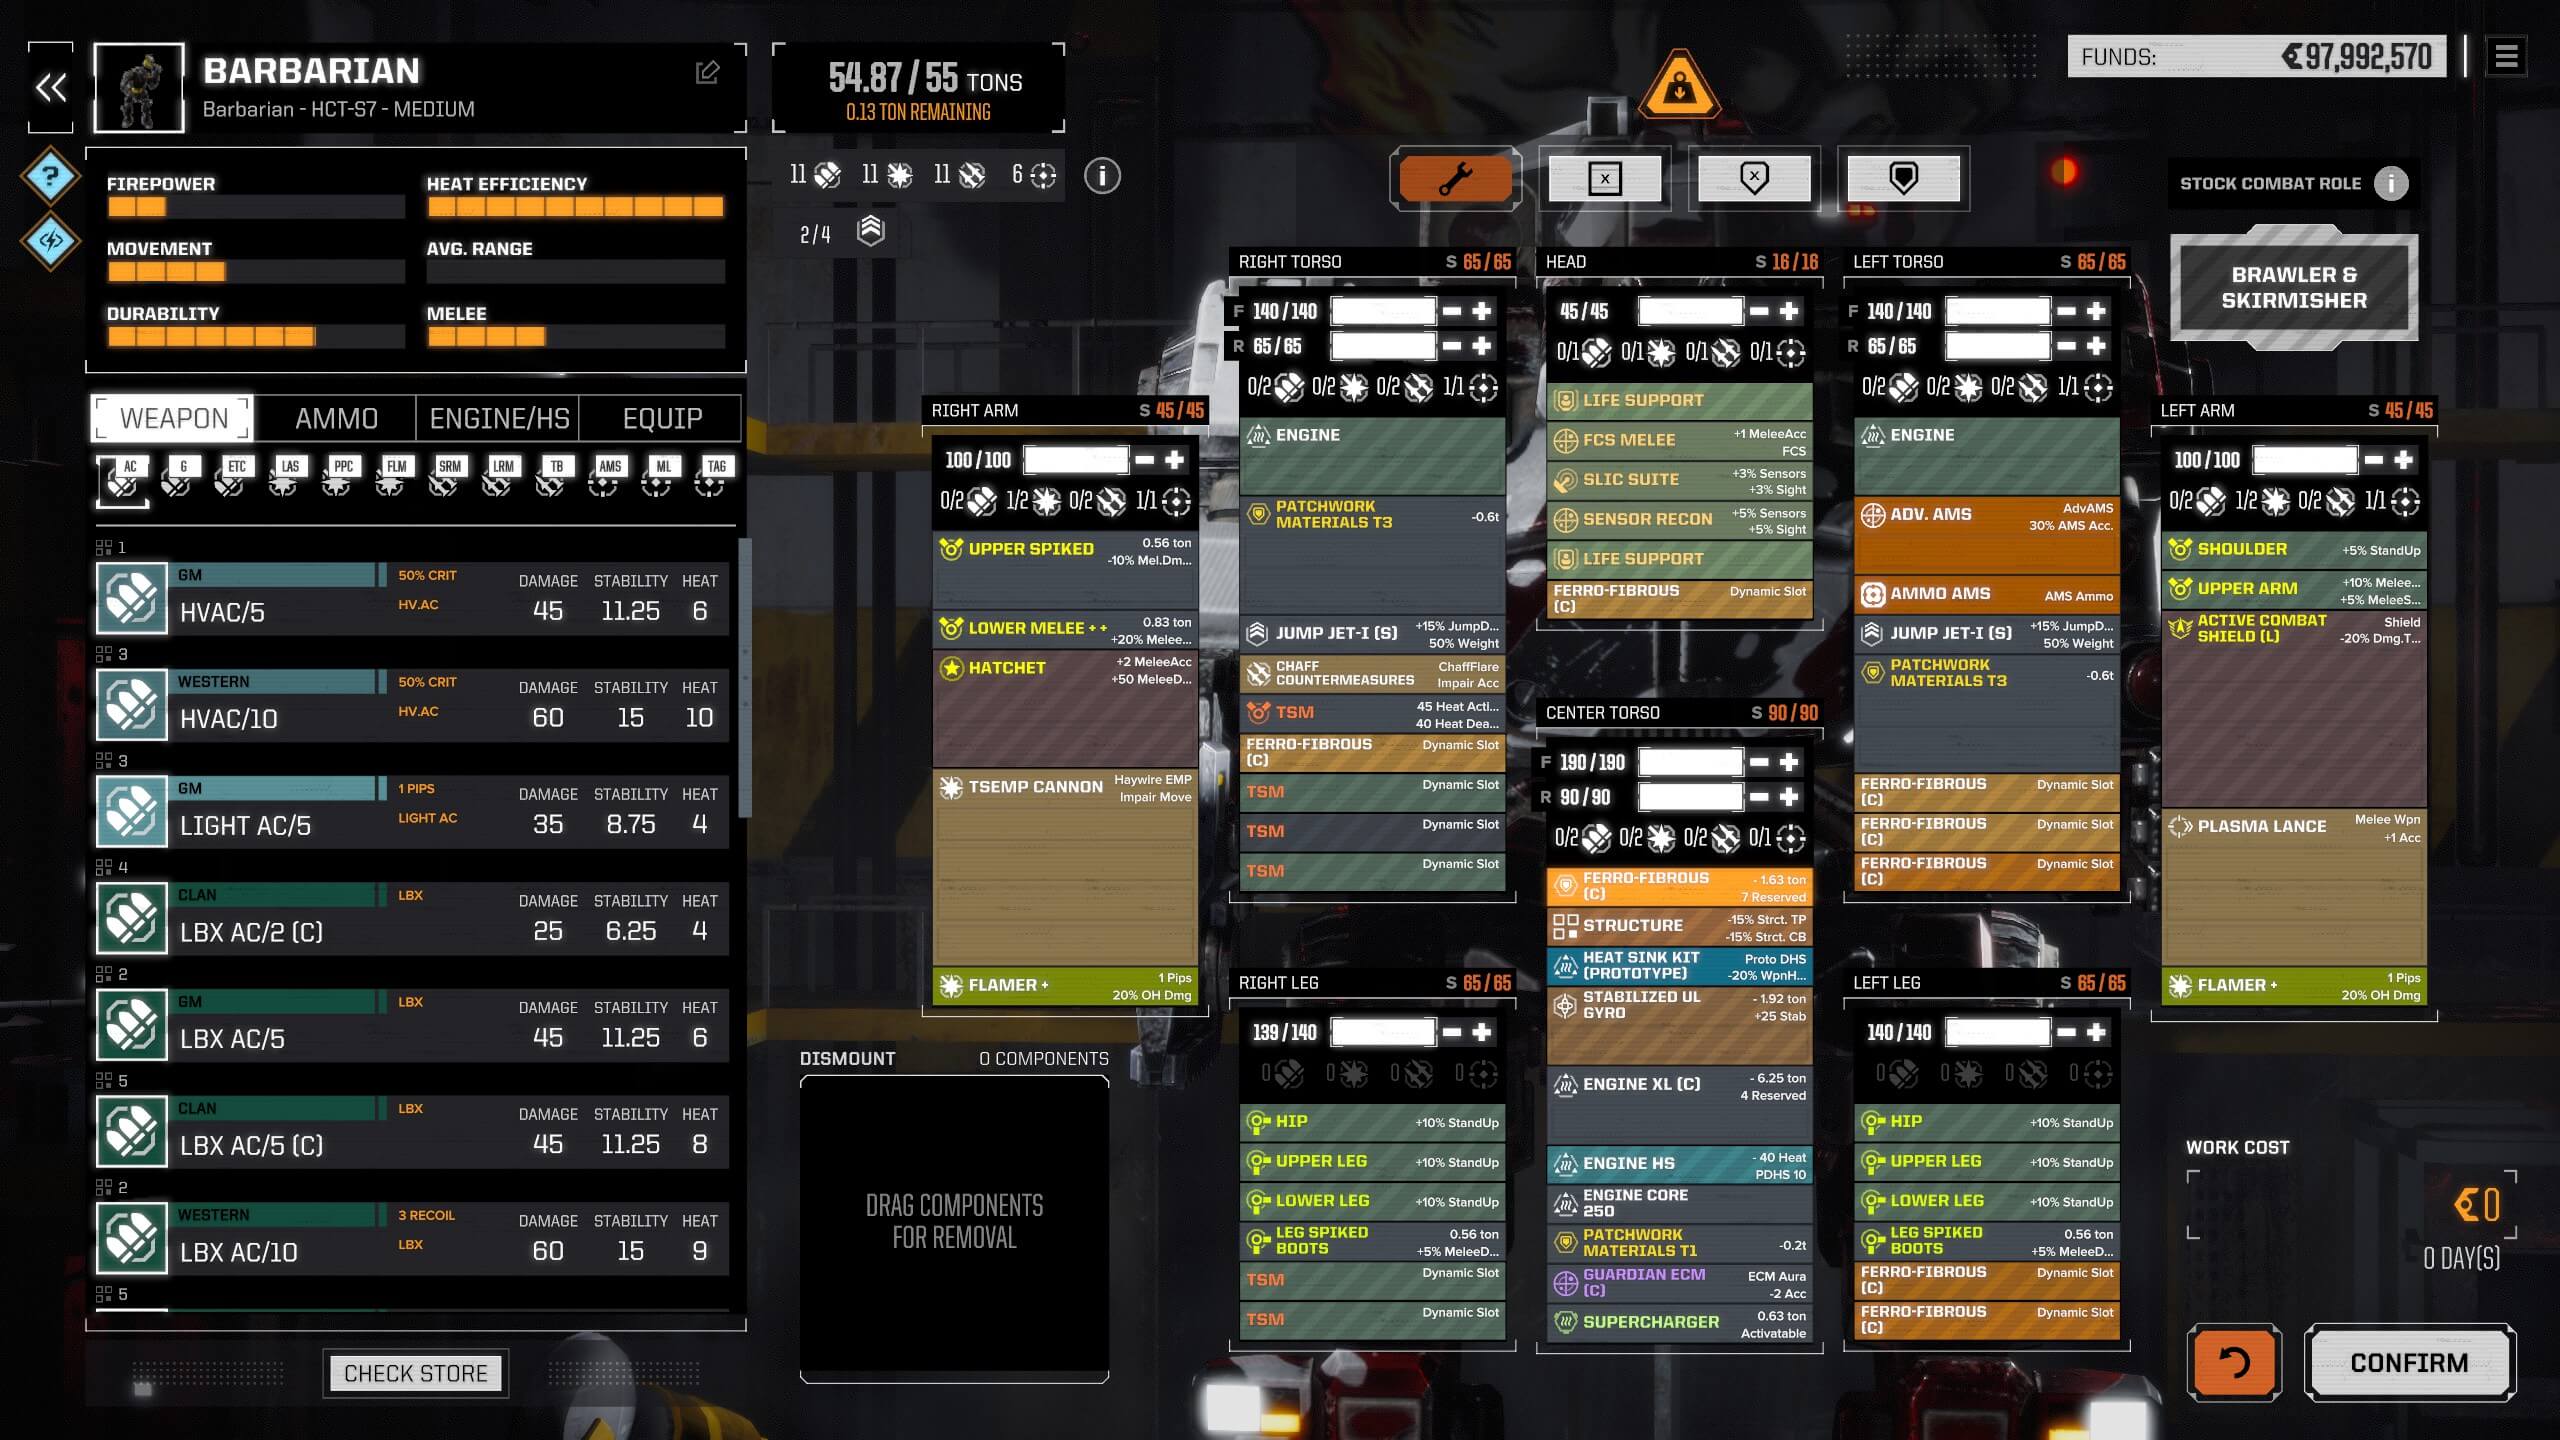
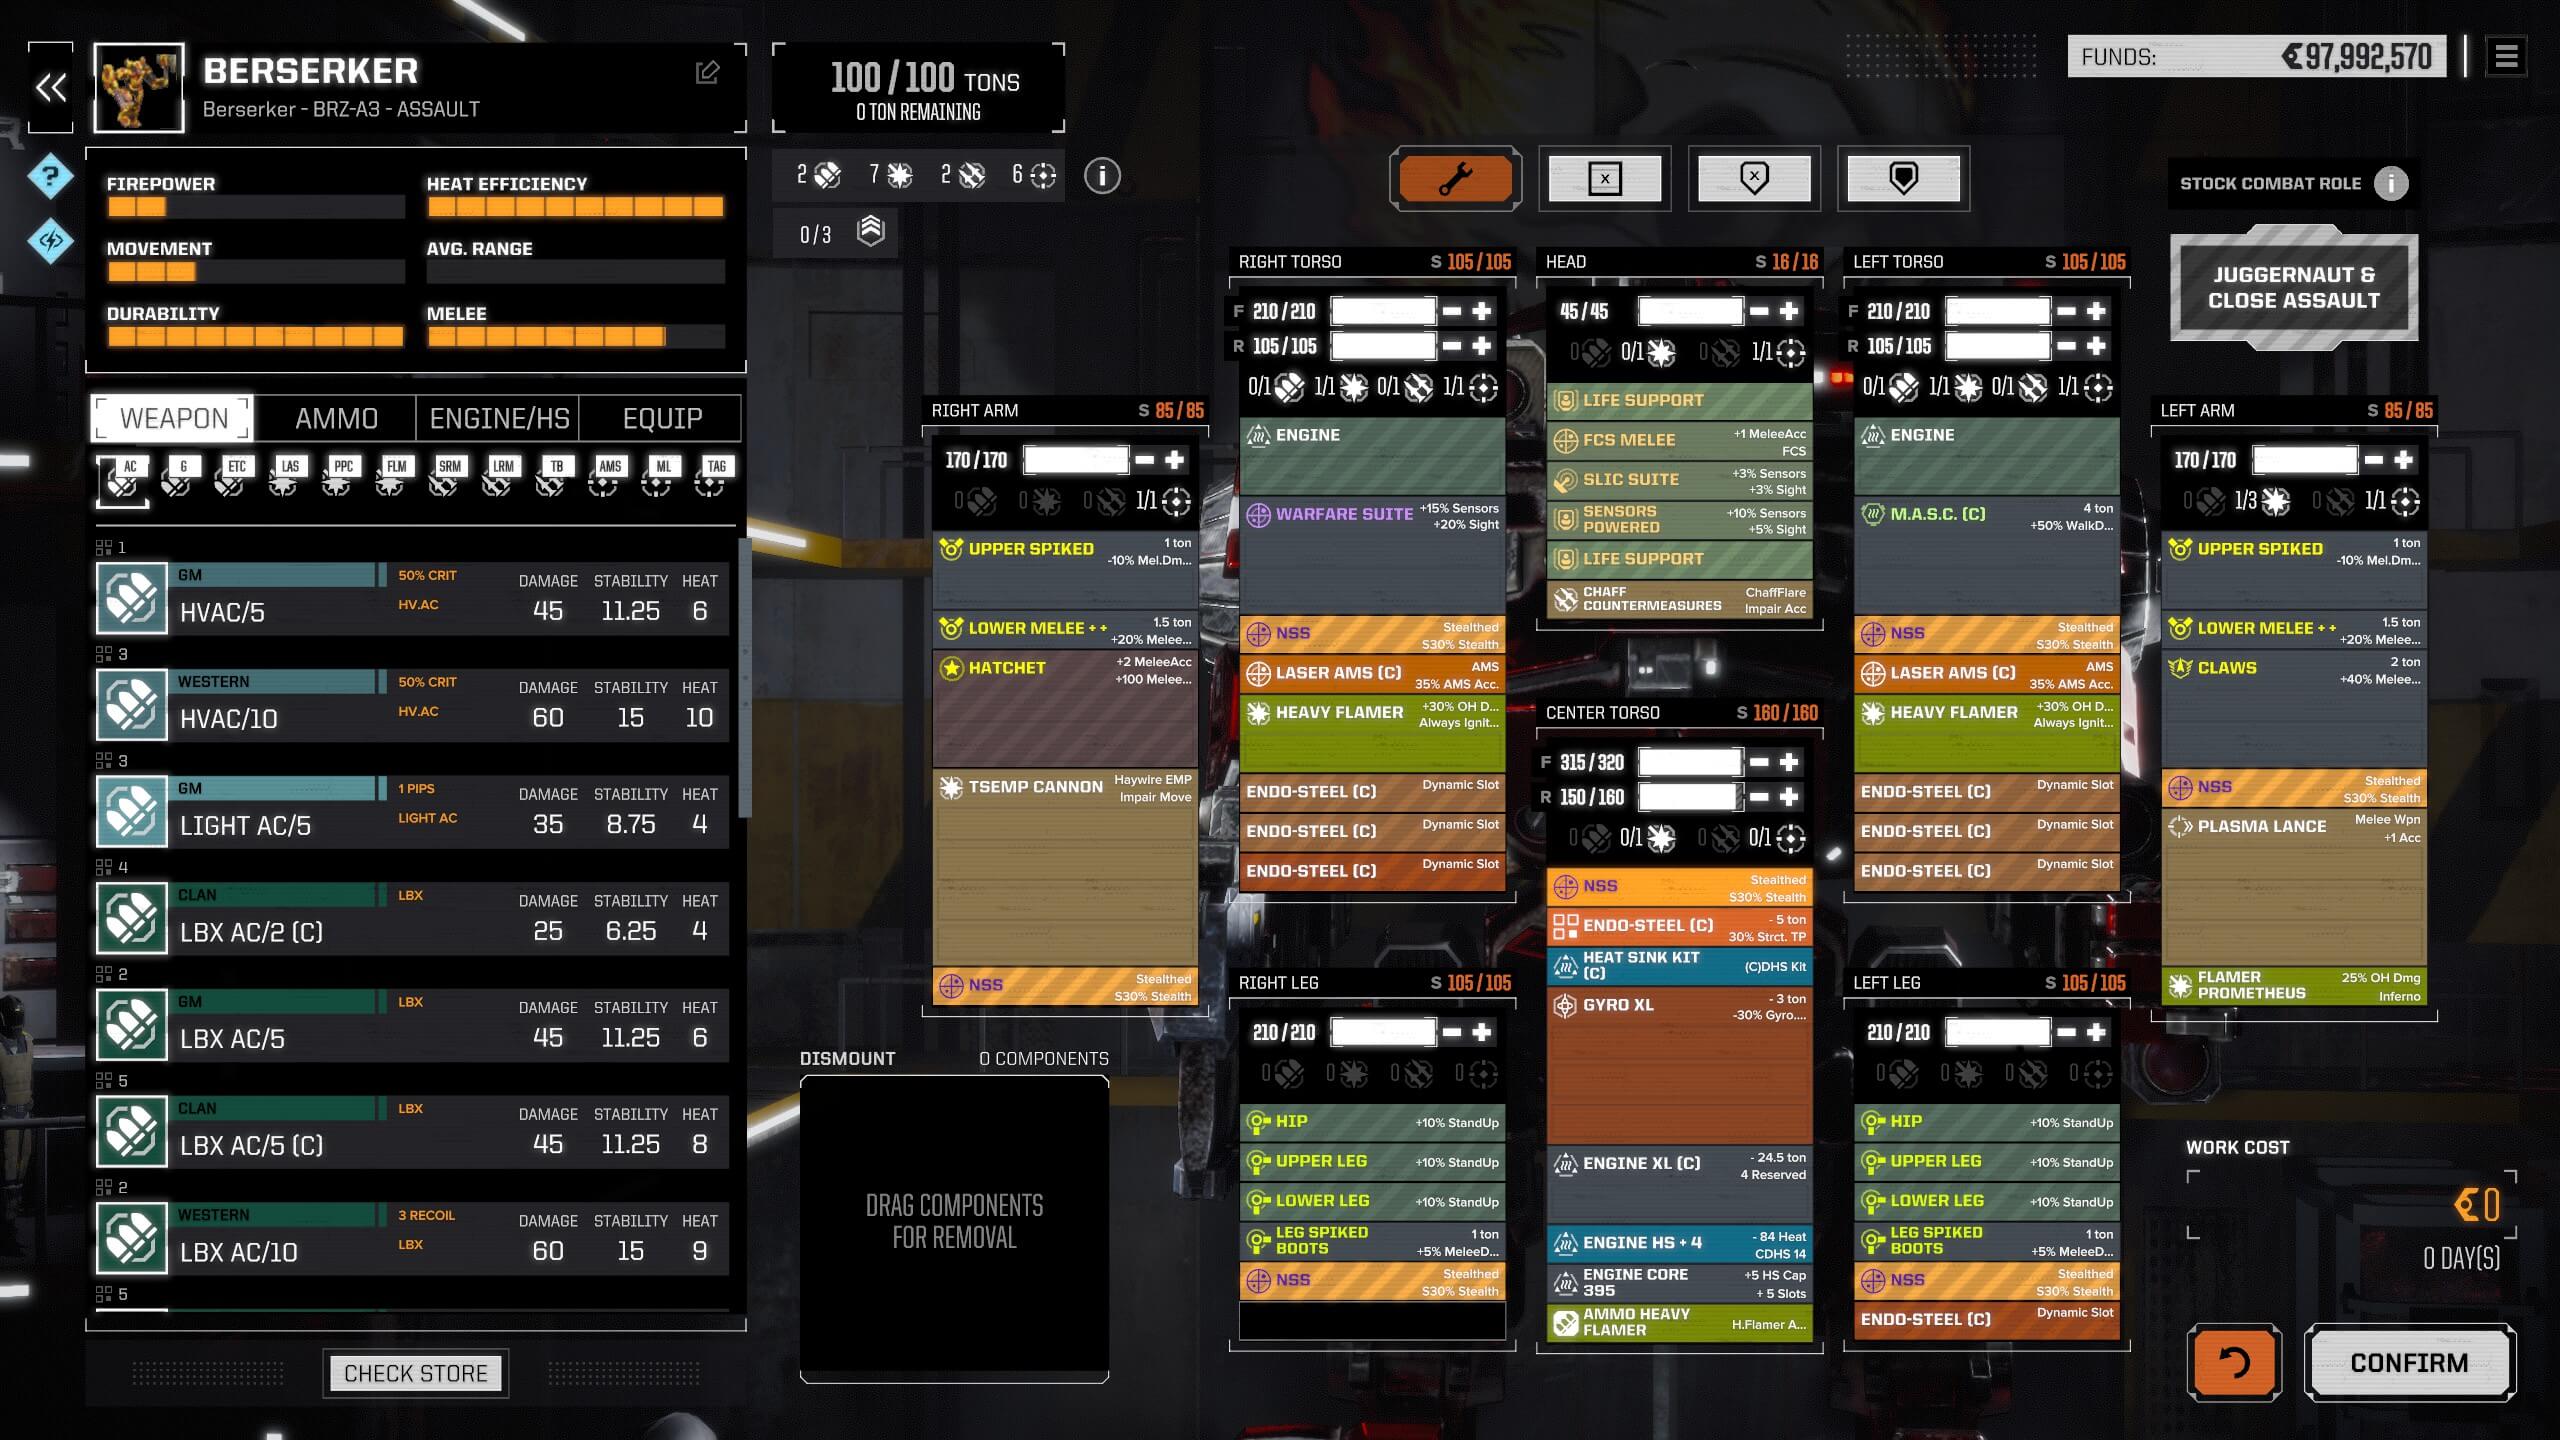
I only use an assault, and medium Mech for melee builds in my current lance setups since I switched to overcooking mechs so I can salvage more equipment and parts. Melee mechs are great for one strike killing mechs, but it tends to completely wreck one side torse/arm and leg doing so. Great for lower-tier missions that yield little to no useful salvage or higher tier assault missions for quick playthroughs. Below two screenshots of my Barbarian medium melee mech and my Berserker assault melee mech.

Barbarian(HCT-S7) Medium Melee Mech.
Melee  medium mech build

Berserker(BRZ-A3) Assault Melee Mech.
Melee assault mech build

The big difference I emphasize the assault melee mech to have stealth so it will take less damage then the medium that has some more tanking function to it also the shield mod on this medium frame has an increased sensor signature penalty so adding stealth would make little sense. As well as adding chaff to reduce sensor and visual detection and flamers and T.S.E.M.P. to overheat and nerf damage output on my targets. Furthermore, I added mods to increase to walk and run distance so I can close in faster per turn, giving any hostile mech little to no chance of escaping.

Mech cookers.

These are speciality build mechs I use to gain more salvage per-mission by overheating a mech I want to salvage as a whole or in part. This centres around doing little to no damage to the Mech but overheating forcing a shutdown forced mech pilot ejection due to panic, or a called heat shot on a shutdown mech due to overheating. Stealth is added to avoid damage because brawlers tend to get flanked and shot in the back and on high-end missions that can result in a one-shot kill. I also added lance A.M.S. in the form of Advanced A.M.S. to reduce incoming L.R.M. damage for the whole lance as well to free up tonnage on the rest of the lance for increased performance. Below two screenshots of my Asura heavy mech cooker and Dire Star assault mech cooker.

Asura(MDG-X) Heavy Mech Cooker.
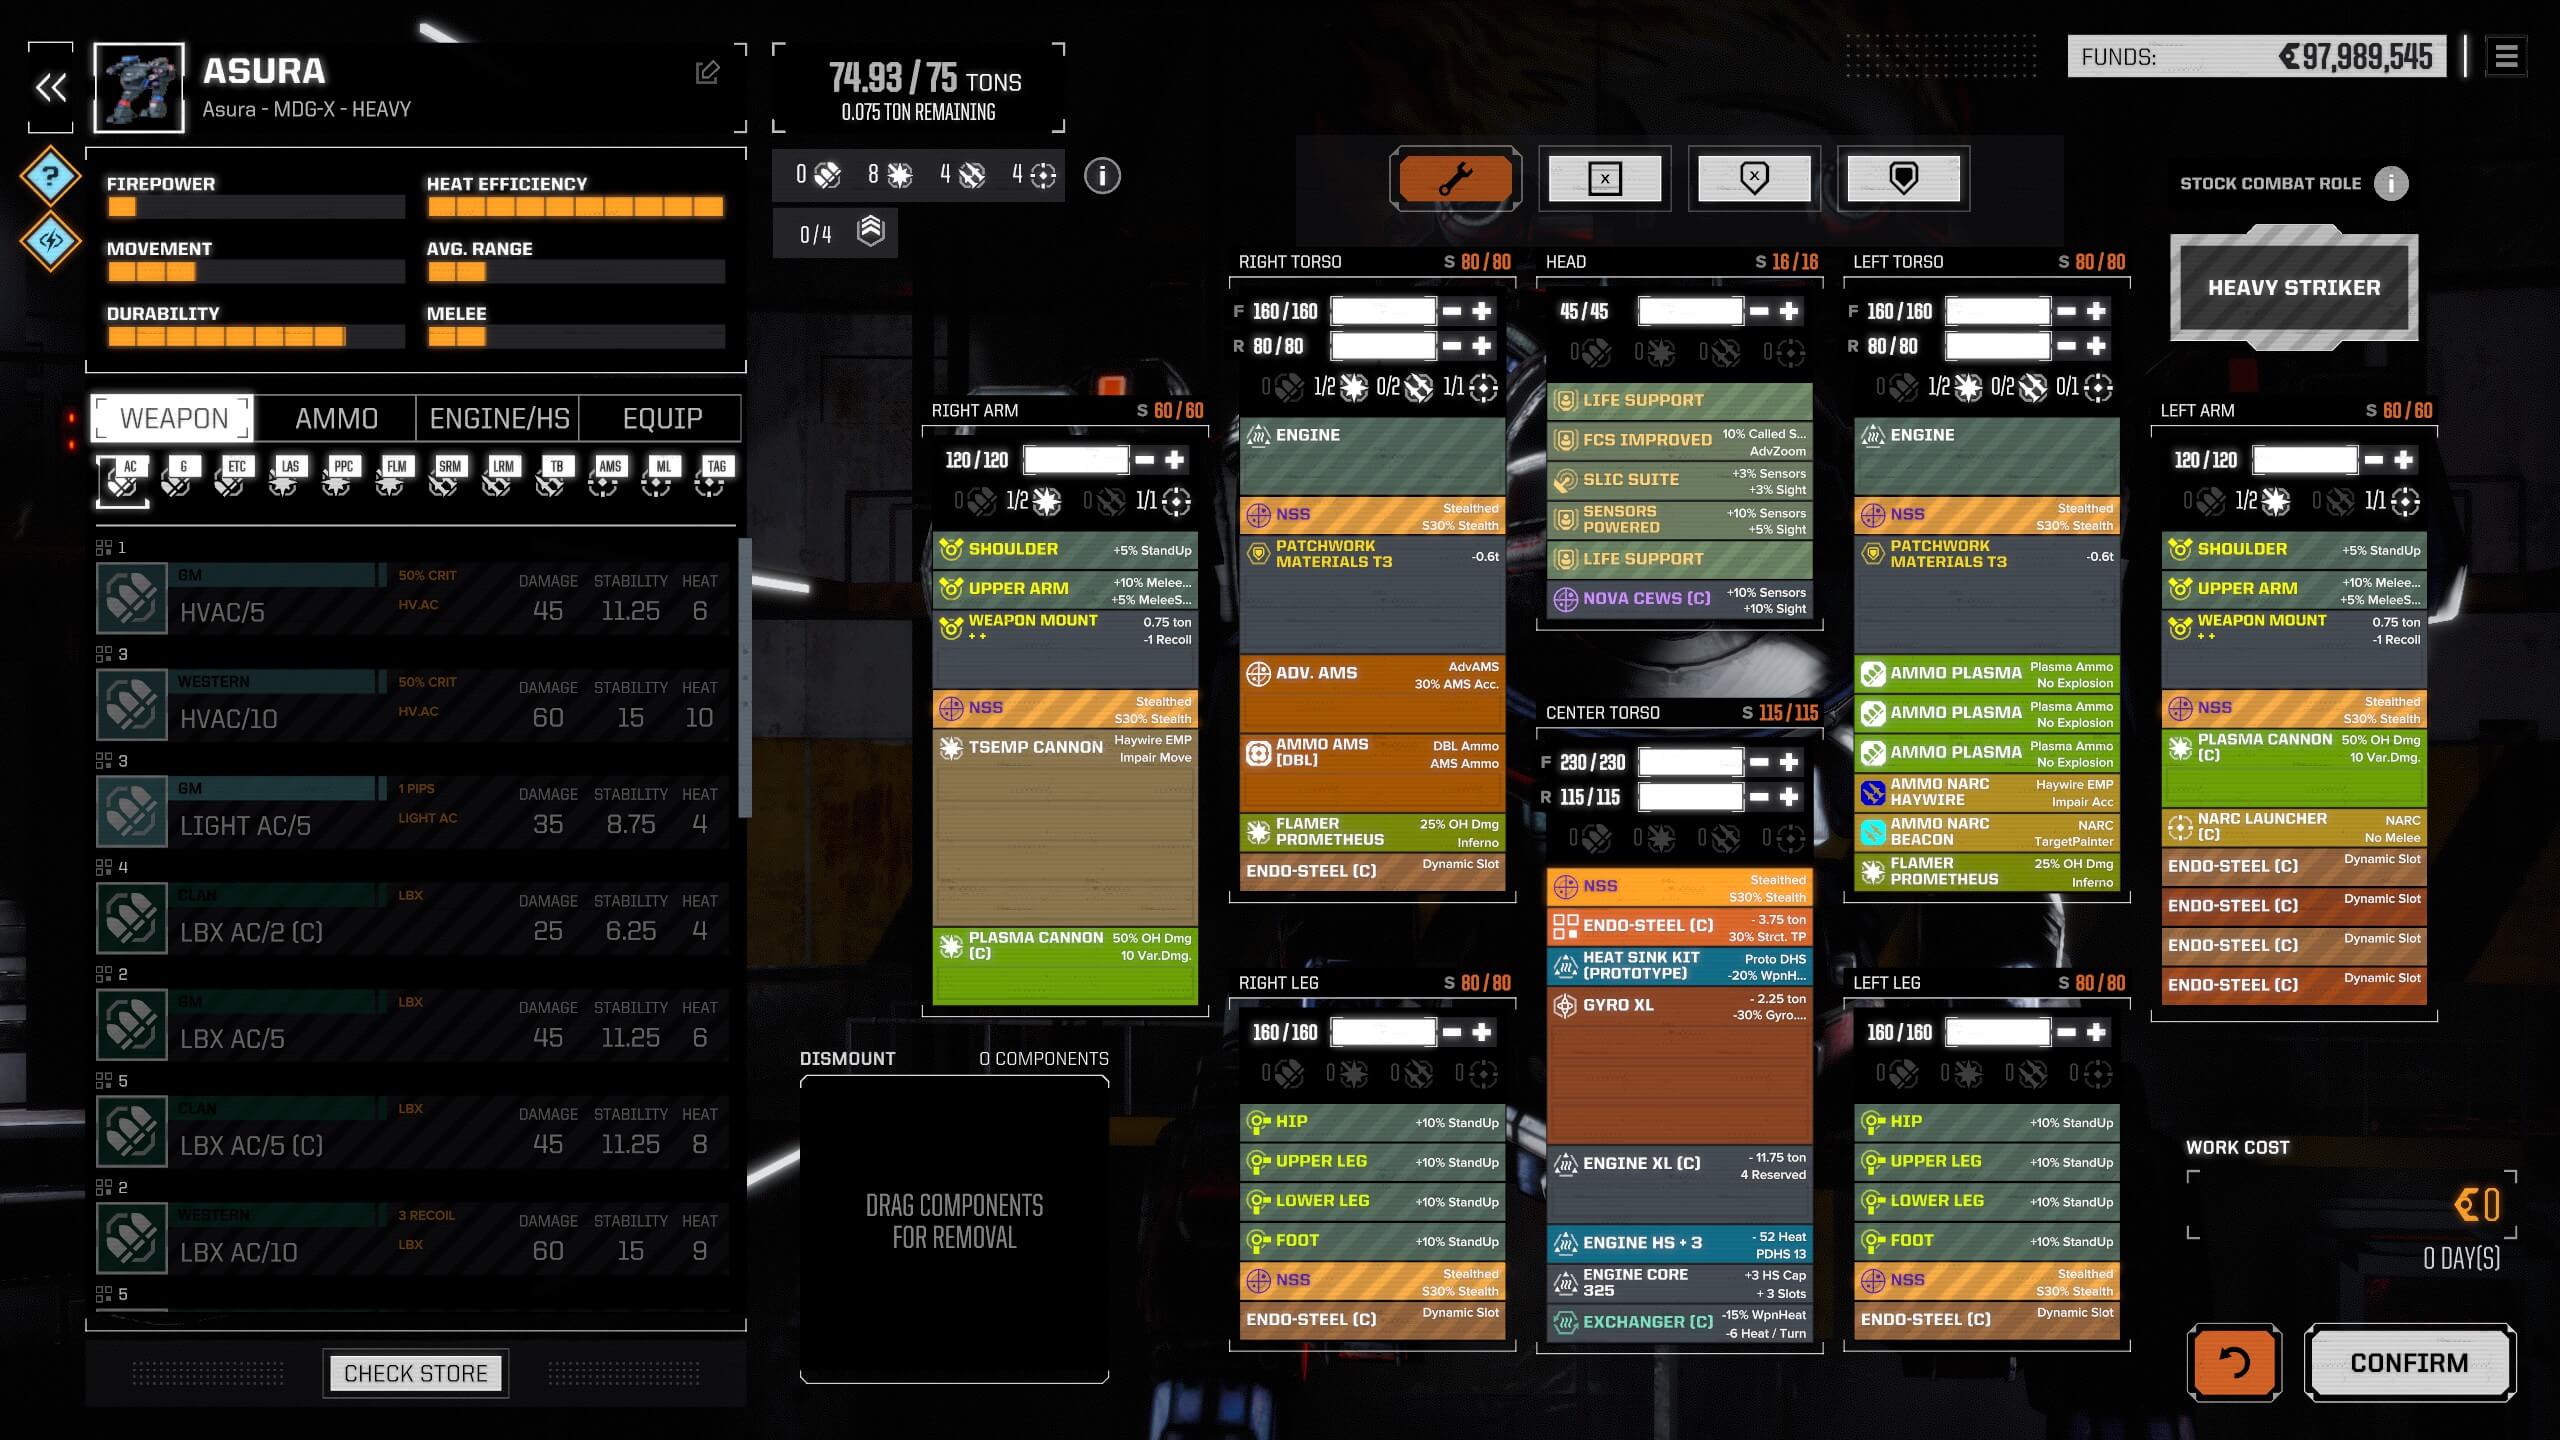
Cooker assault mech build

Dire Star(DS-Prime) Assault Mech Cooker.
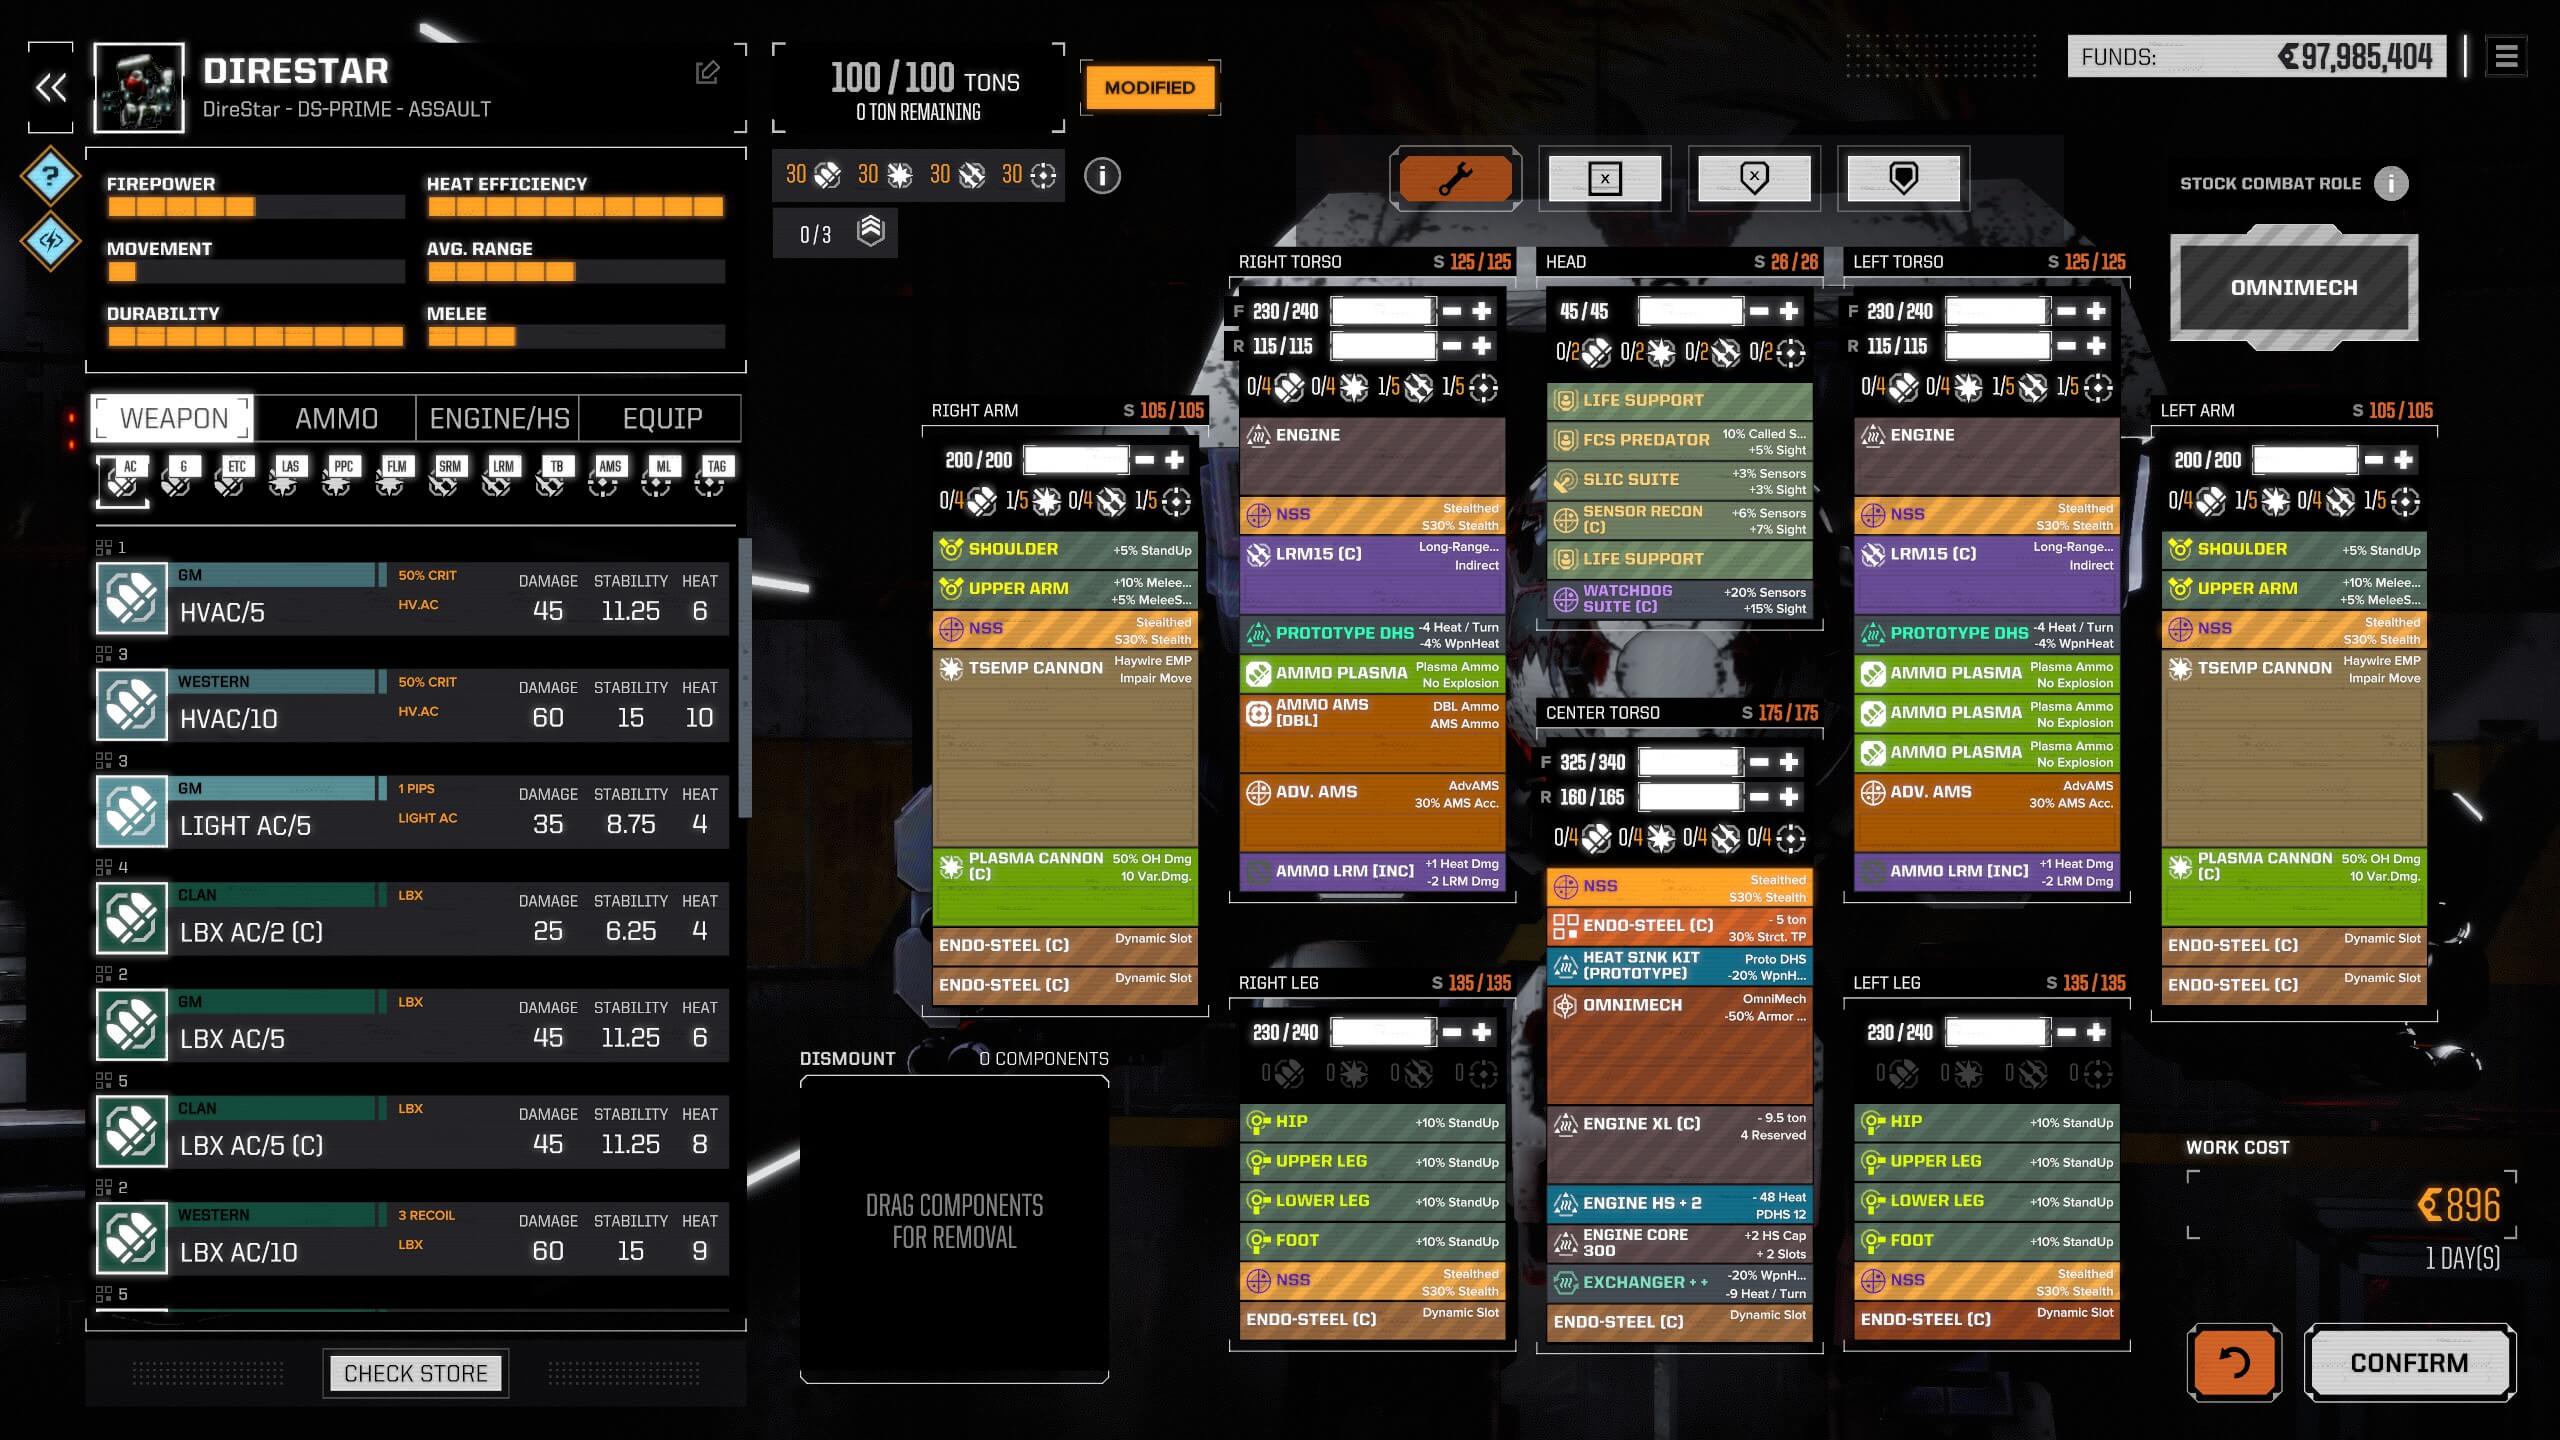
Cooker assault mech build

Both builds are almost identical with the Asure being a very rare Solaris brawler and the Dire Star is a rare version of the Dire Wolf Omni mech the only downside to the Dire Star due to the fact it is an Omni mech it can not use the regular arm mods. The Omni pod will not work with P.P.C. type weapons like the T.S.E.M.P. Cannons, However, as an Omni mech, it will allow for more weapon tonnage to be added thus giving a far greater heat output. For the Asura, the weight restriction won't allow for 2 T.S.E.M.P. cannons to be fitted, but that is fixed by using a NARC Launcher(C) with beacons and haywire making it easier taking on medium and light mechs. The E.C.M. or cockpit mods will share sensor data through C3 functionality with the rest of the lance.

Long & Extreme Range Snipers.

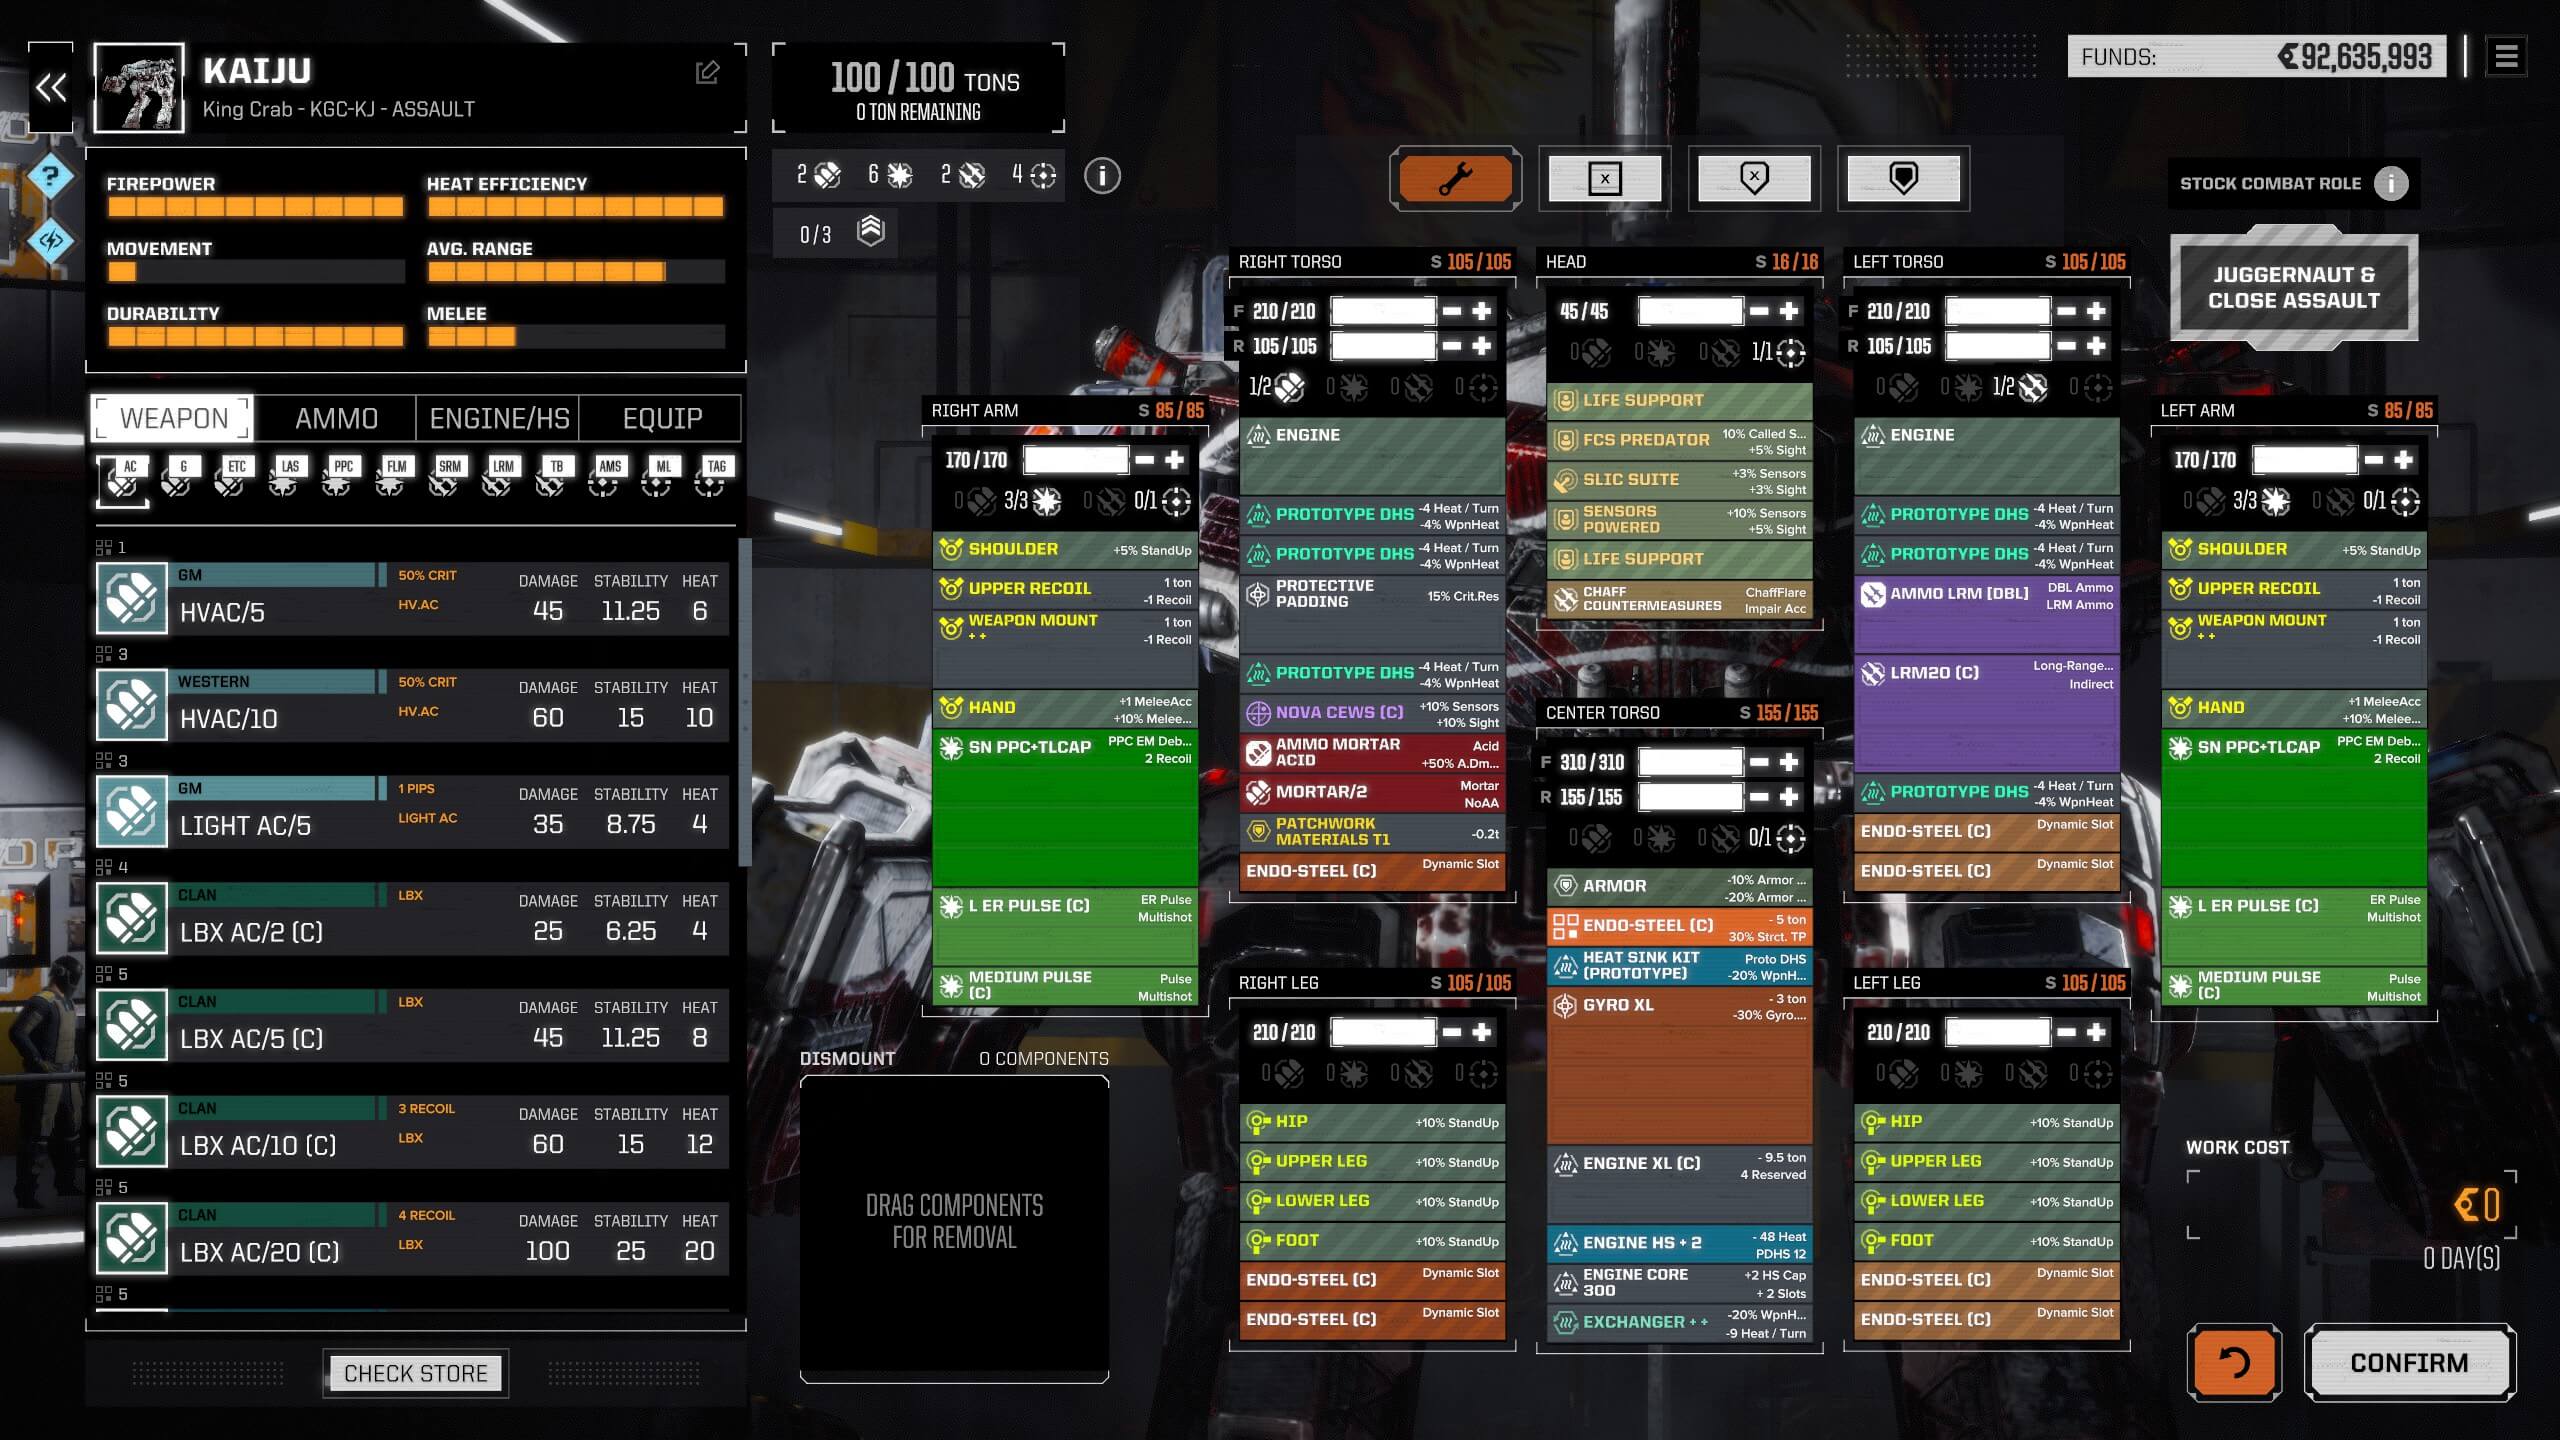
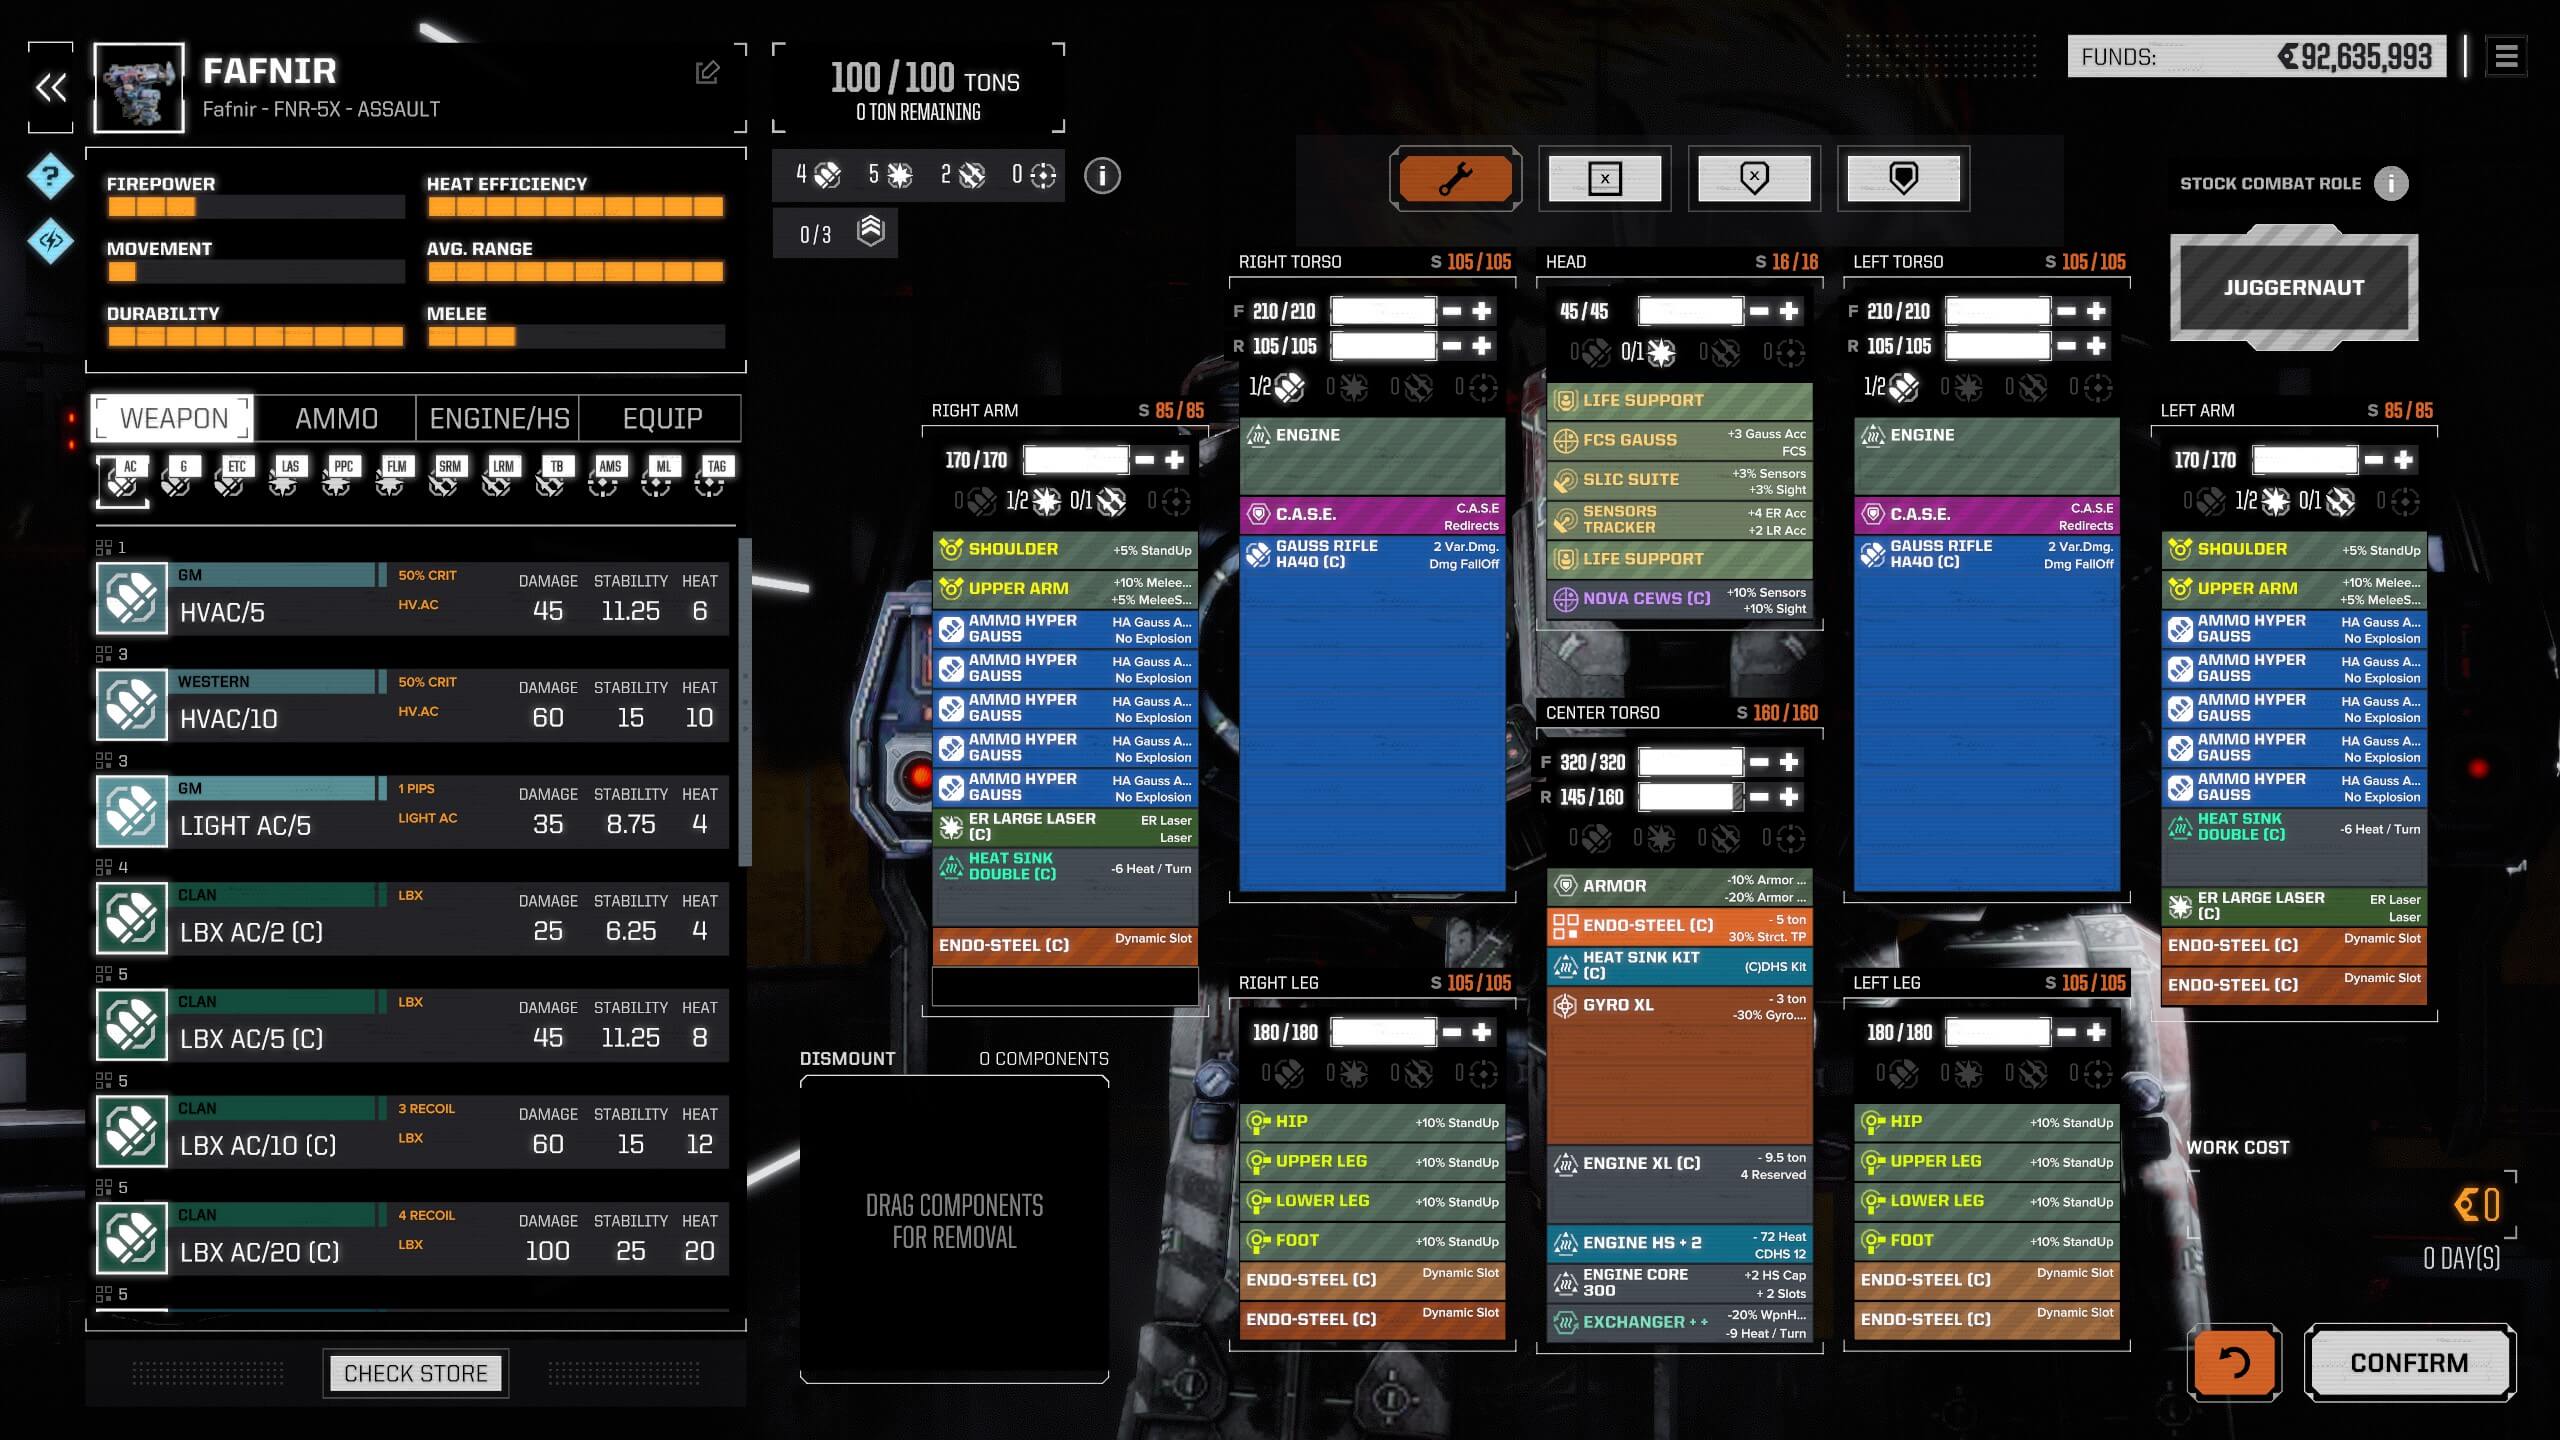
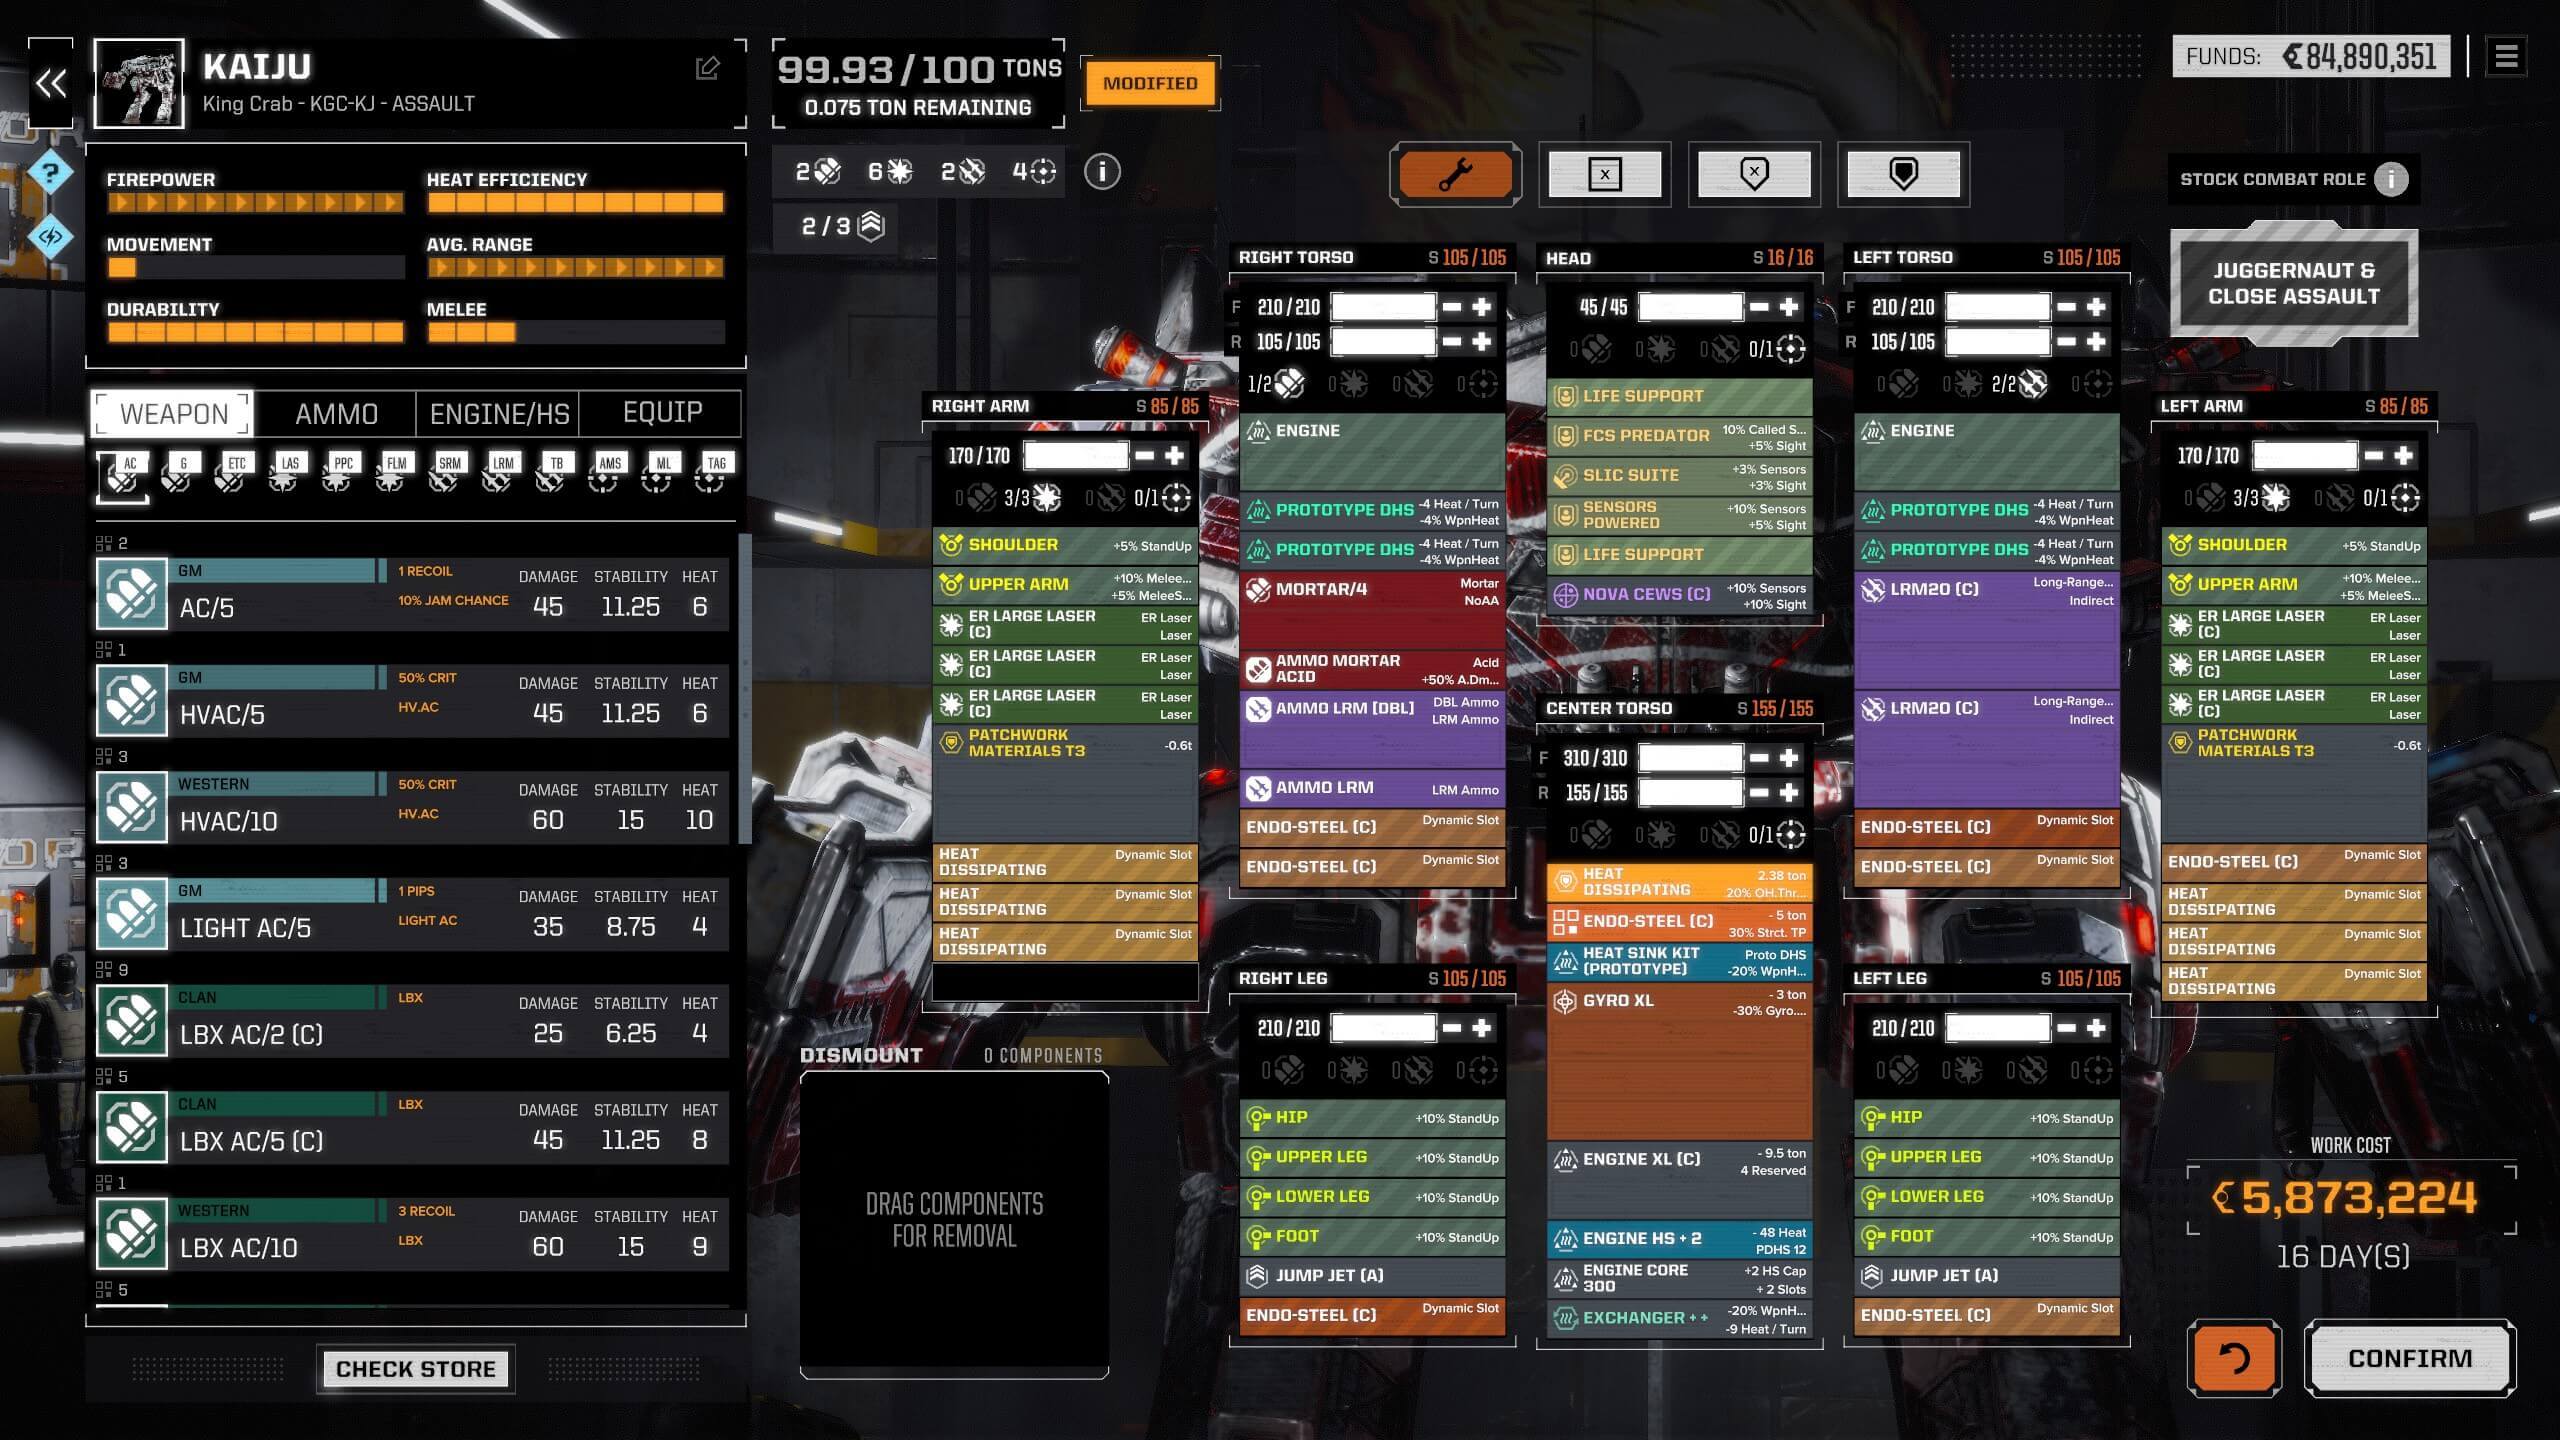
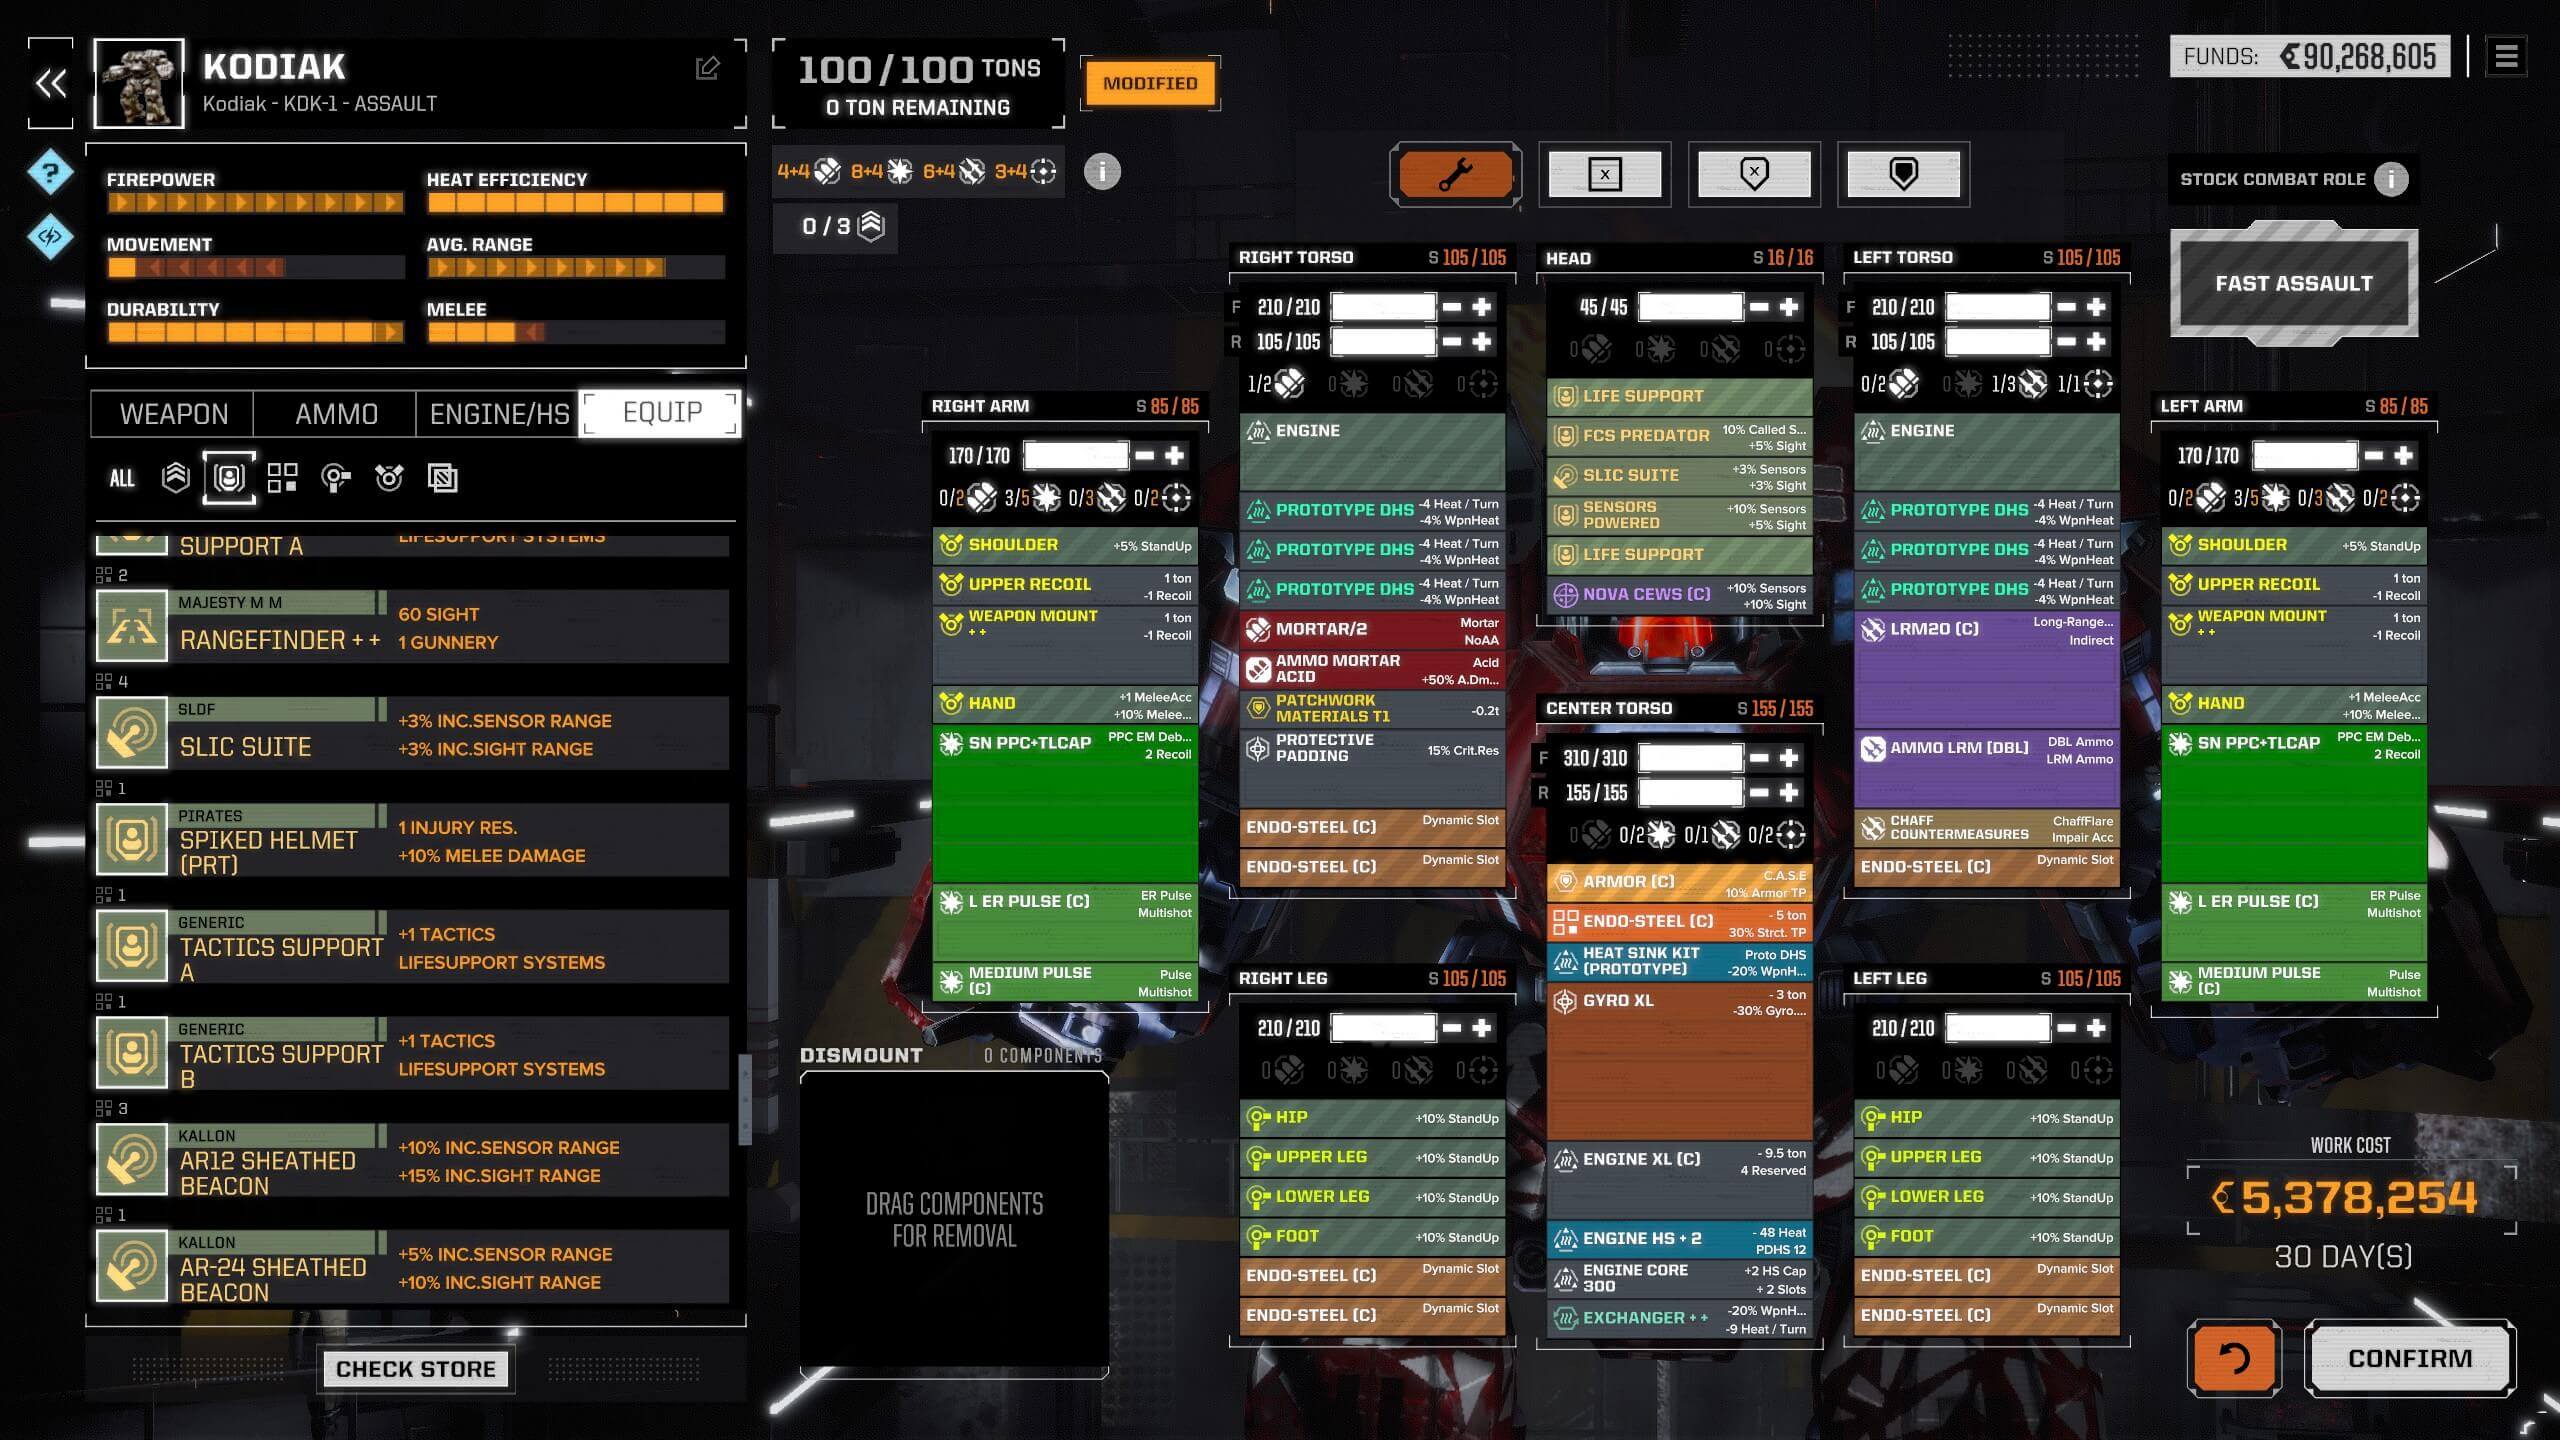
Purpose build Mech for long to extreme ranges engagements due to the nature of the long to extreme range builds it is vital to have C3 networking make use of T.A.G. or NARC beacons for successful engagements. A downside to long to extreme range builds is that those weapons tend to be on the heavy side even when using AC/2 weapons but then you also run in the damage output issues as well as hit chance being lower at the extreme ranges. Another consideration to make is having the higher ground; however, when inserted into the low ground and having to fight uphill, you will have to close the distance to gain an acceptable hit %. None the less it is always wise to have at least one Mech in your lance to engage at long to extreme ranges even if it is to soften up targets while you close in below three screenshots of Gungnir heavy mech sniper, Kaiju assault mech sniper, Fafnir assault mech sniper.

Gungnir(MAD-S7) Heavy Sniper.
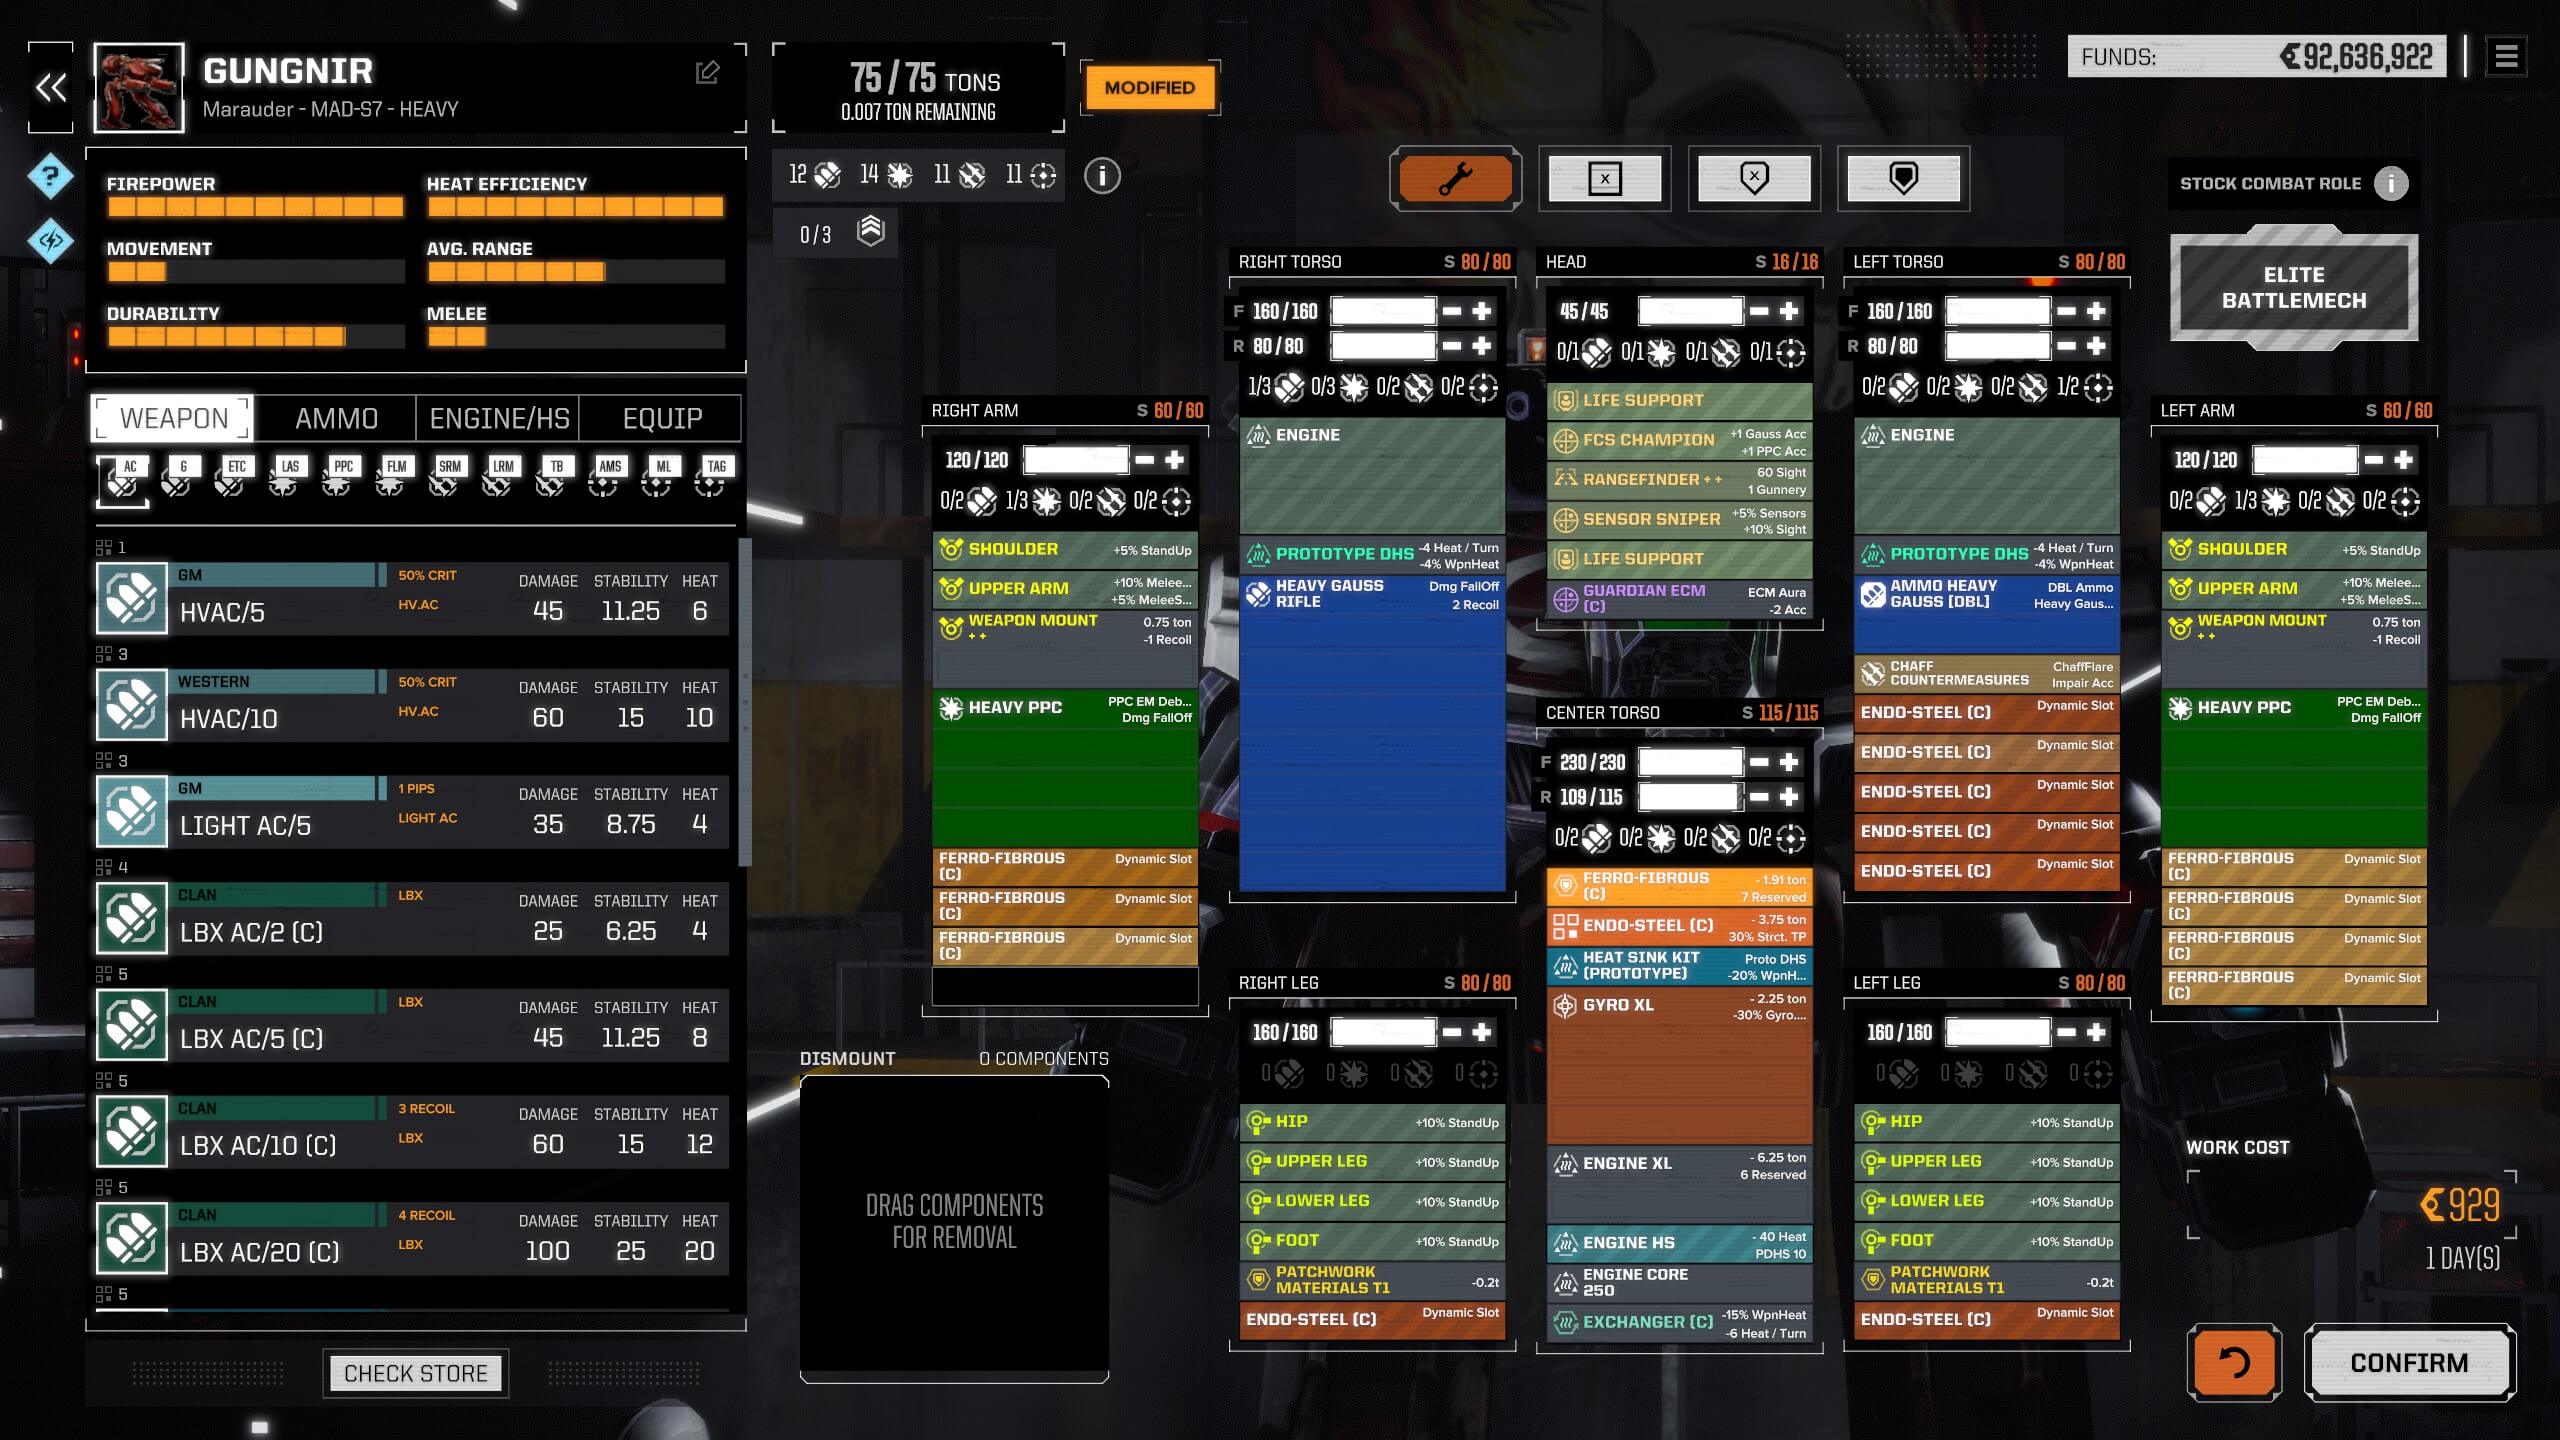
Sniper heavy mech build

Kaiju(KGC-KJ) Assault Sniper.

Sniper assault mech build

Fafnir(FNR-5X) Assault Sniper.

Sniper assault mech build

Kaiju(KGC-KJ) Assault Sniper v2.

Sniper assault mech build

Kodiak(KDK-1) Assault Sniper.

Sniper assault mech build

These are five different builds where the Gungnir trades in range for long-range damage and is only slightly modified from the original Gungnir build and is a rare version of the Marauder heavy mechs. Whereas the Kaiju is a rare version of the King Crab and offers a lot of punch through the twin-linked P.P.C.'s and Large ER Pulse lasers but can close in and dual purpose as a brawler as well as an acid debuff through the mortar/2 important to note here that the Mortar is there purely for the Debuff and not damage output by itself. With recent changes, the Kaiju lost the ability to fit certain arms mode that would aid in sniping. As a result, the Kaiju is now only viable as a sniper with lasers and L.R.M.'s. The Kodiak can replace the role of the Kaiju with the same loadout while fielding the arm mods to balance Recoil. The Fafnir is built around extreme-range sniping with hyper-assault gauss rifles and two large E.R. laser too round of the damage. What is also very important is to use regular mechs that allow you to fit arms mods to gain accuracy and reduce Recoil this will greatly increase your hit % at long to extreme ranges. Since those mods are fitted on arms weapons should be fitted in the arms where possible with support weapons and ammo storage fitted in the side torsos.

Lance A.M.S.

This evolves around sacrificing some tonnage on a mech to fit the advanced A.M.S. system with plenty of ammo to reduce incoming missile damage allowing other mechs to use their tonnage towards other equipment. Only the Advanced A.M.S. system will intercept incoming fire at all friendlies there is a Pirate version of a laser A.M.S. that also allows for lance A.M.S., but it is tough to come by and has a relatively low intercept chance. These platforms are best suited for short to mid-range weapons I moved some of my lance A.M.S. to my cooker mechs and melee mechs however I retain one specialized build for lance A.M.S. due to the nature of the mech making is perfect for a lance A.M.S. build. Below one screenshot of my Kracken assault lance A.M.S.

Kracken(AS7-KR) Lance AMS.
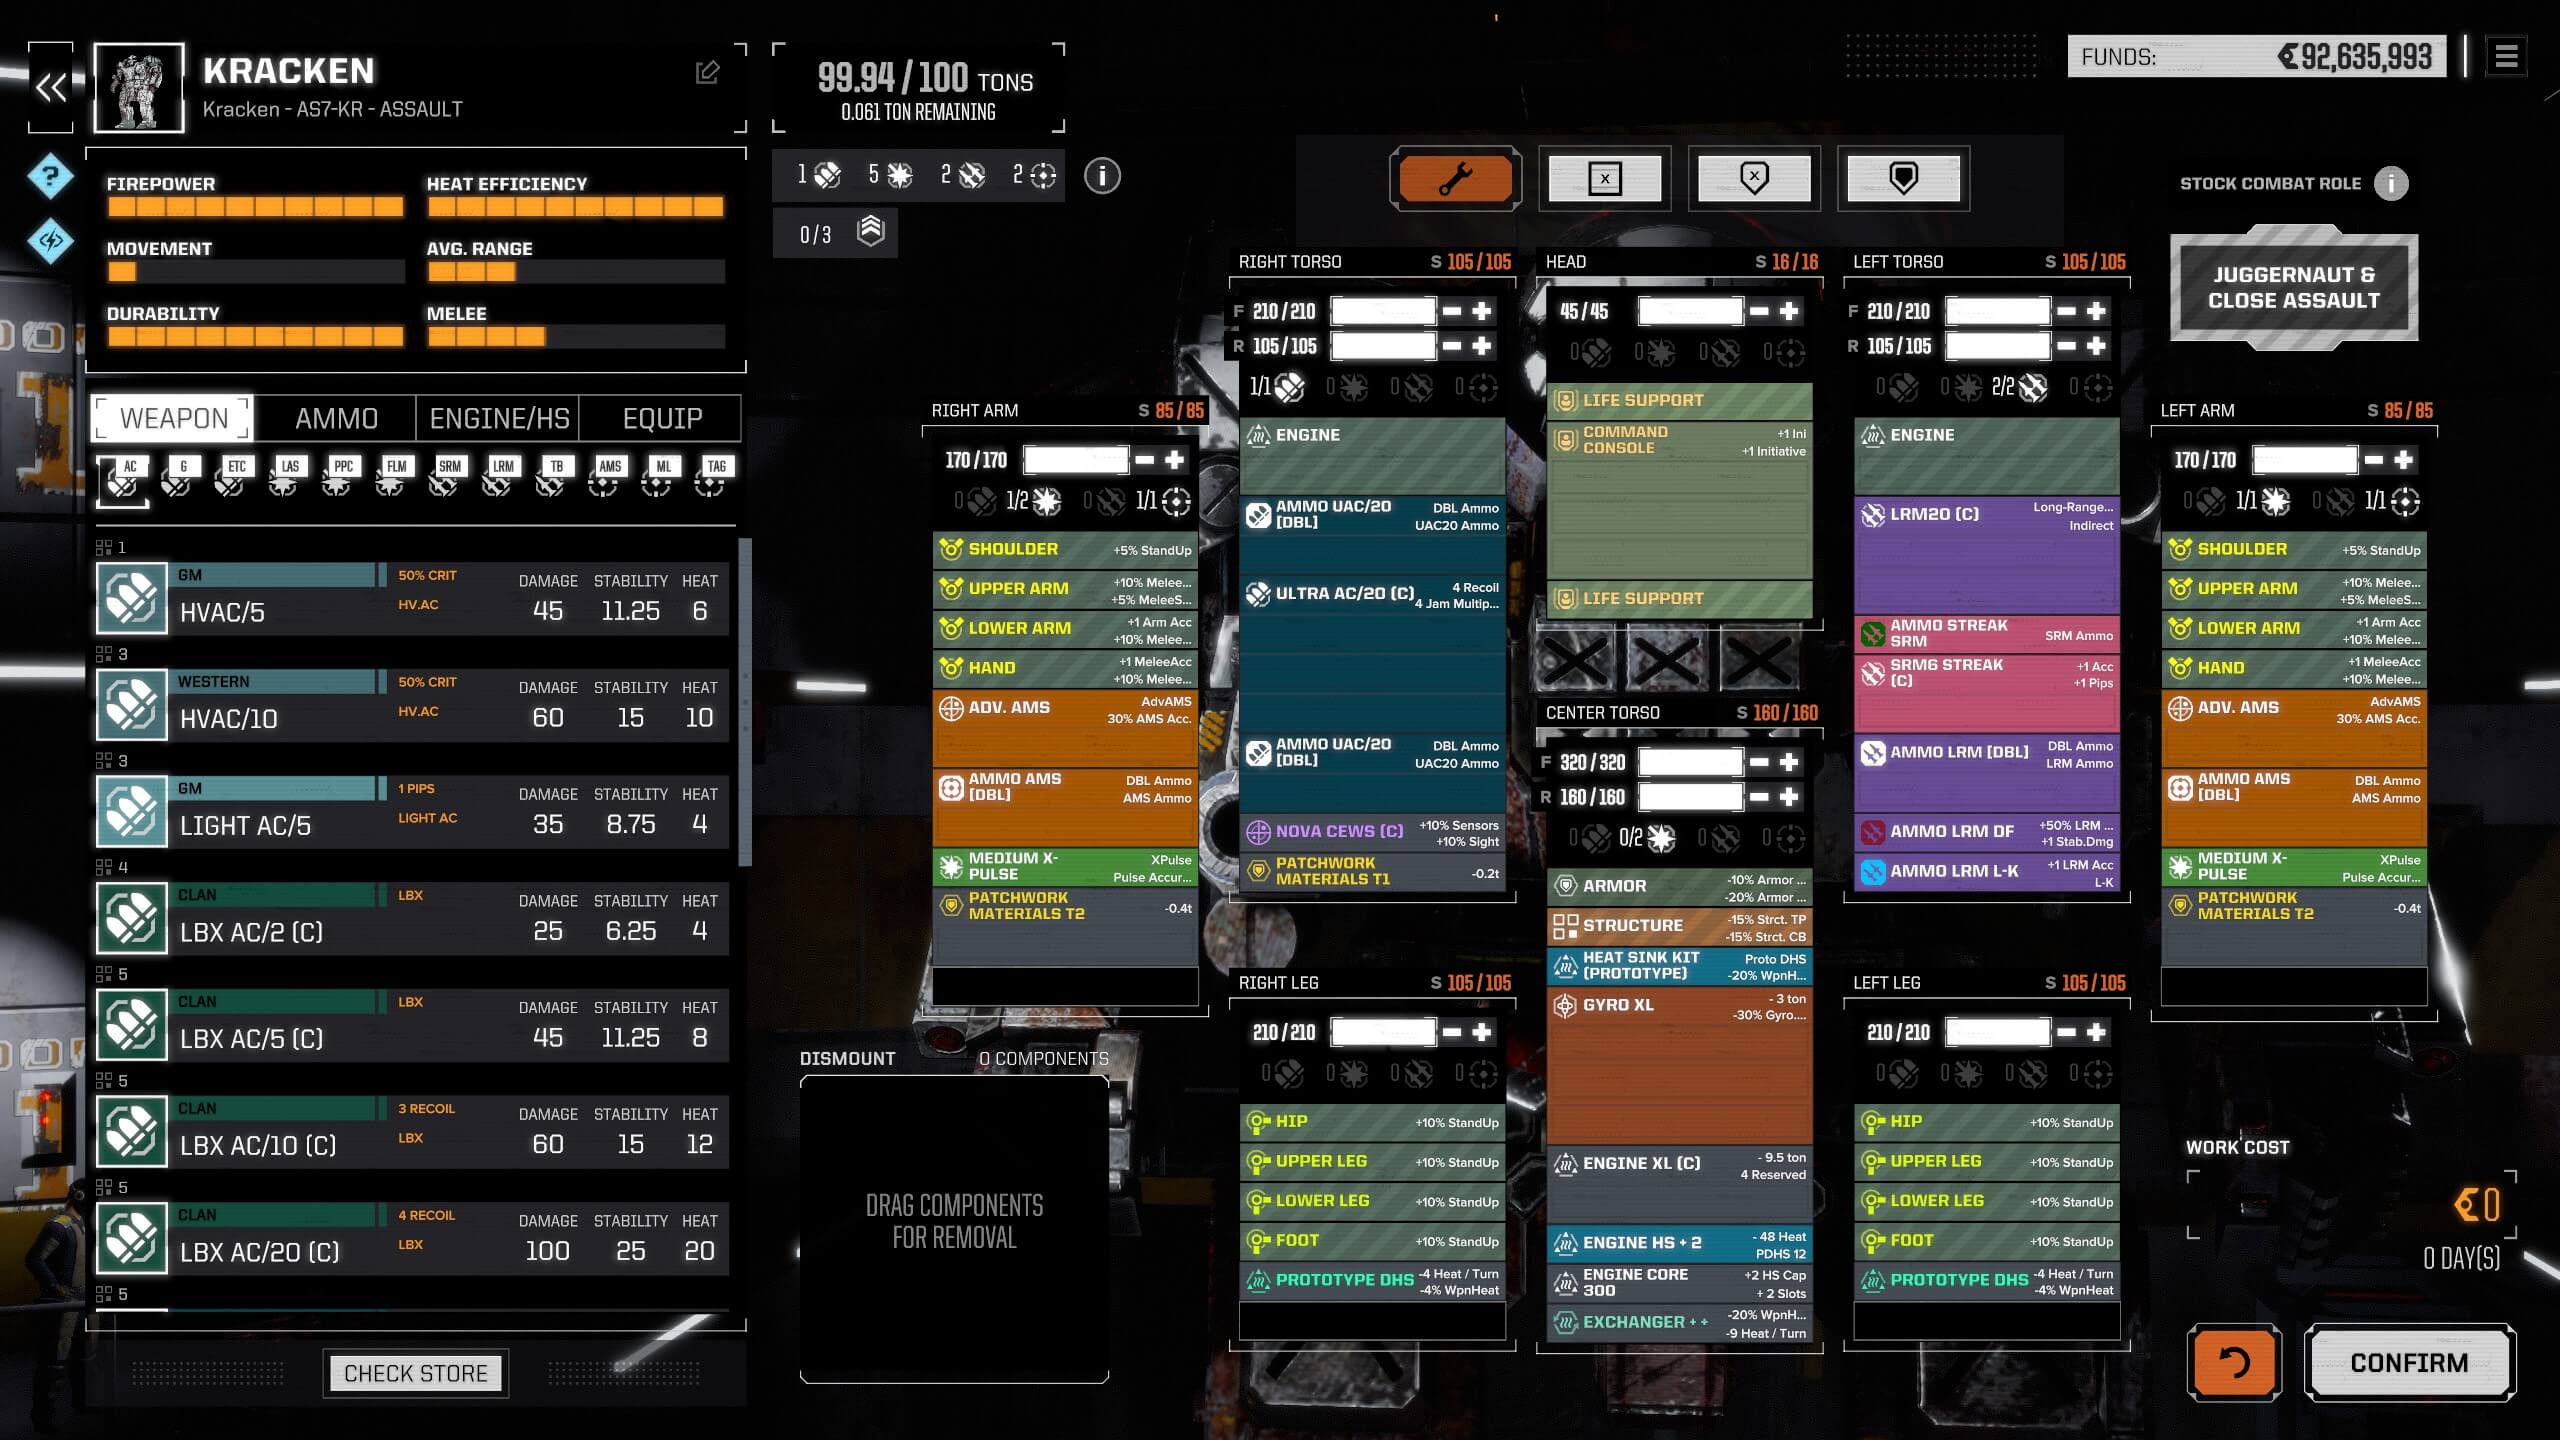
Lance AMS assault mech build

A simple build centred around supporting the whole lance with A.M.S., a Command Console, and damage. The Atlas and variants due to the lack of weapon hardpoints are well suited for this role. As well as offering long to short-range weapons it is more than capable of taking on other assault mechs on its own.

Damage Brawlers.

These builds are for dealing damage and soaking up damage and are always better at close ranges since the heavier weapons only have a short-range and optimal range on most other damage dealing weapons is mid-range as well as being able to hit better at close range due to the hit %. They also are very well suited for sensor stealth builds with good E.C.M. suites making them harder to hit while being able to switch to ECCM to be able to hit better to counter E.C.M. Also to consider here is to use of AX SRM missiles or the A.X. mortars rounds from support builds that would increase there overall damage output even further. Below three screenshots of my Gladiator heavy damage brawler, Dire Wolf assault damage brawler and, Lone Wolf assault damage brawler.

Gladiator(BL-S7) Heavy Damage Brawler.
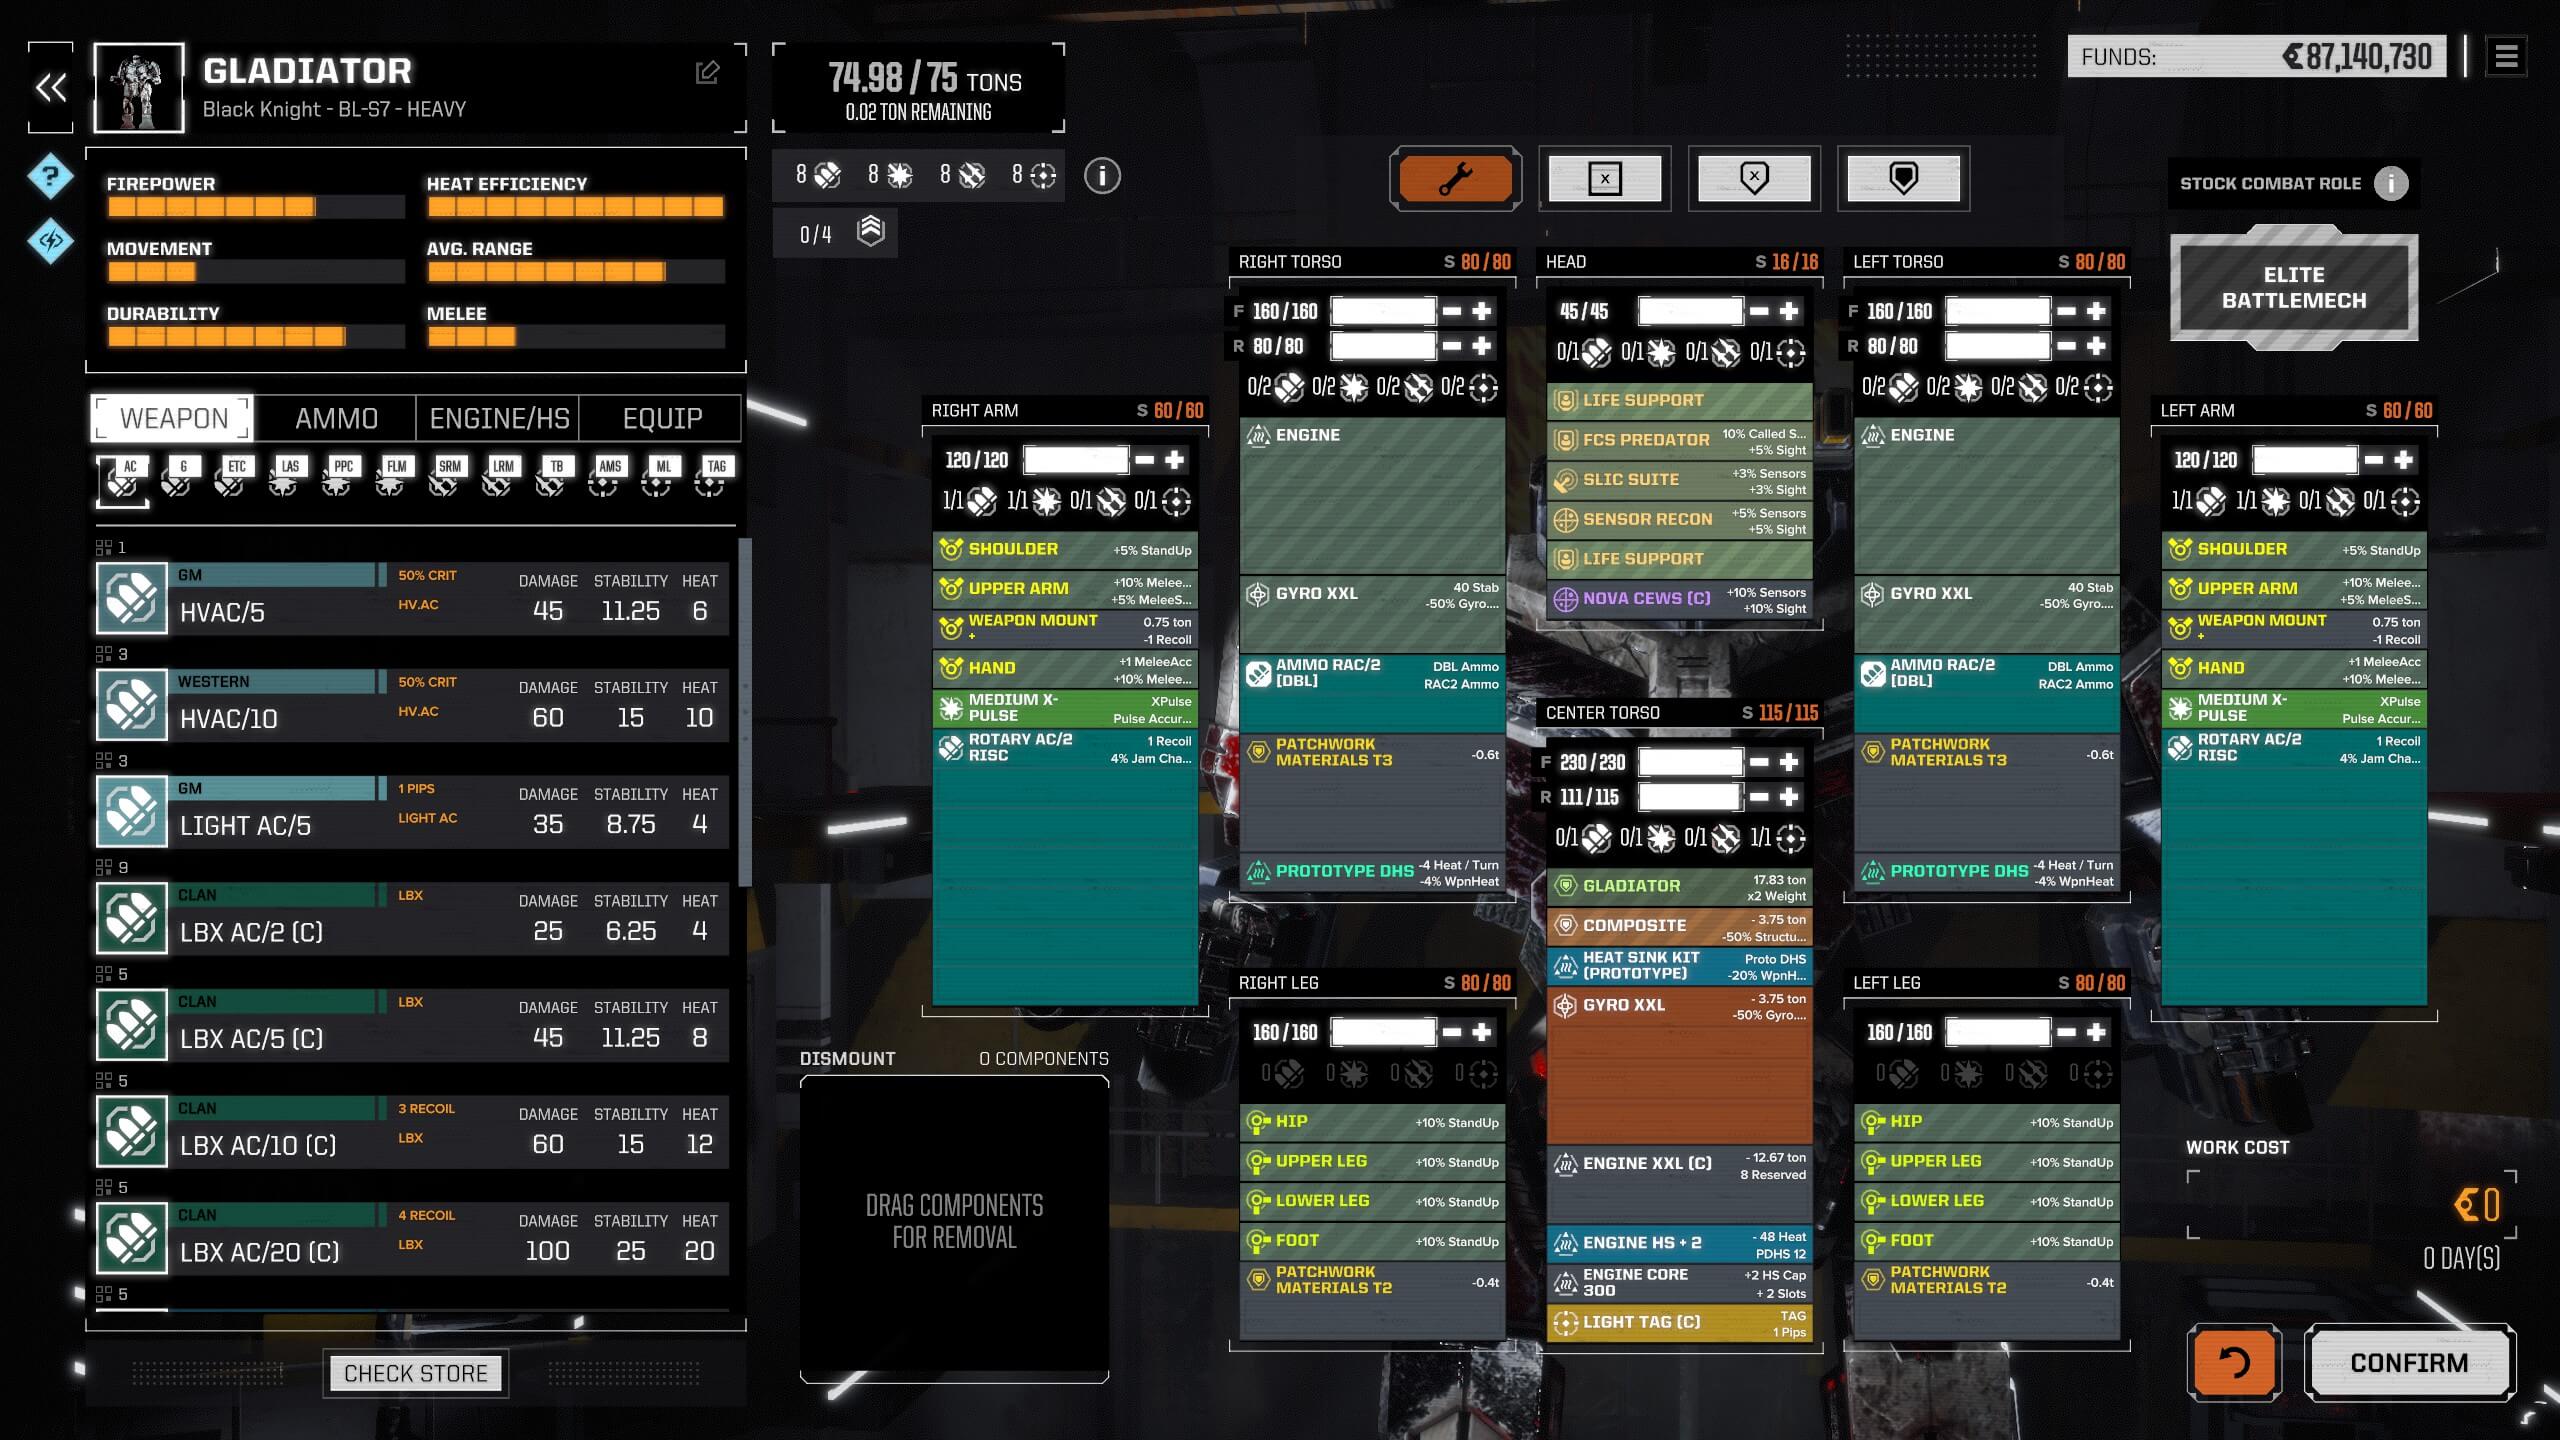
Damage brawler assault mech build

Dire Wolf(DW-B) Assault Damage Brawler.
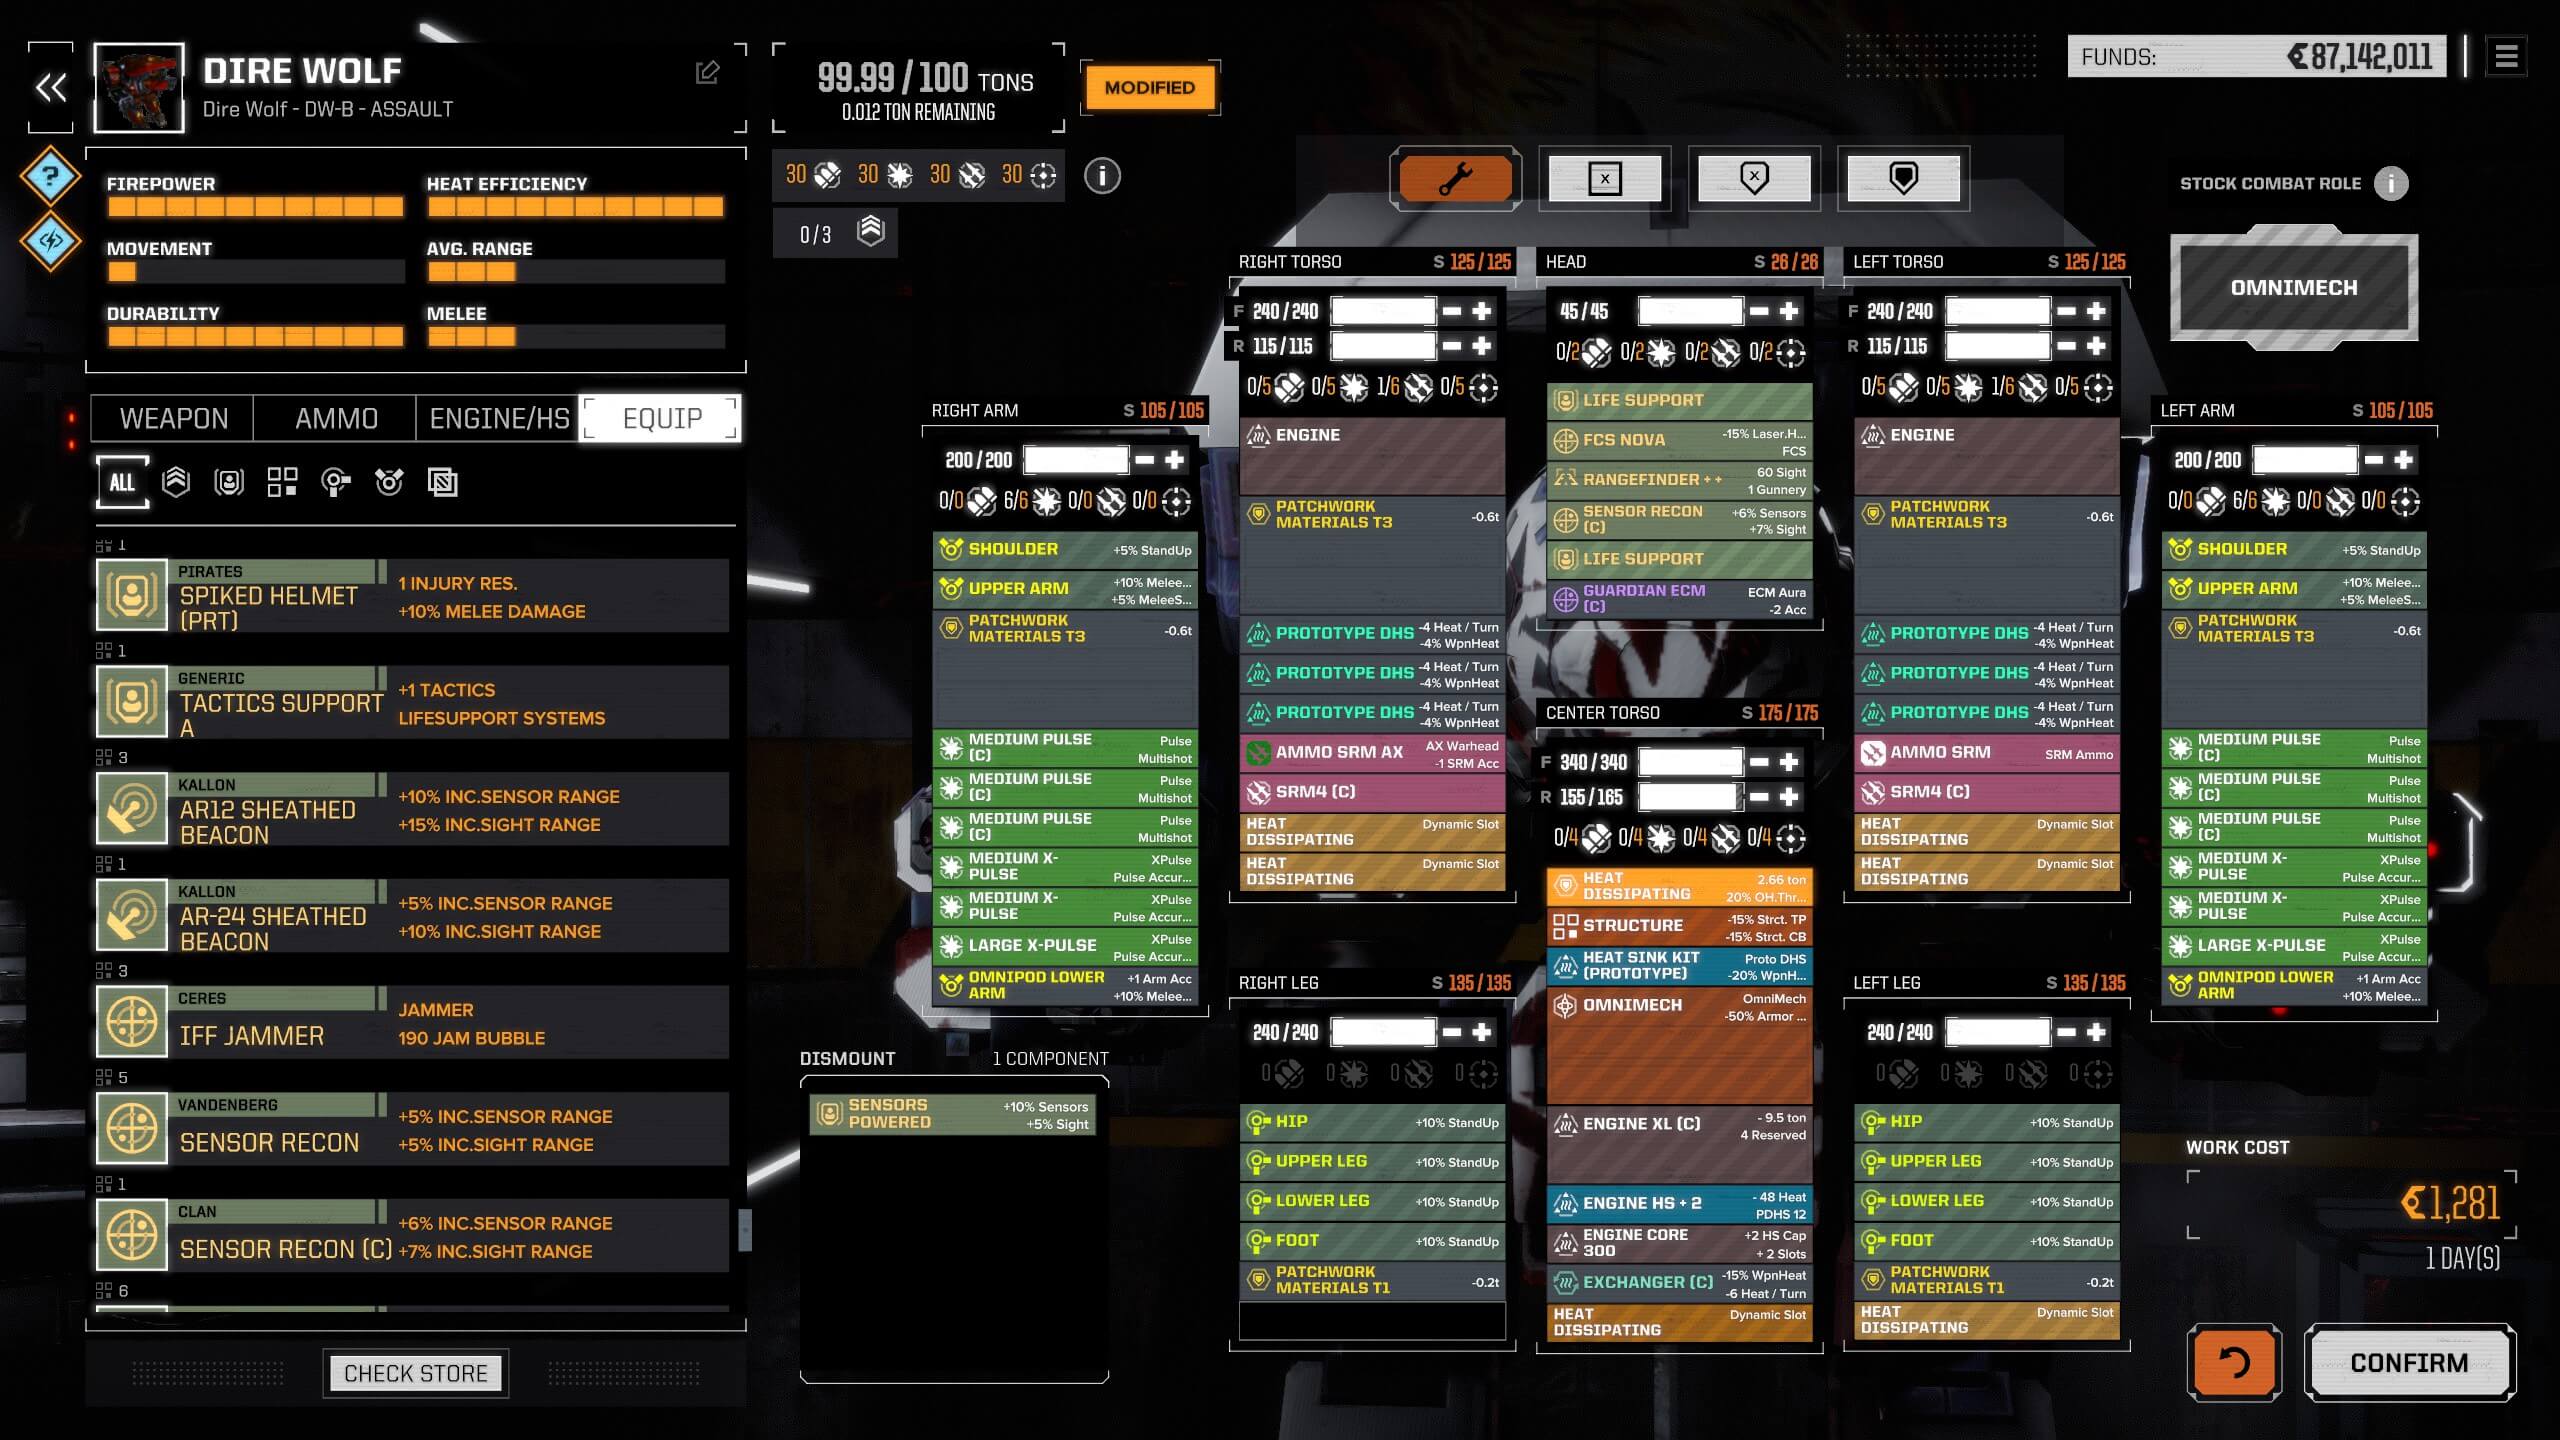
Damage brawler assault mech build

Lone Wolf(DW-LP-AP) Assault Damage Brawler.
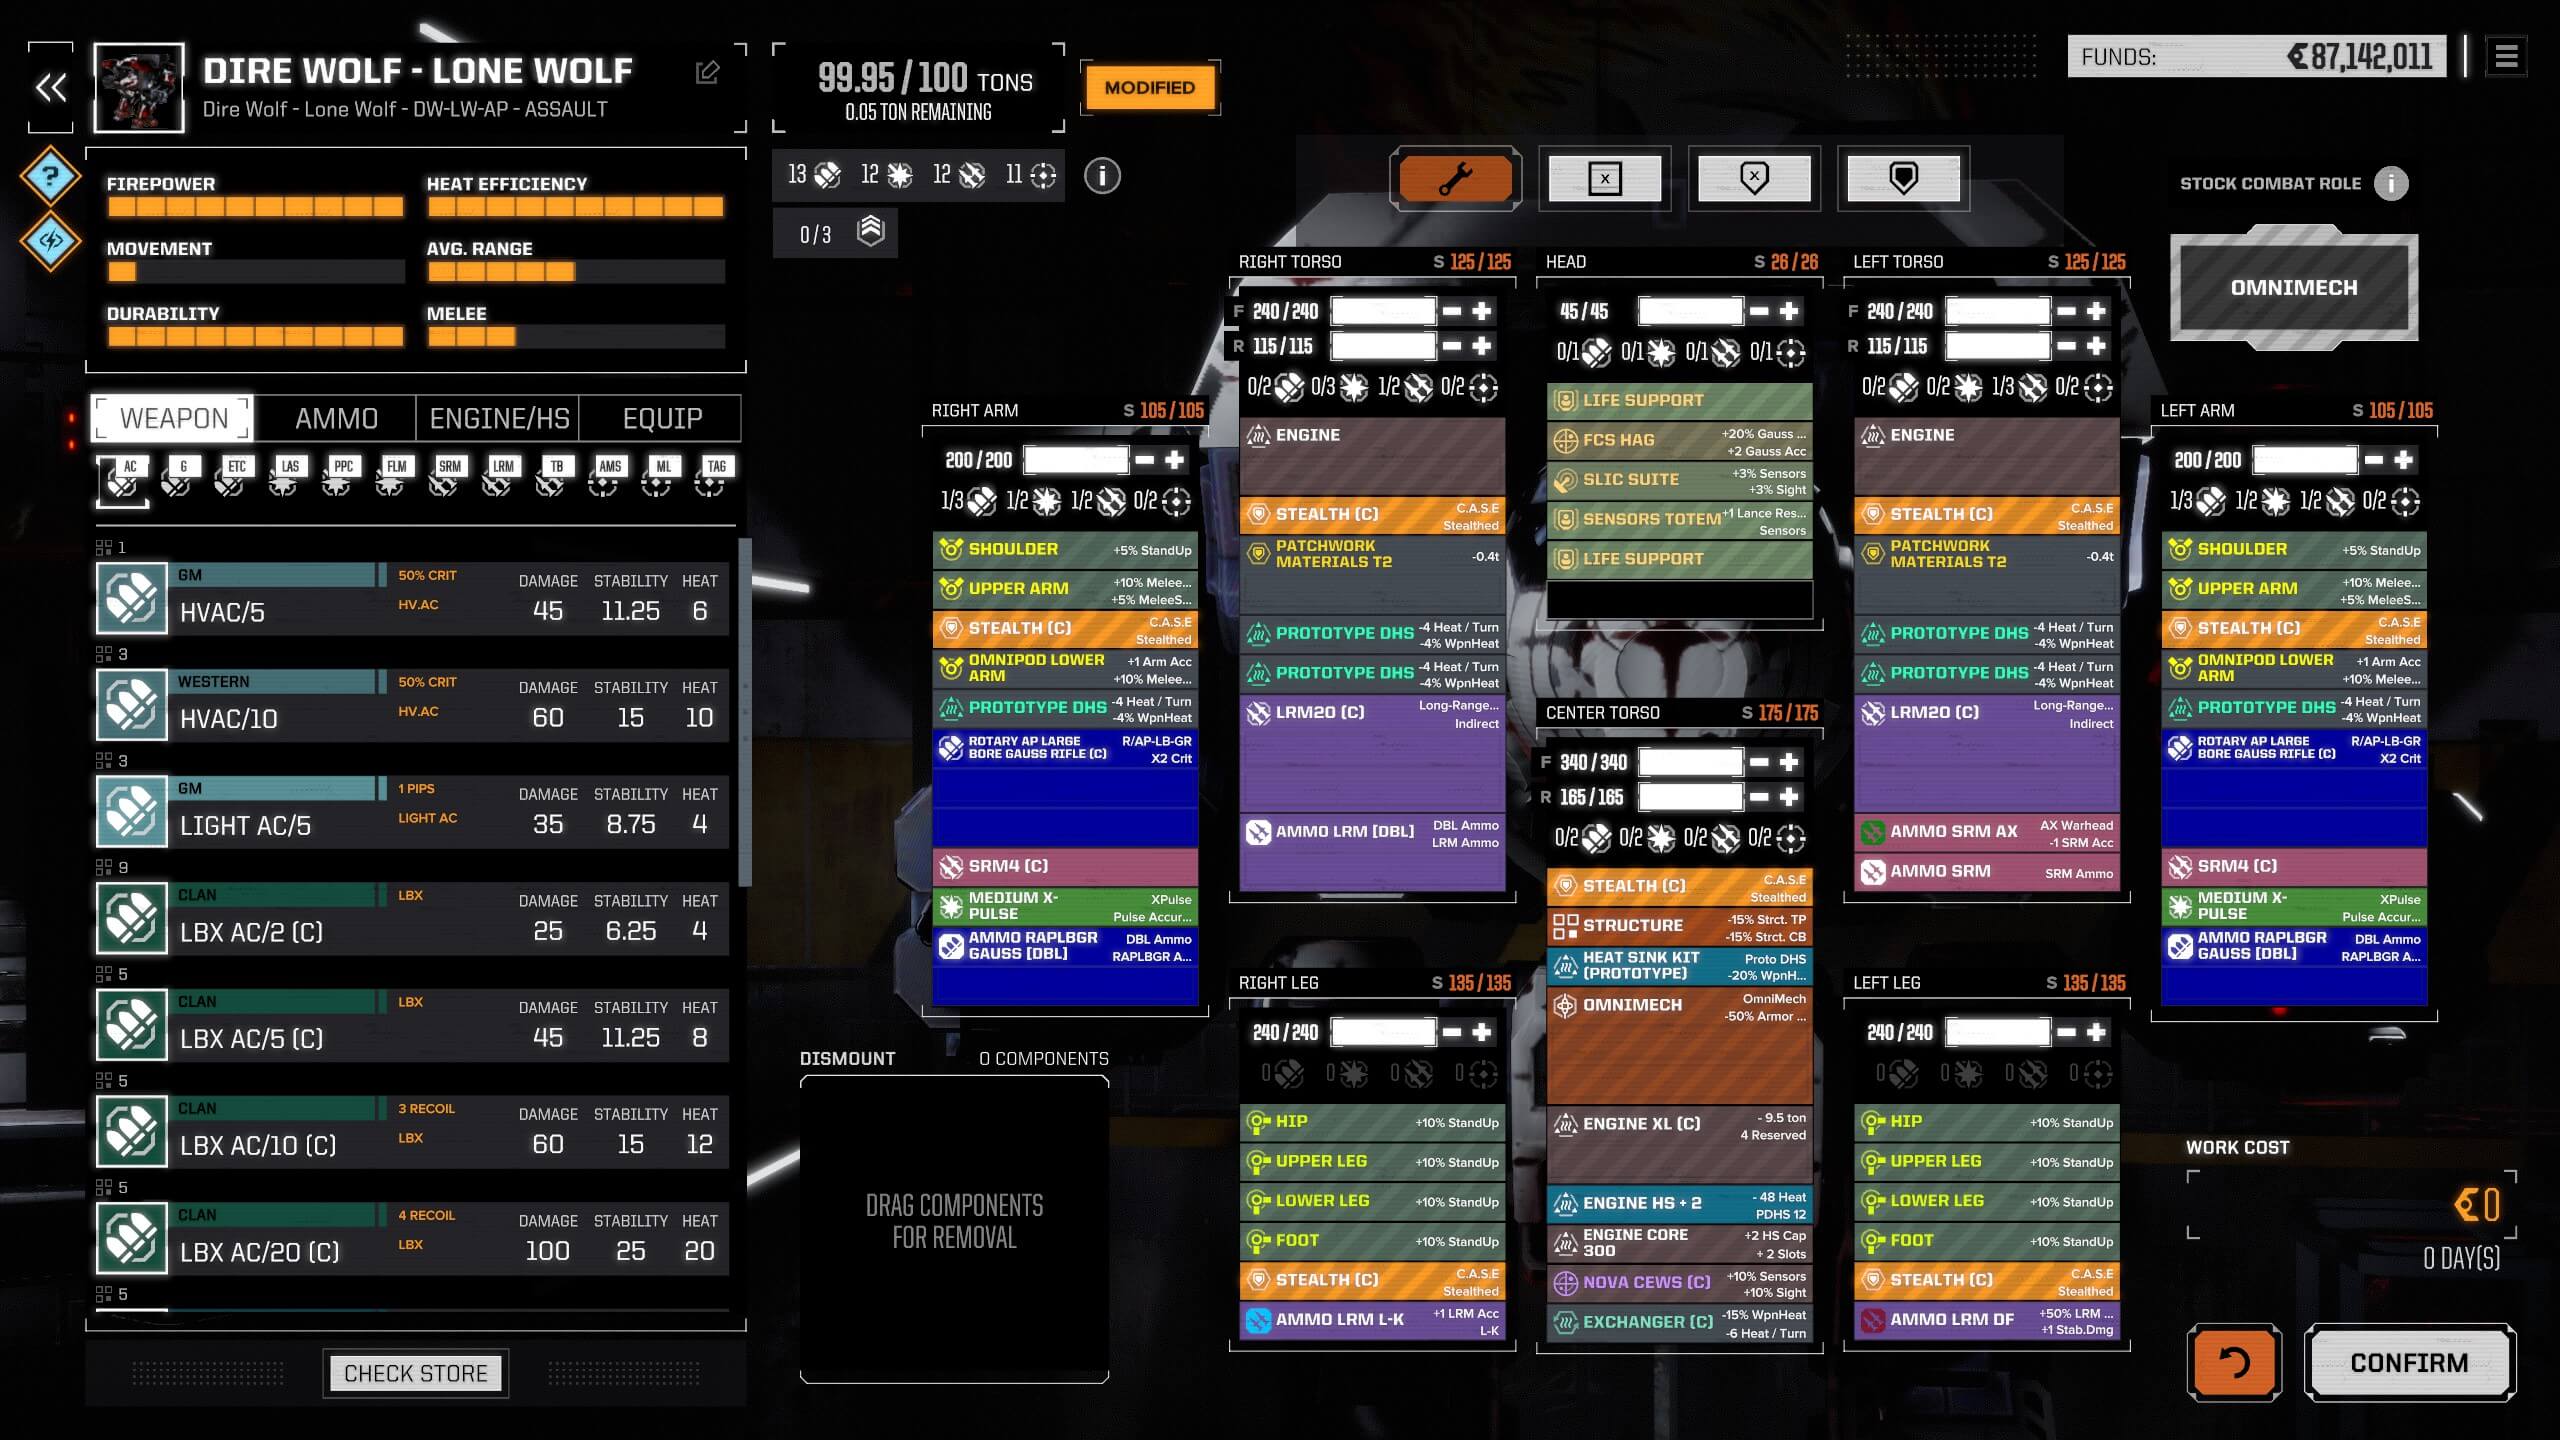
Damage brawler assault mech build

Timber Wolf(TW-D) Heavy Damage Brawler.
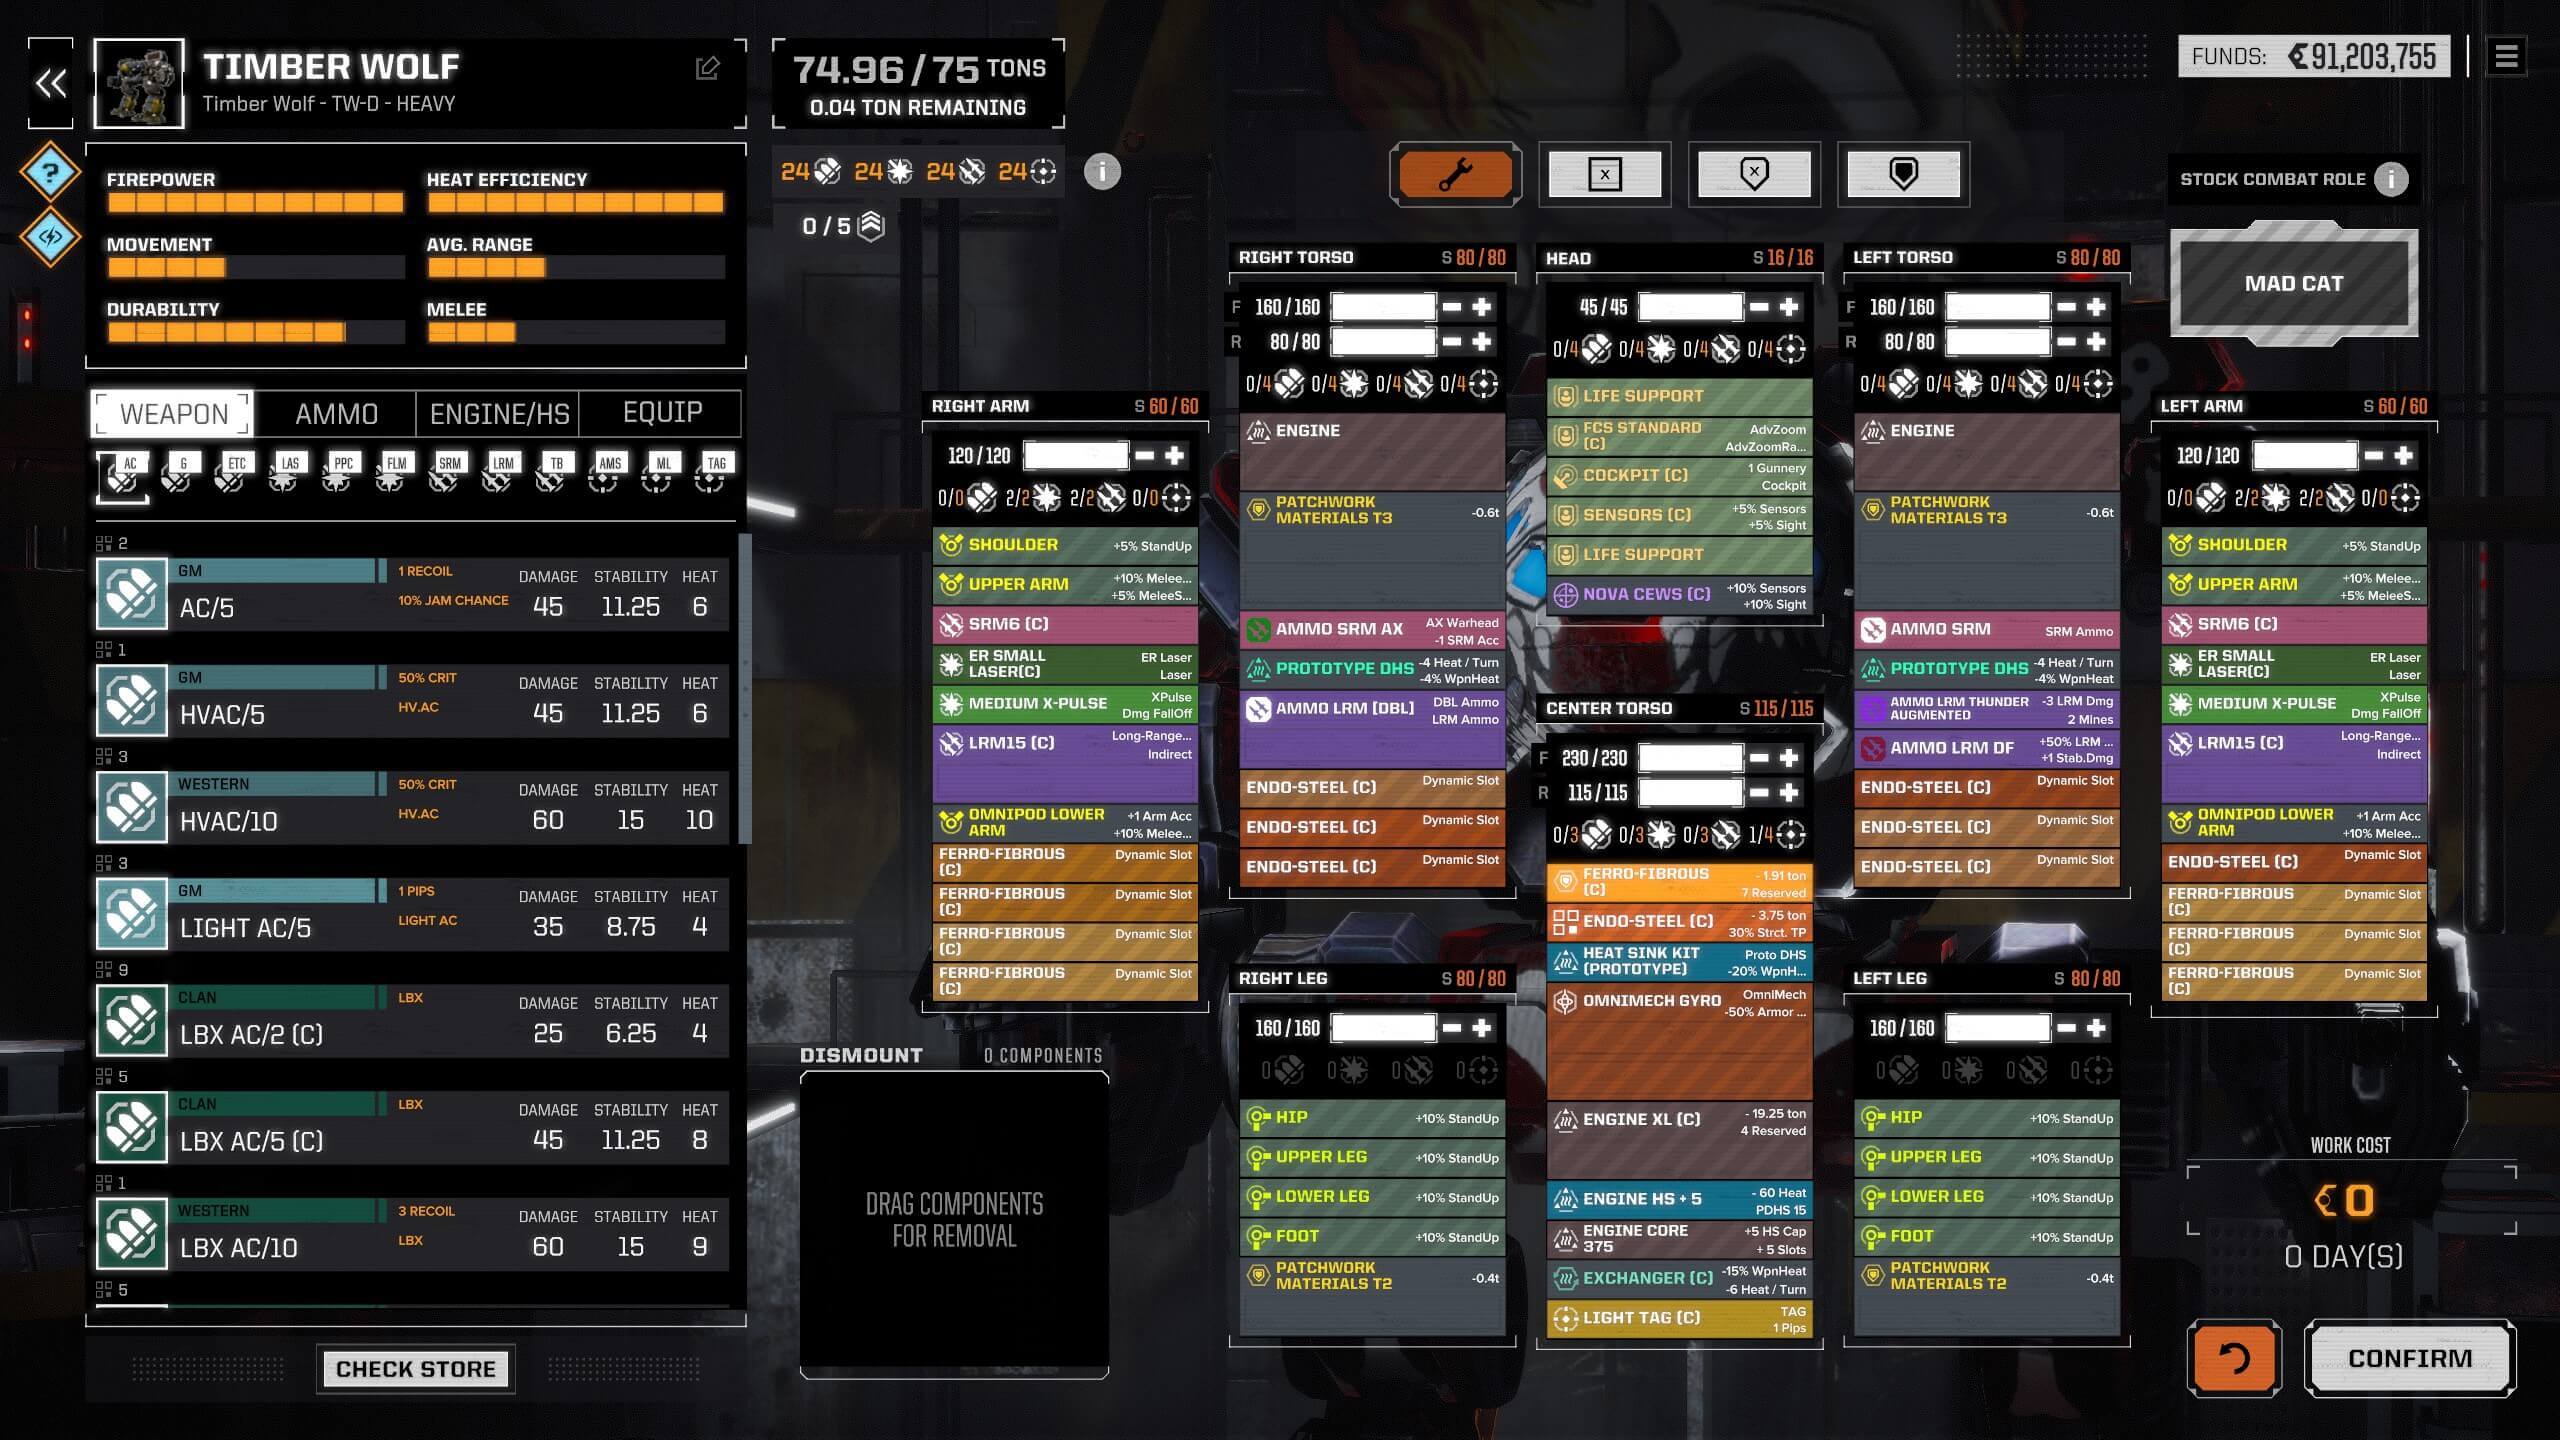
Damage brawler heavy mech build

Timber Wolf(TW-H) Heavy Damage Brawler.
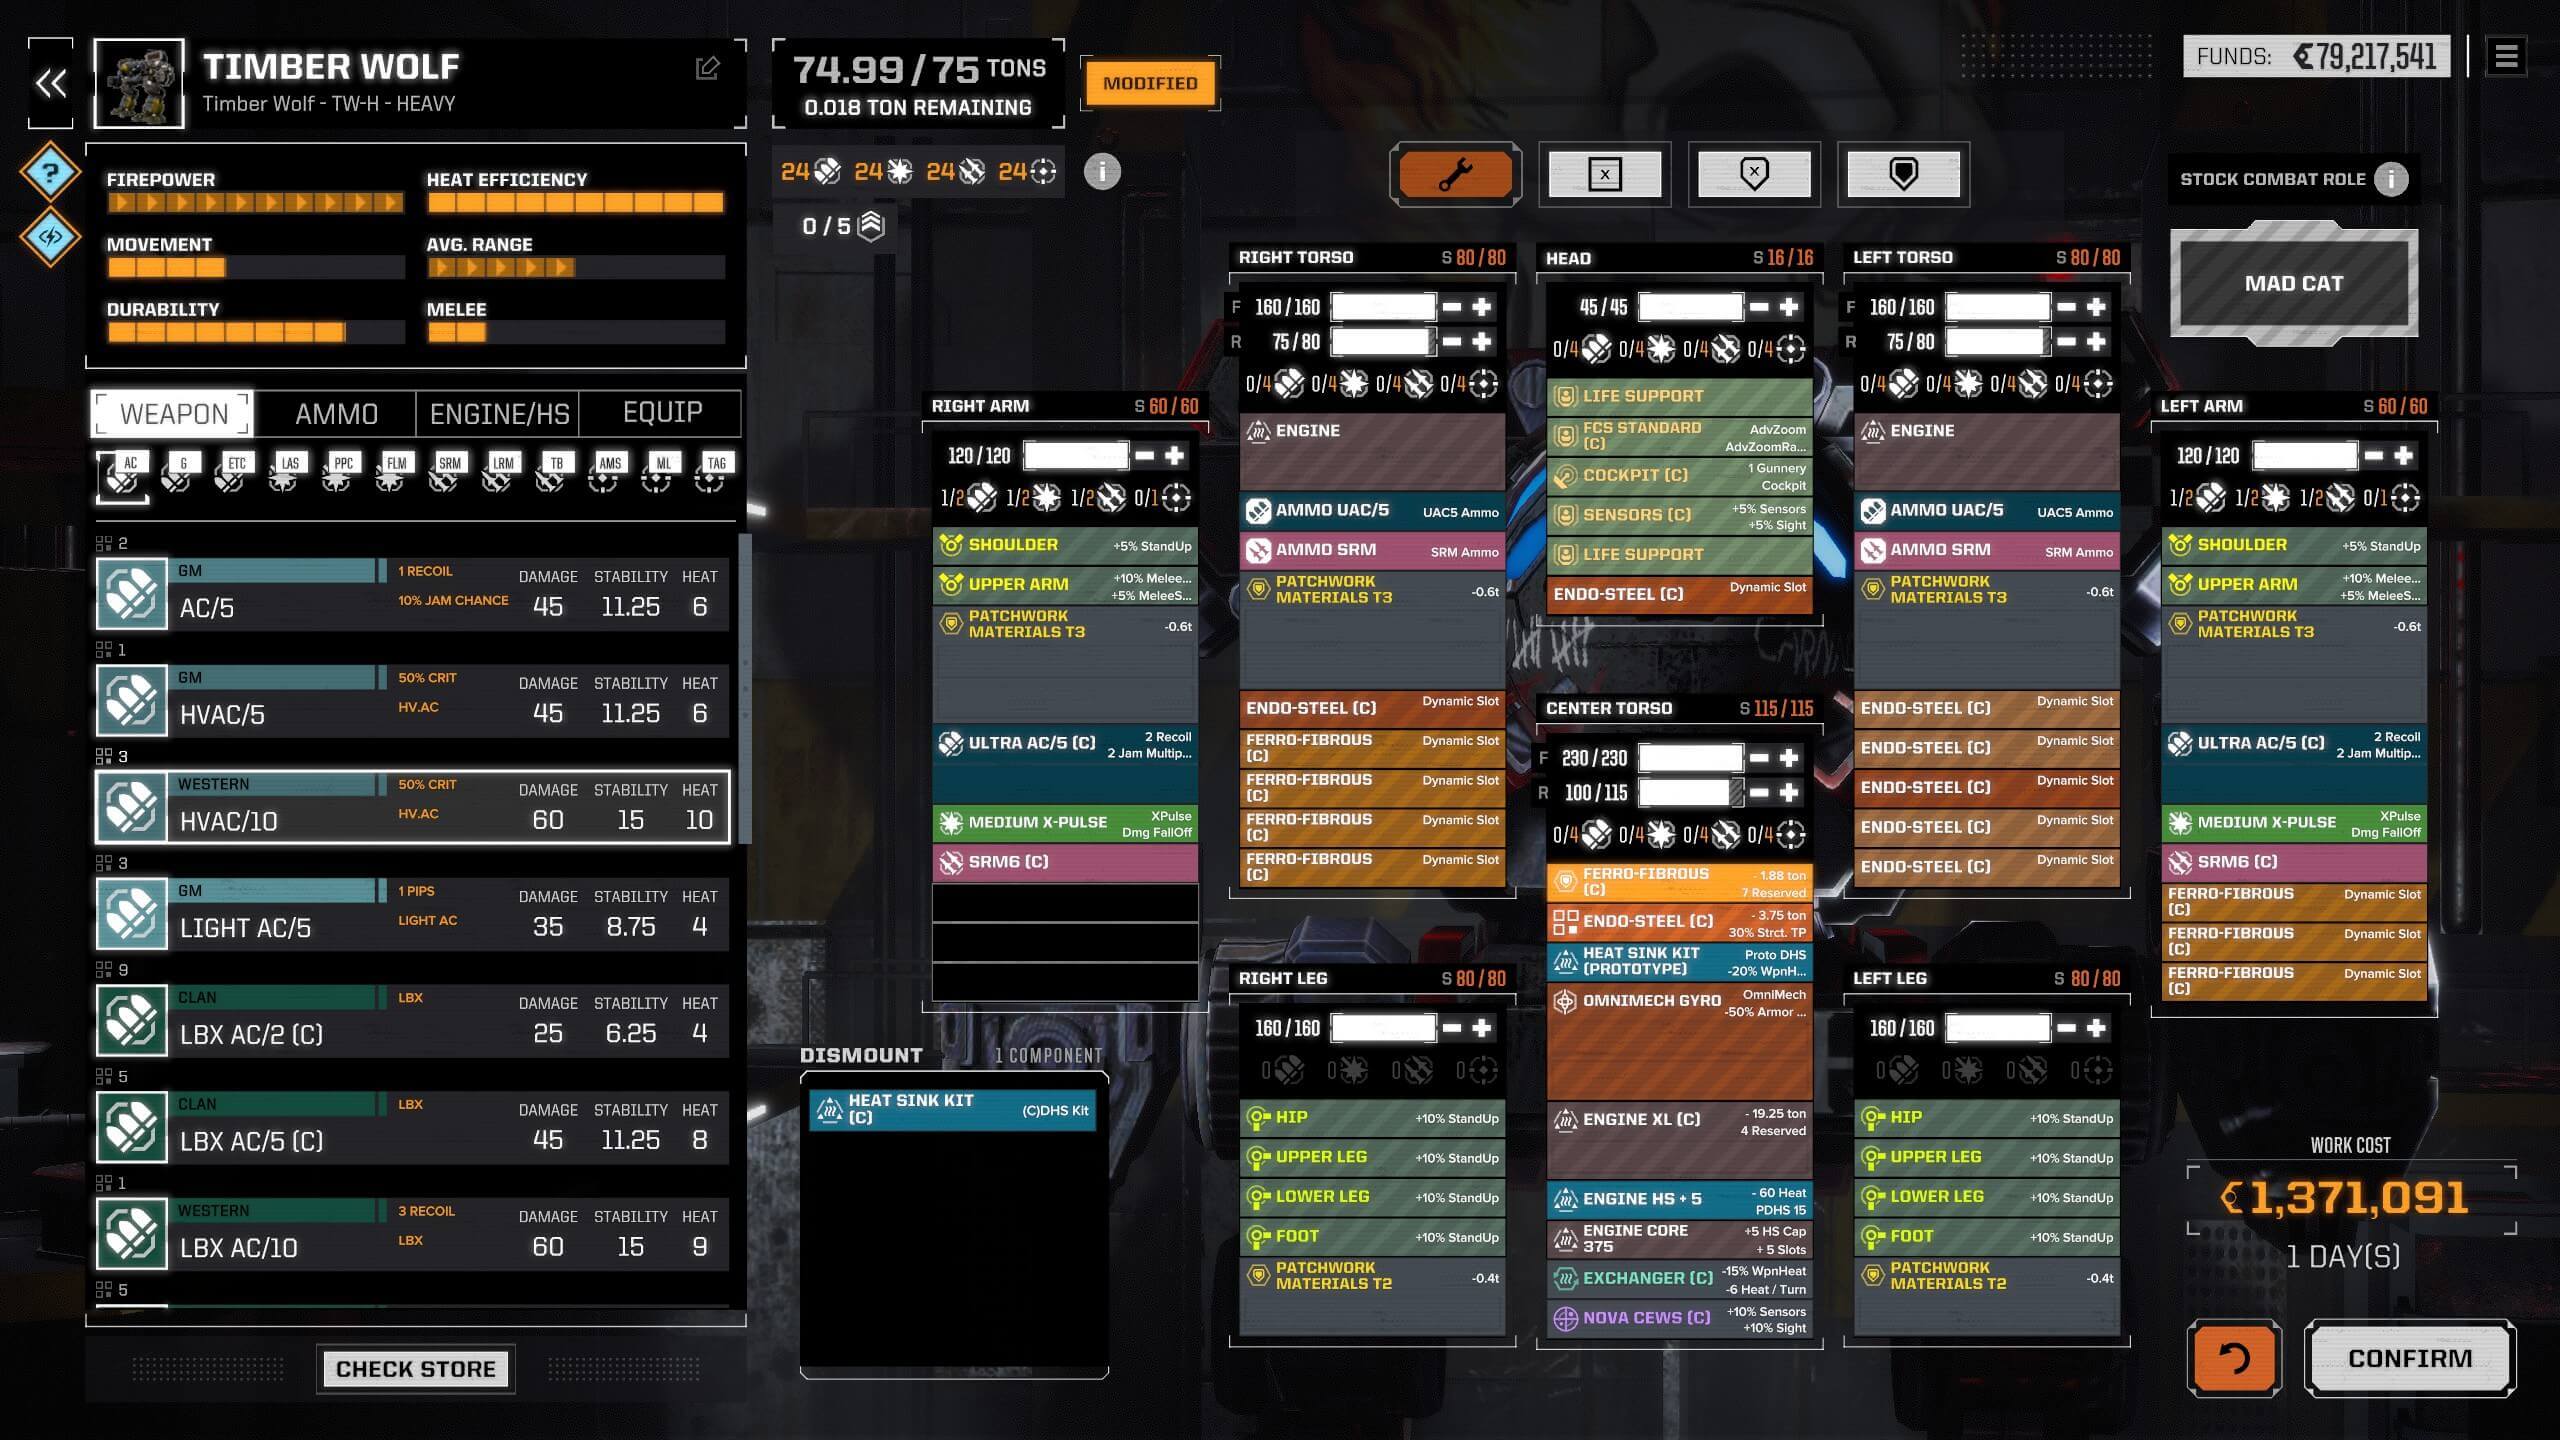
Damage brawler heavy mech build

All five builds are centred around maximum damage while retaining full armour Omni mech are especially useful for this since they offer more tonnage for weapons while having more armour then let's say an Atlas. Since you do not have much in limb mods for Omni mechs you can use the Omnipod lower arm mod to gain some accuracy however this limits the use since no ballistic or P.P.C. weapons will fit in the Omni pods. The Gladiator is a reworked Black Knight as Solaris brawler and features special armour that increases the overall protection at double the weight and an internal structure mod that does not take up slot space while lowering the chassis weight as well as having an internal M.A.S.C. in the armour that can be turned on/off. Finally, the Gladiator does well over 300 damage and can even double as a long-range sniper with the RAC/2 weapons and arm mods. The Dire Wolf is an all-out laser build with some AX SRM's fitted to increase the damage output even further, and the damage is well over 600 without any buffs so it will crater any other assault mech it comes close. Due to the massive heat output, special armour and a special F.C.S. is fitted that helps with heat management. The Lone Wolf is a very rare Dire Wolf Omni mech that comes with special rotary gauss rifles I was unable to salvage more than 2, adding two more rotary gauss rifles and dropping some of the other weapons would be my preferred setup. But even now the build does well over 700 damage, and that is without any buff as well. It comes with a baked-in stealth armour and Nova CEWS ECM suite, special gauss F.C.S. and a Totem sensor suite. Both the Timber Wolves are to augment each other and field a 375 engine allowing them to close into optimal weapons range as well as flanking manoeuvres. The D variant was rebuilt to offer Long to Medium-range fire with about 345 damage output. In comparison, the H variant was designed around Medium to Short-range fire with about 374 damage output. Both use E.C.M. and Sensors with C3 networking through the Nova C.E.W.S. (C).

Light Mech Builds.

Many will start with light mechs with perhaps some medium mechs as well as some prefer a light and medium mech lance, so I decided to add some light mech builds. These are all made with the best components available at the time of writing this article. You can opt to work up to these builds or iterate upon them to suit your own needs. The light Mech builds below cover a wide range of capabilities and are best used in synergy within a lance since they do not offer the tonnage like heavier mechs to deal large amounts of damage. In general light mechs should be more operate as a wolf pack; therefore, they should supplement each other with damage, E.C.M. and C3 networking and spotting(TAG/NARC). Light mechs also tend to be very fragile when taking on heavy and assault mechs, so stealth armour is also a wise option to consider.

Raven(RVN-M) Stealth Light.
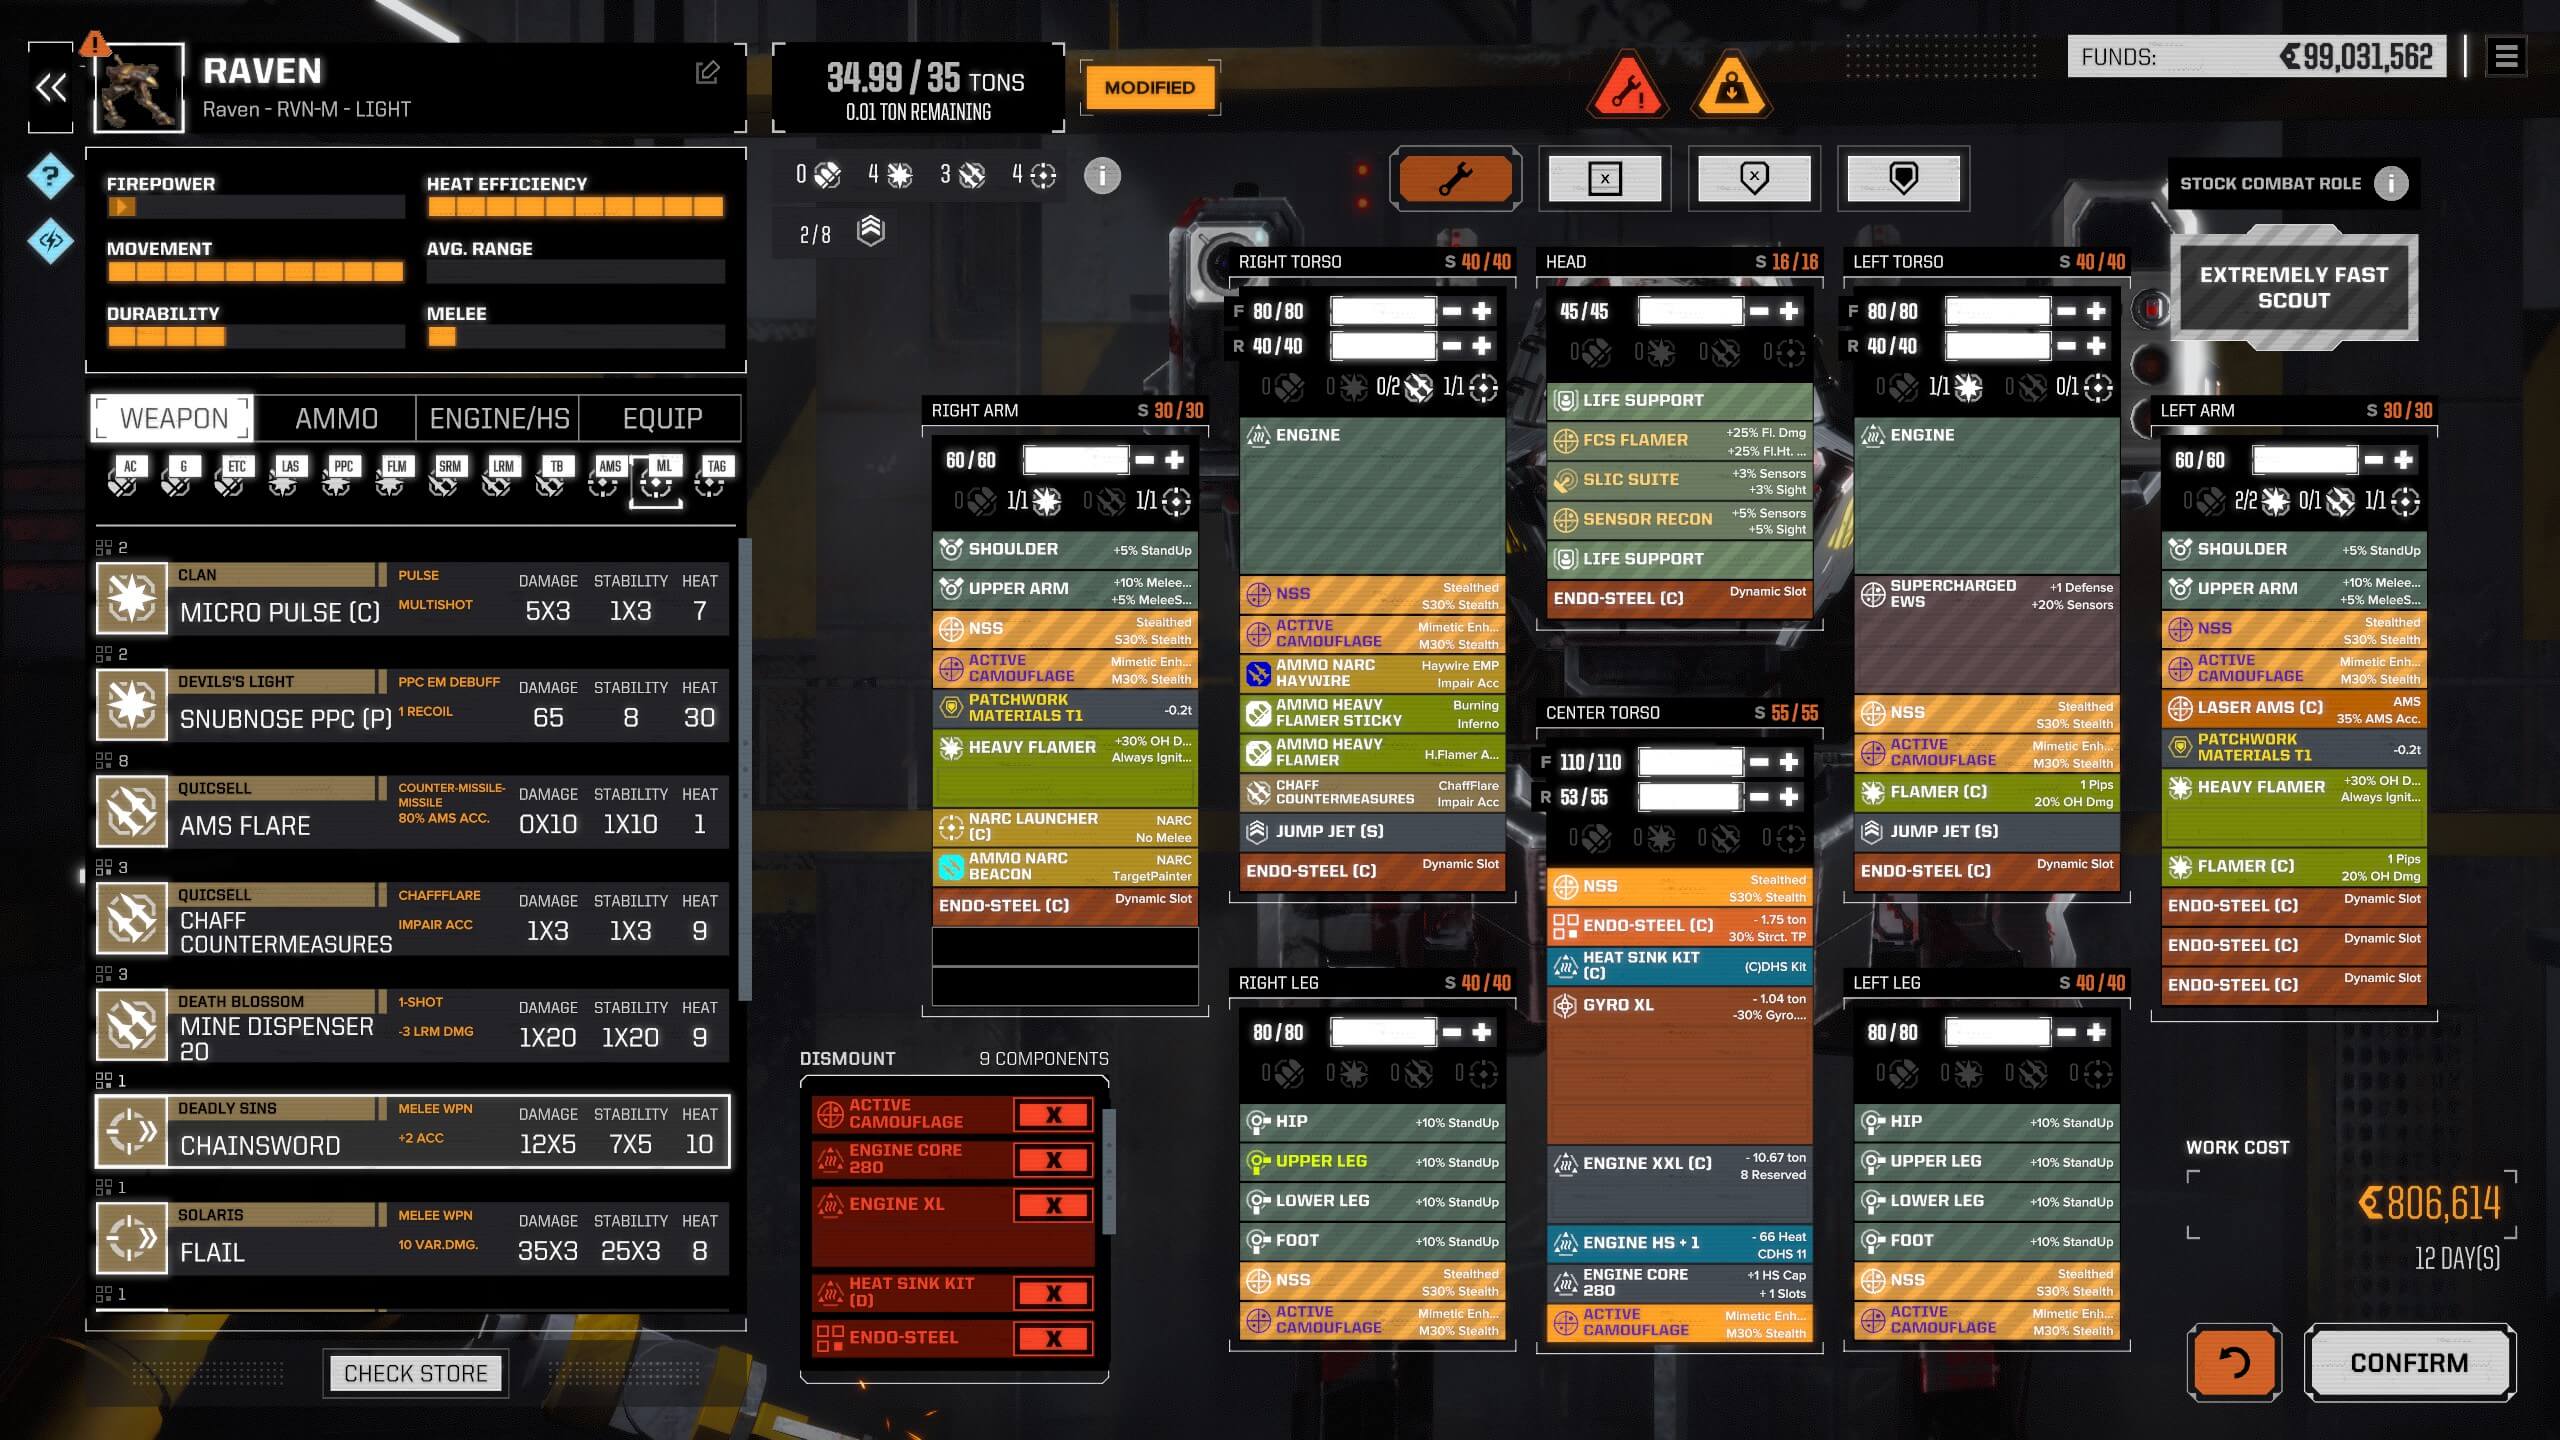
Raven(RVN-M) full stealth build

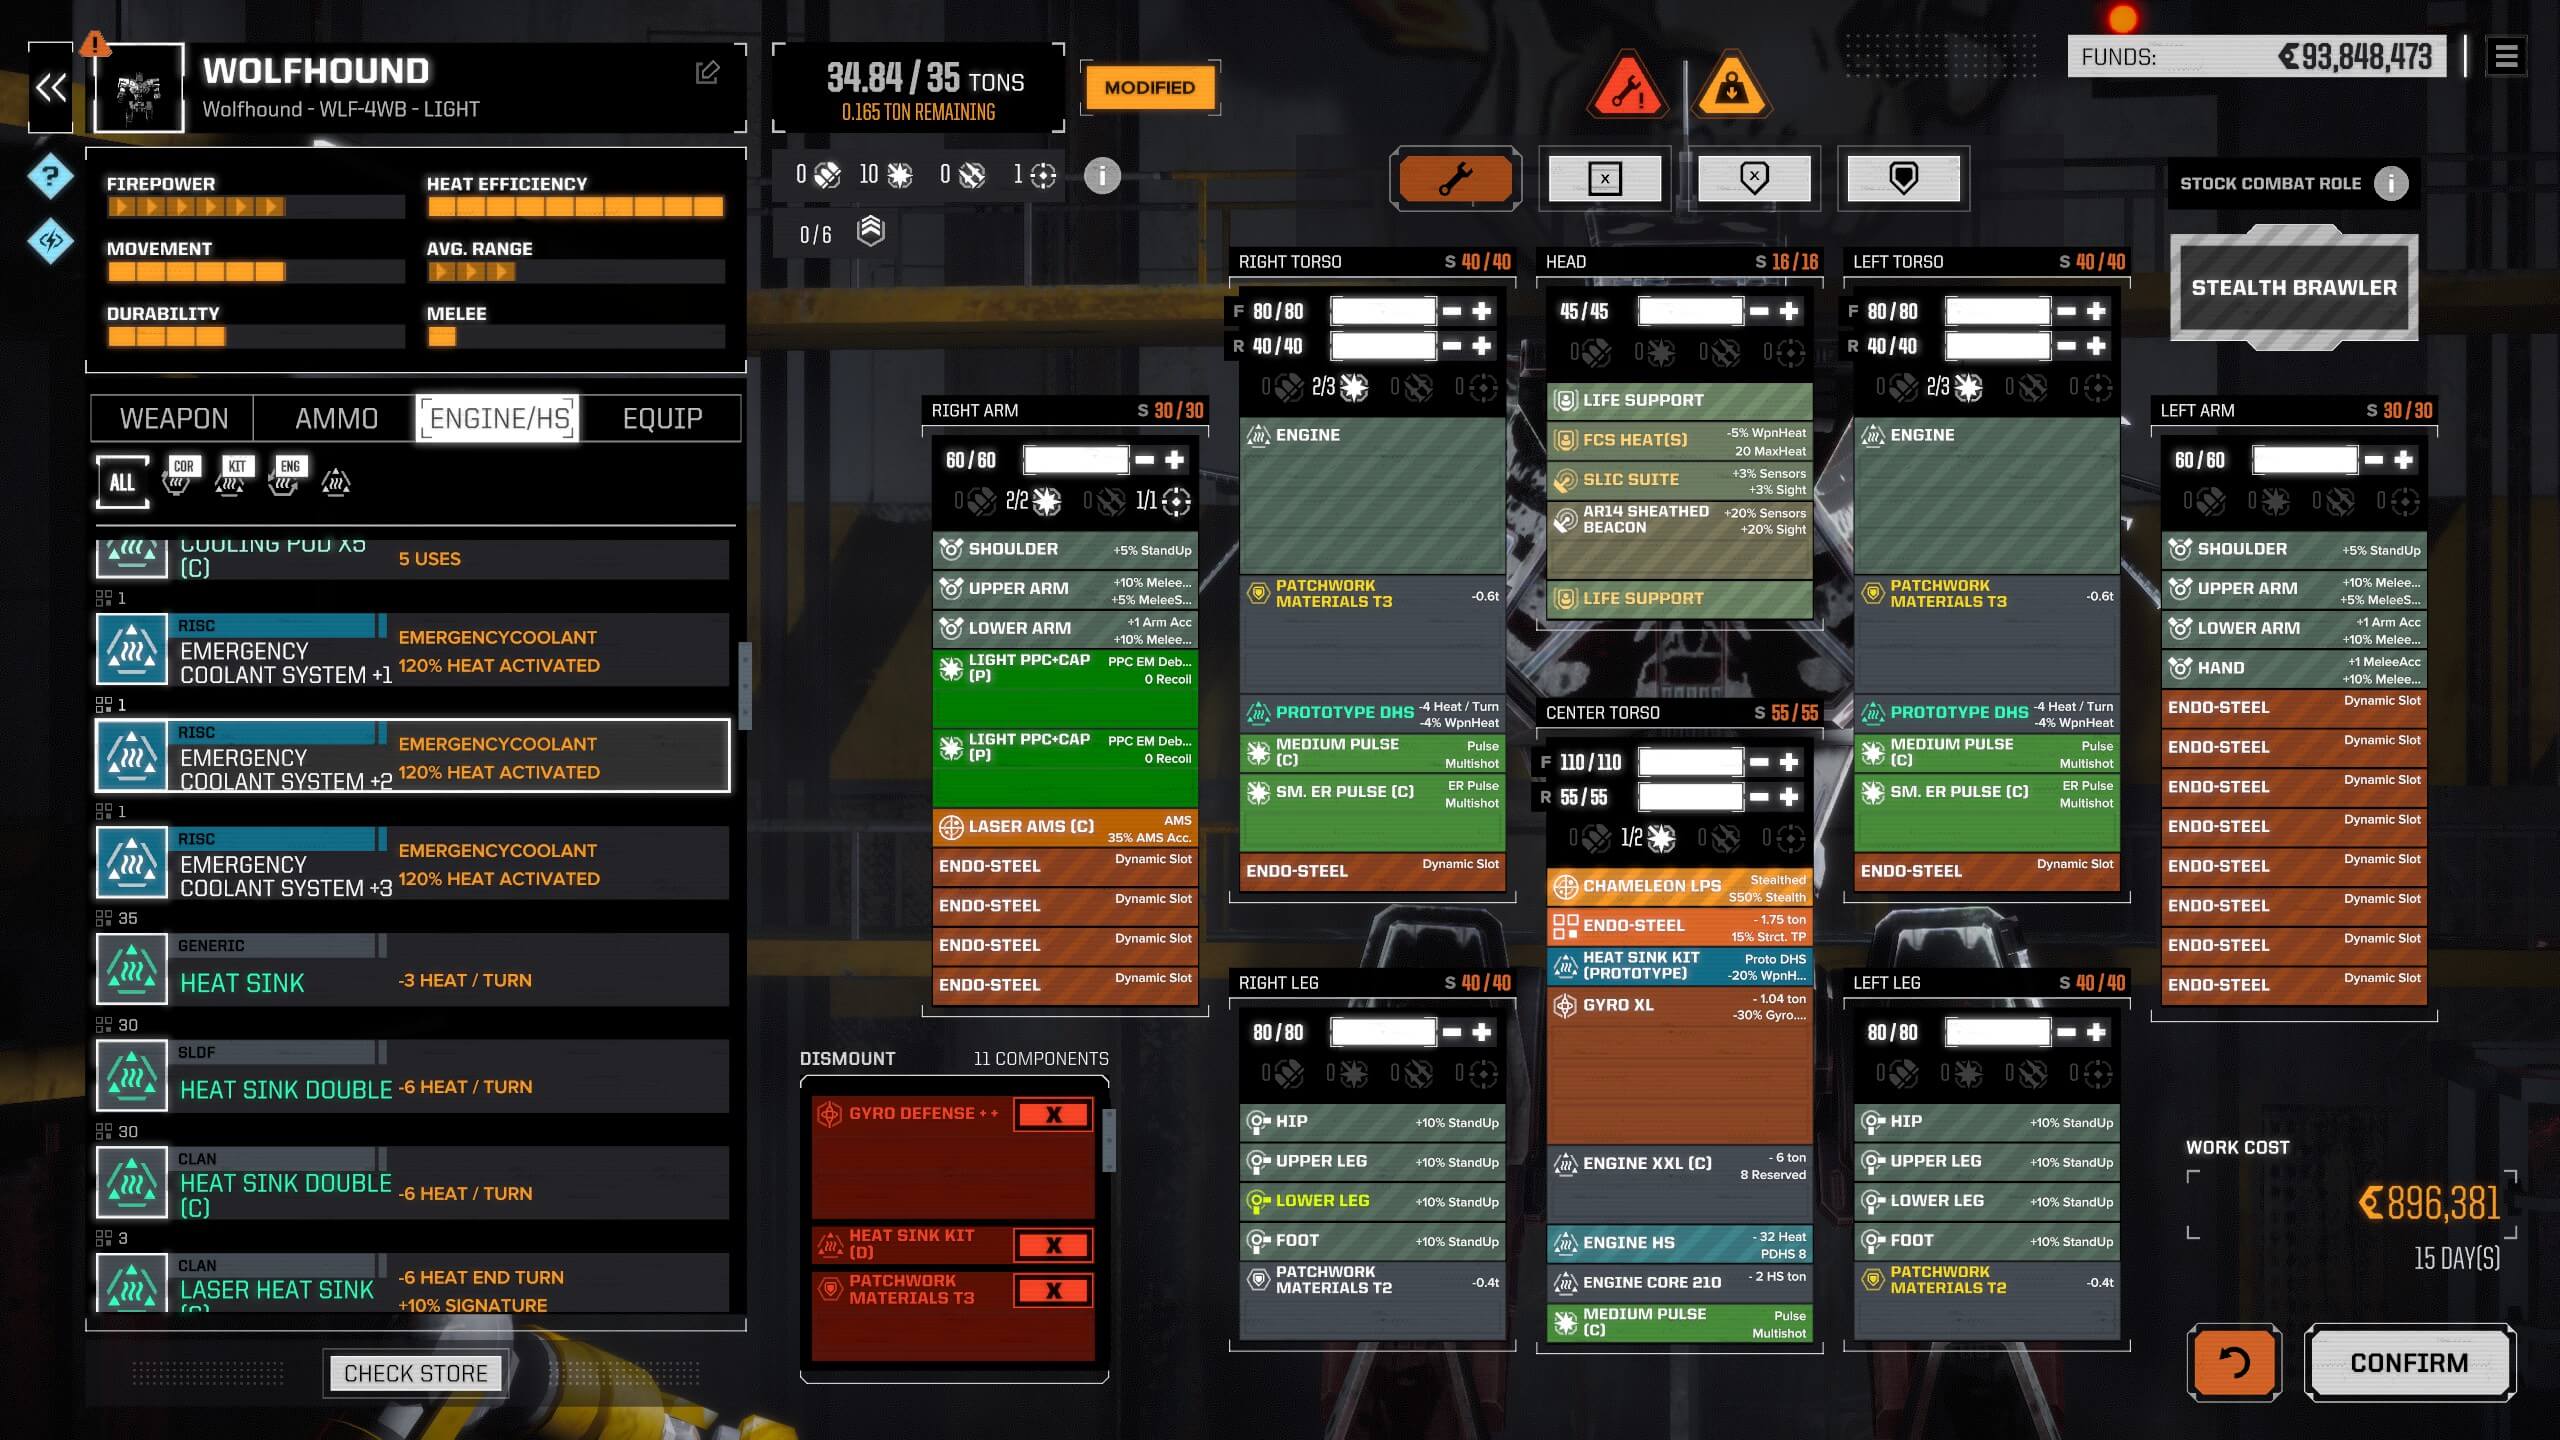
Wolf Hound(WLF-4WB) Damage Light.

Wolf Hound(WLF-4WB) damage dealer build

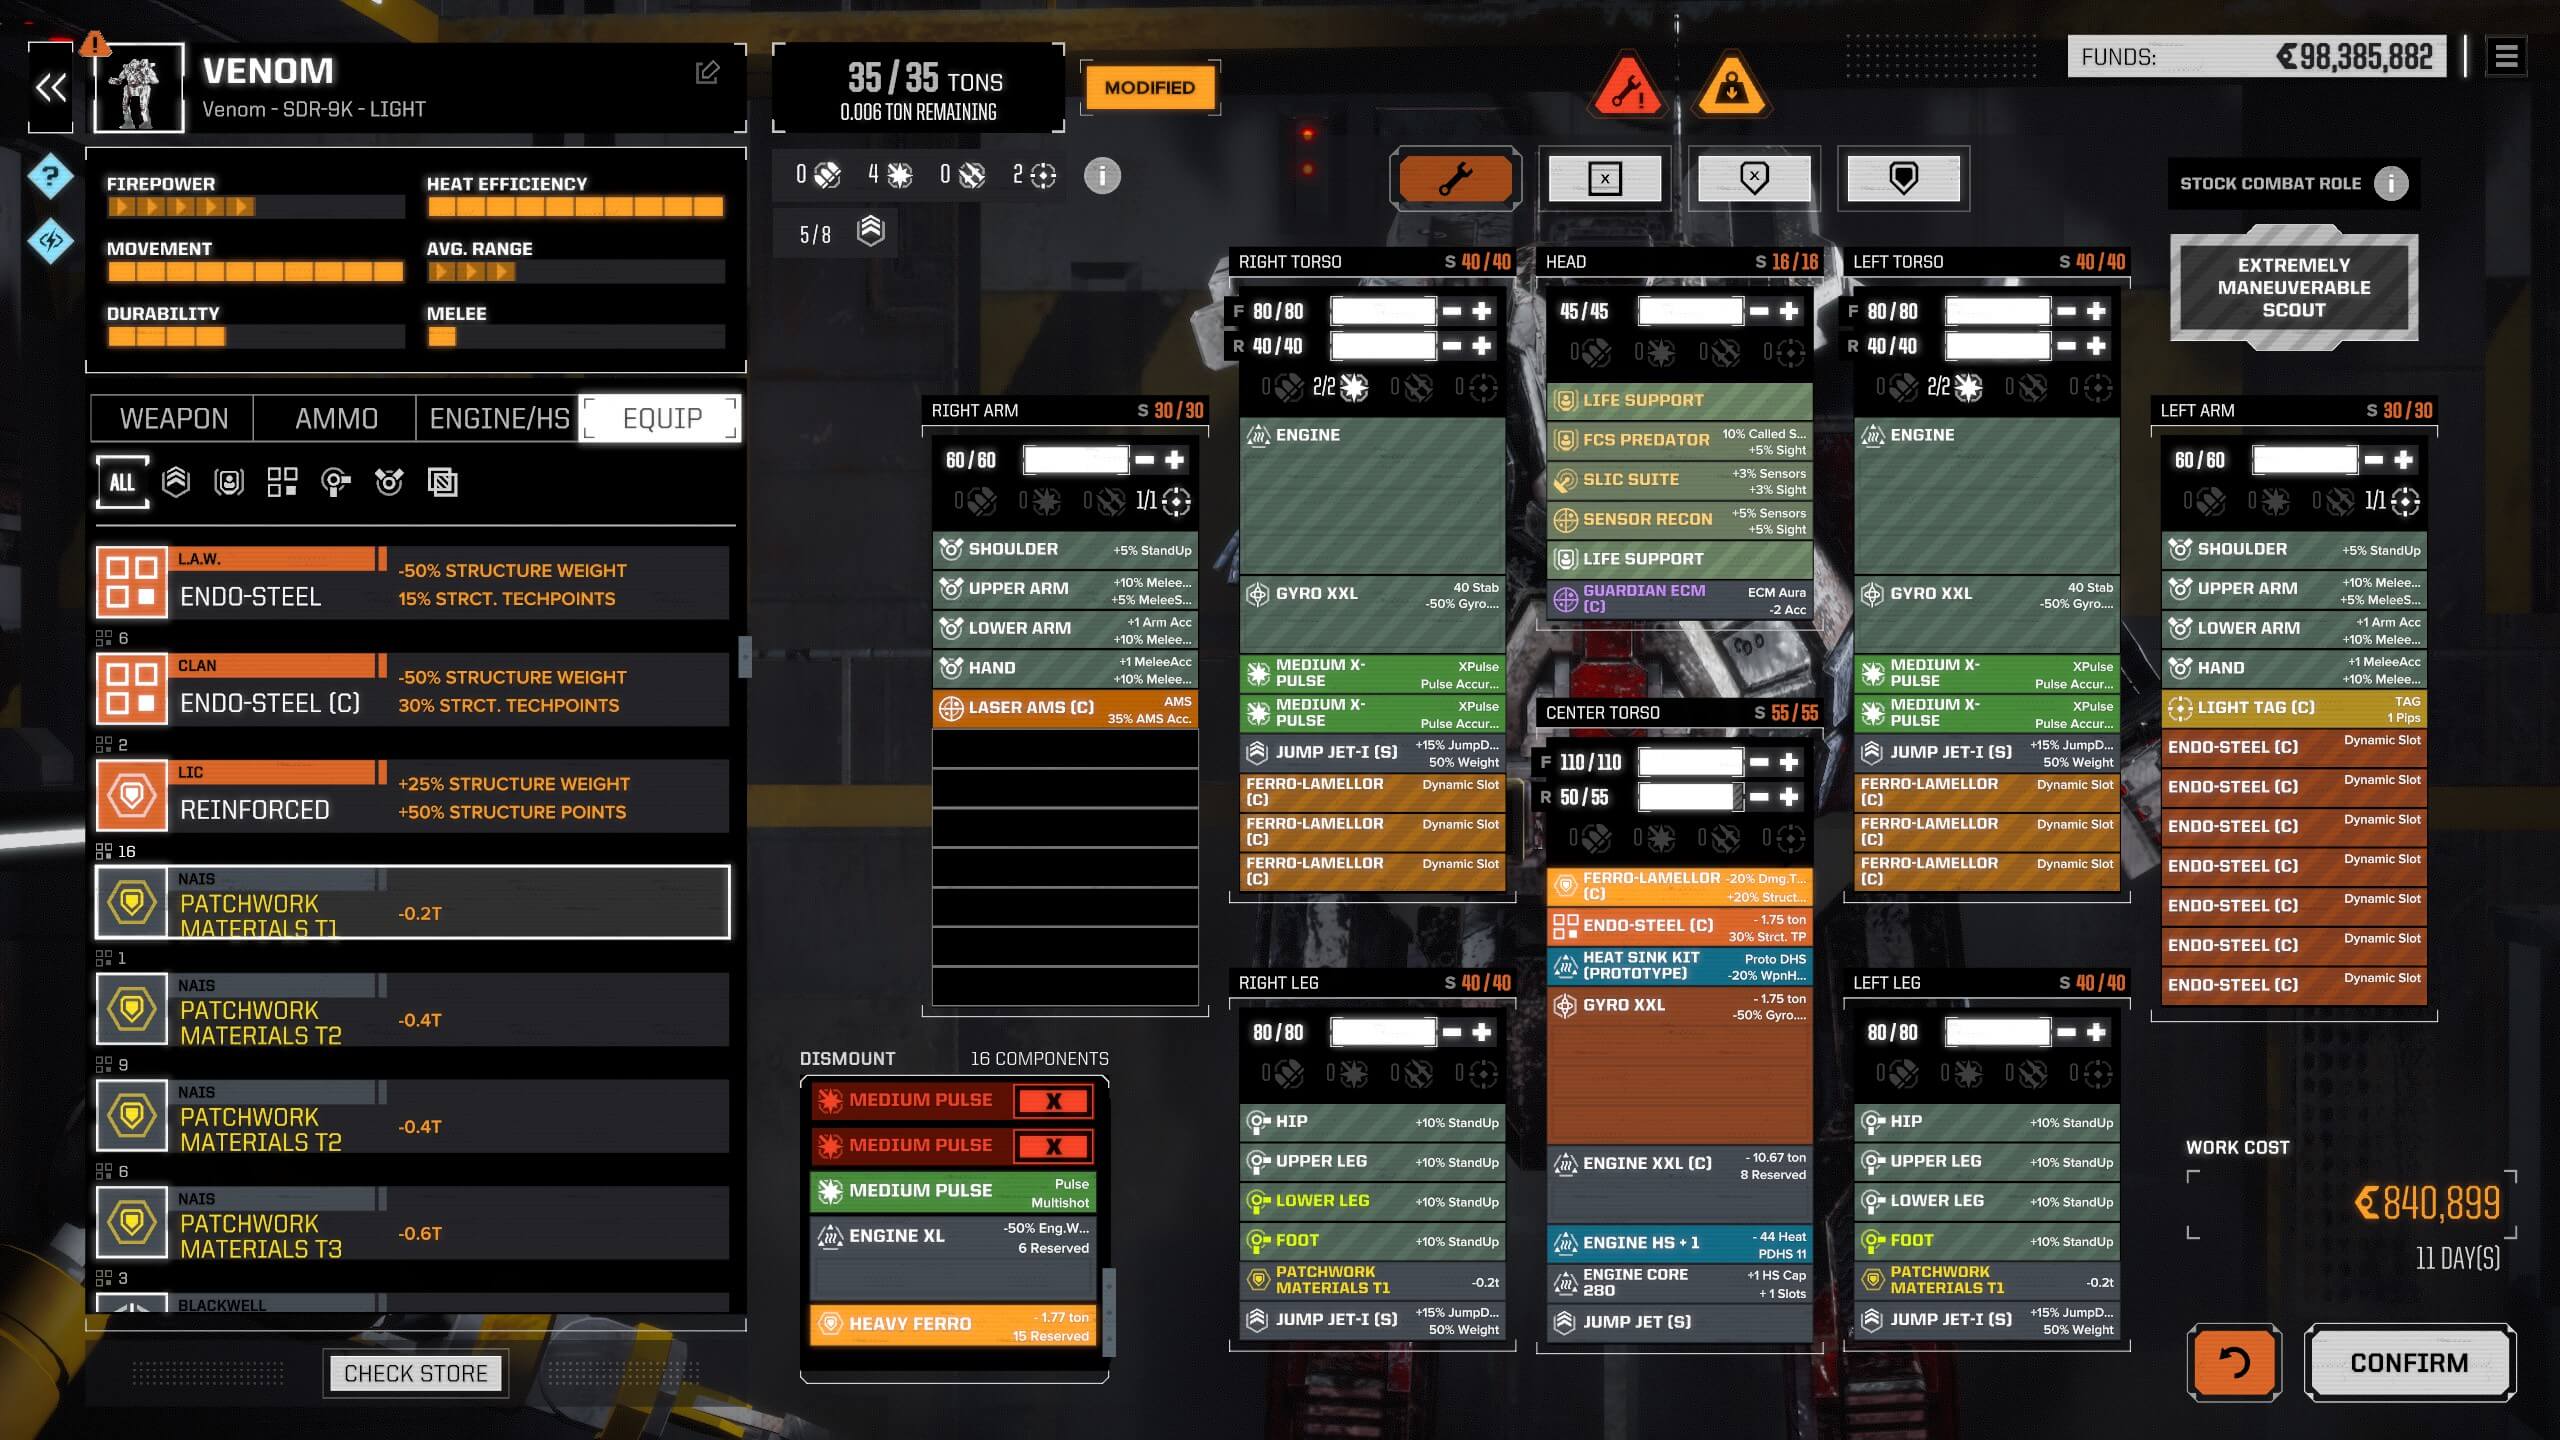
Venom(SDR-9K) Flanker Light.

Venom(SDR-9K) flanking build

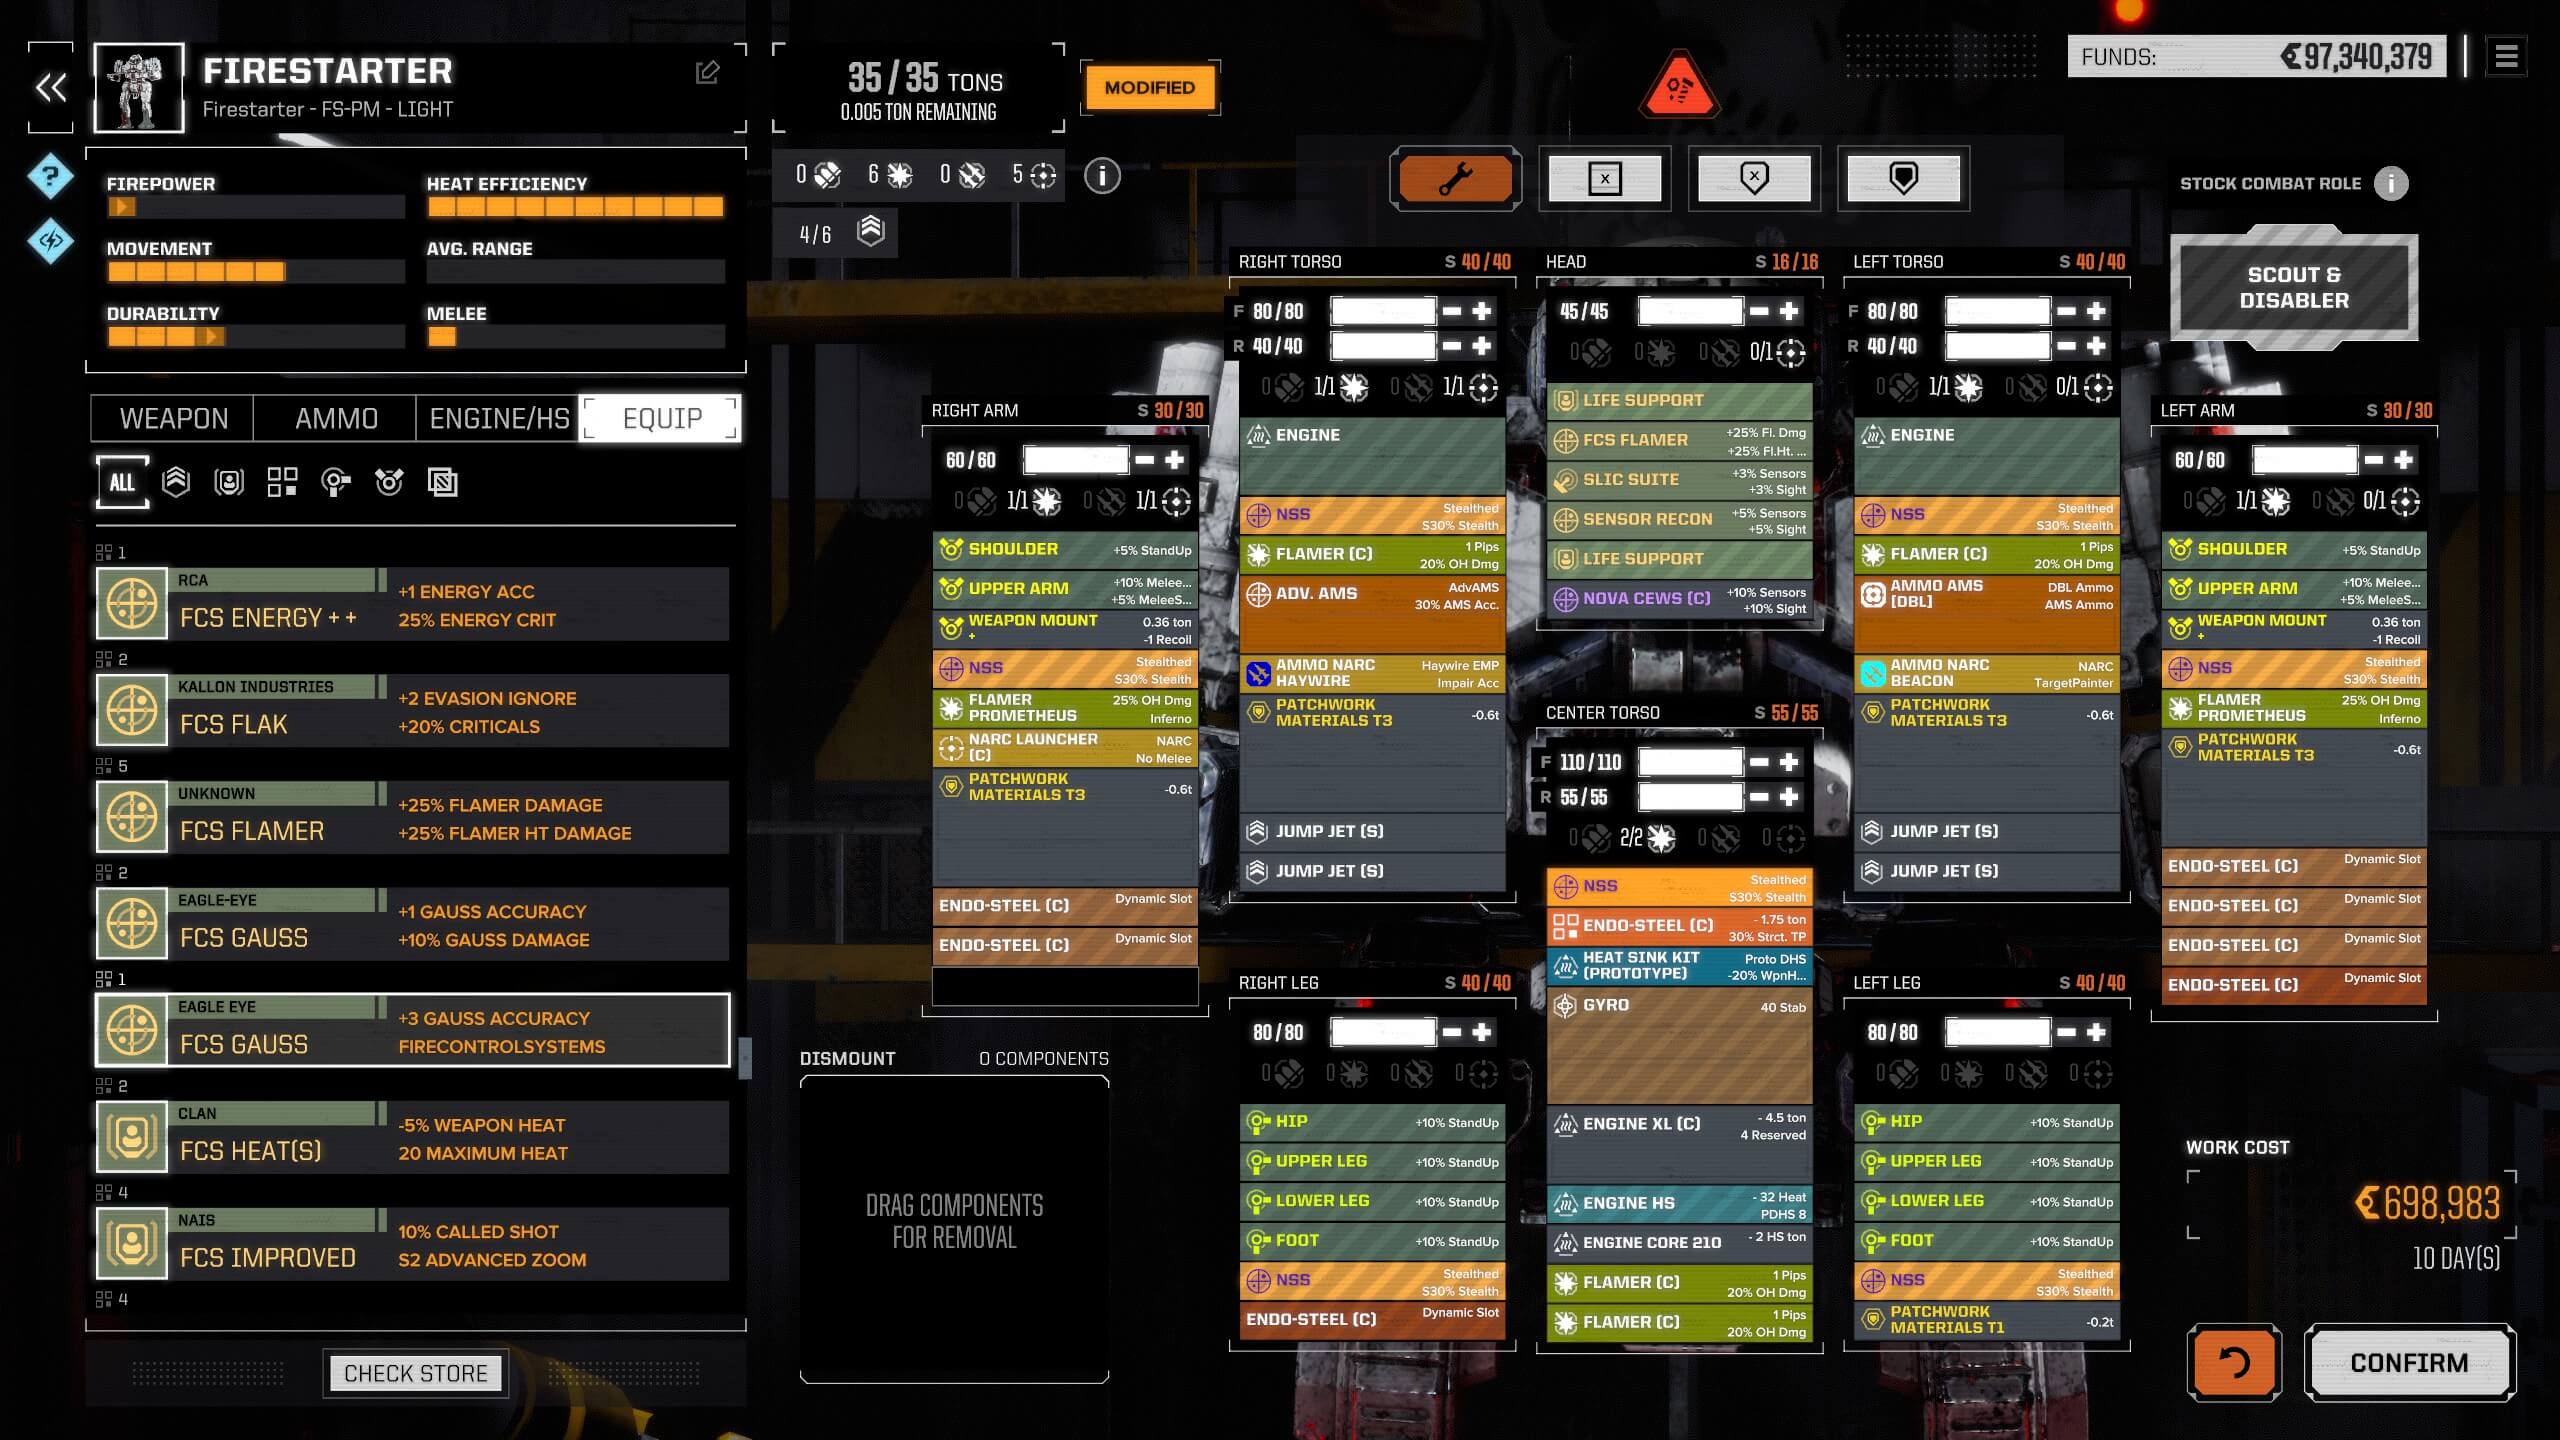
Fire Starter(FS-PM) Recon Light.

Fire Starter(FS-PM) recon and spotter build.

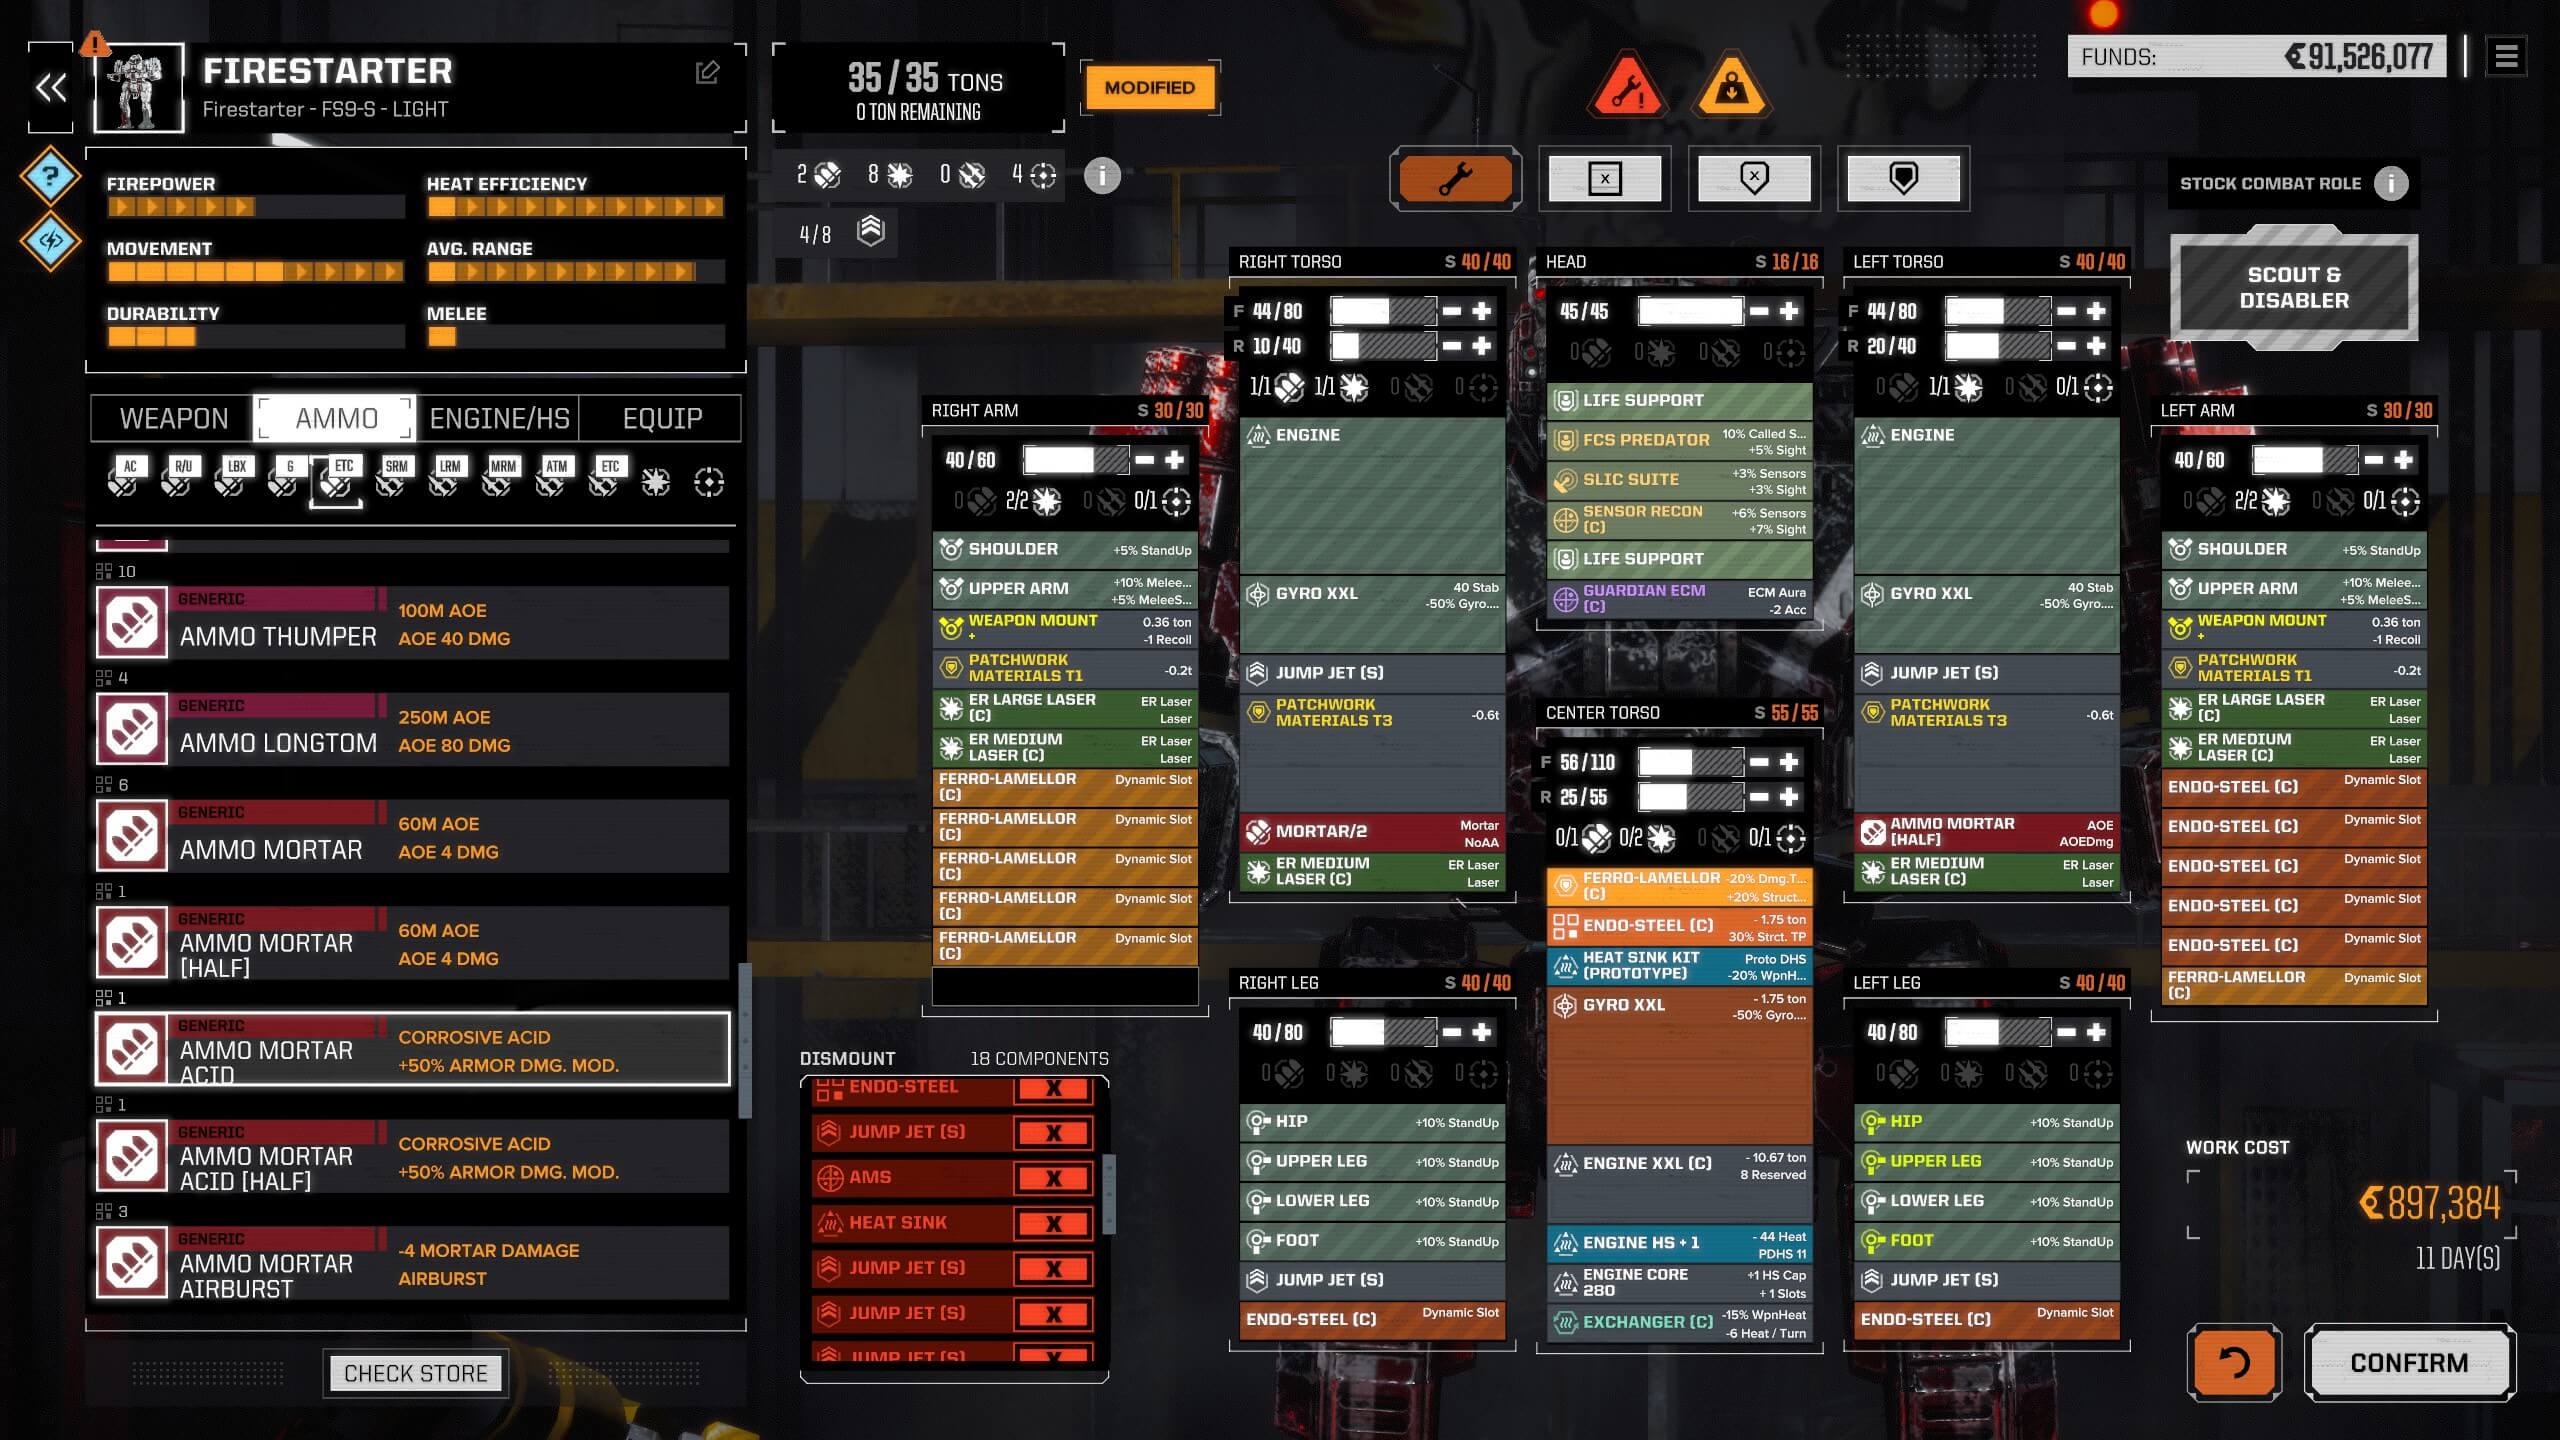
Fire Starter(FS9-S) Sniper Light.

Fire Starter(FS9-S) sniper build

A wide range of builds that can be switched out to complement each other or use a different light mech with similar hardpoints to fulfil the same role. The hardest part will be to crank out as much damage out of a light mech since so little tonnage is available hence why usually light Mech fulfil a support role and damage dealing is handled by heavier class mechs. However, some damage can be dished out but either requires pulse lasers and light P.P.C.'s with plenty of heatsinks or a long-range build but also is centred around lasers or P.P.C.'s with lowering the armour values to mount large lasers and ER PPC's. This Raven Stealth build is for visual, and sensor stealth making it an excellent spotter and comes with a baked-in E.C.M. and sensor suite. The NARC launcher is to mark targets for the rest of the lance or switch to its other support role and haywire and overheat a target. The Wolf Hound is a stealthy damage brawler with a mid to short-range, and this variant comes with a baked-in stealth armour and E.C.M. and sensor suite. The Venom is a highly mobile flanker that ideally get's behind a target and uses Ferro-Lammellor armour to get a damage reduction as well as a T.A.G. to support the rest of the lance. The Fire Starter Recon is similar to the Raven build above but also doubles as lance A.M.S. This build also features six flamers, stealth armour and a NARC/Haywire launcher to provide additional support to the rest of the lance. The Fire Starter Sniper is a variant that uses E.R. large and medium lasers to deal damage at a distance with a light mortar to provide an acid debuff to hostile mechs. The Ferro-Lammellor is to offset the lower armour values; it takes up equipment slots and not tonnage. All these builds, however, use C3 networking either through the Nova C.E.W.S. or Sensor Recon to share information to gain hit % to make every shot count. Lastly, all but one build feature jump jets for better positioning as well as the high ground offers an increased hit %.

Medium Mech builds.

Medium mechs could be used to early-game or late-game for specific mission types or farm mission for C-Bills and parts that have a low skull rating, therefore, have a lower payout and Assault or Heavy Mech would cost more then you would earn. Medium mechs will work best if you use a similar playstyle then Light mechs. The added bonus is more tonnage for more armour and weapons while being able to maintain a similar speed but more comfortable to detect.

Guerilla(BSW-S7) Damage Medium.
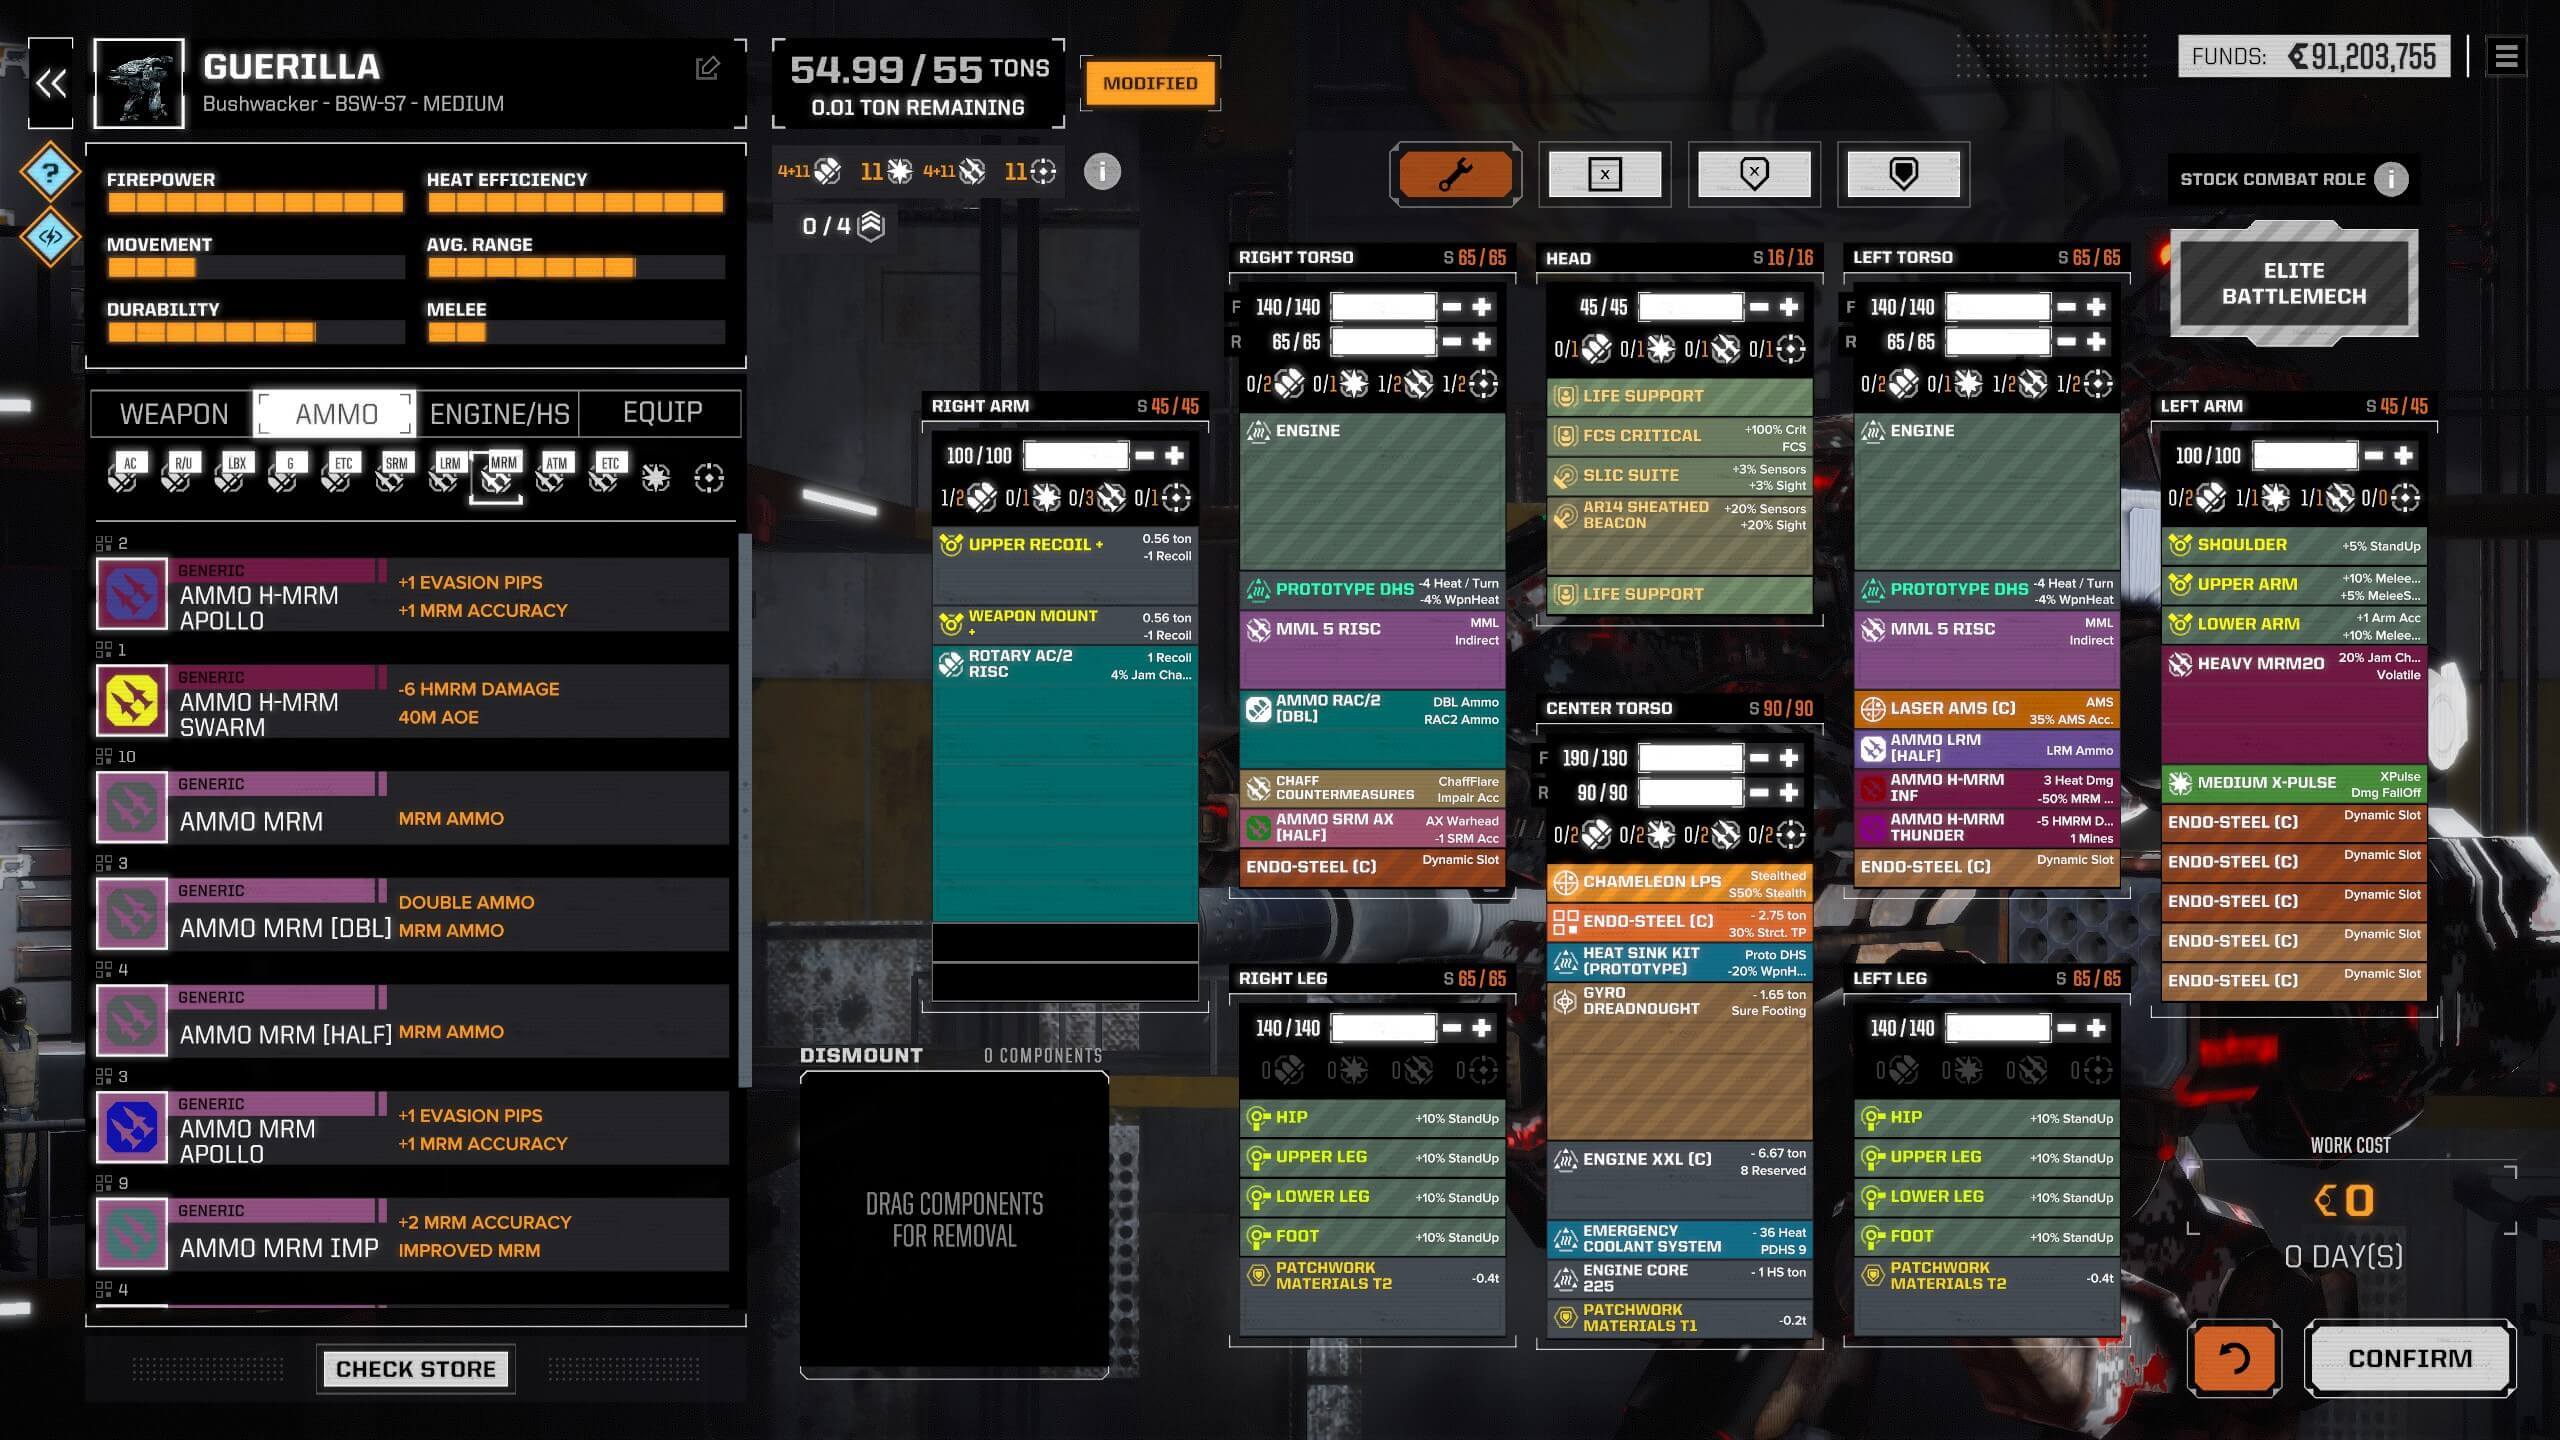
Medium mech damage build

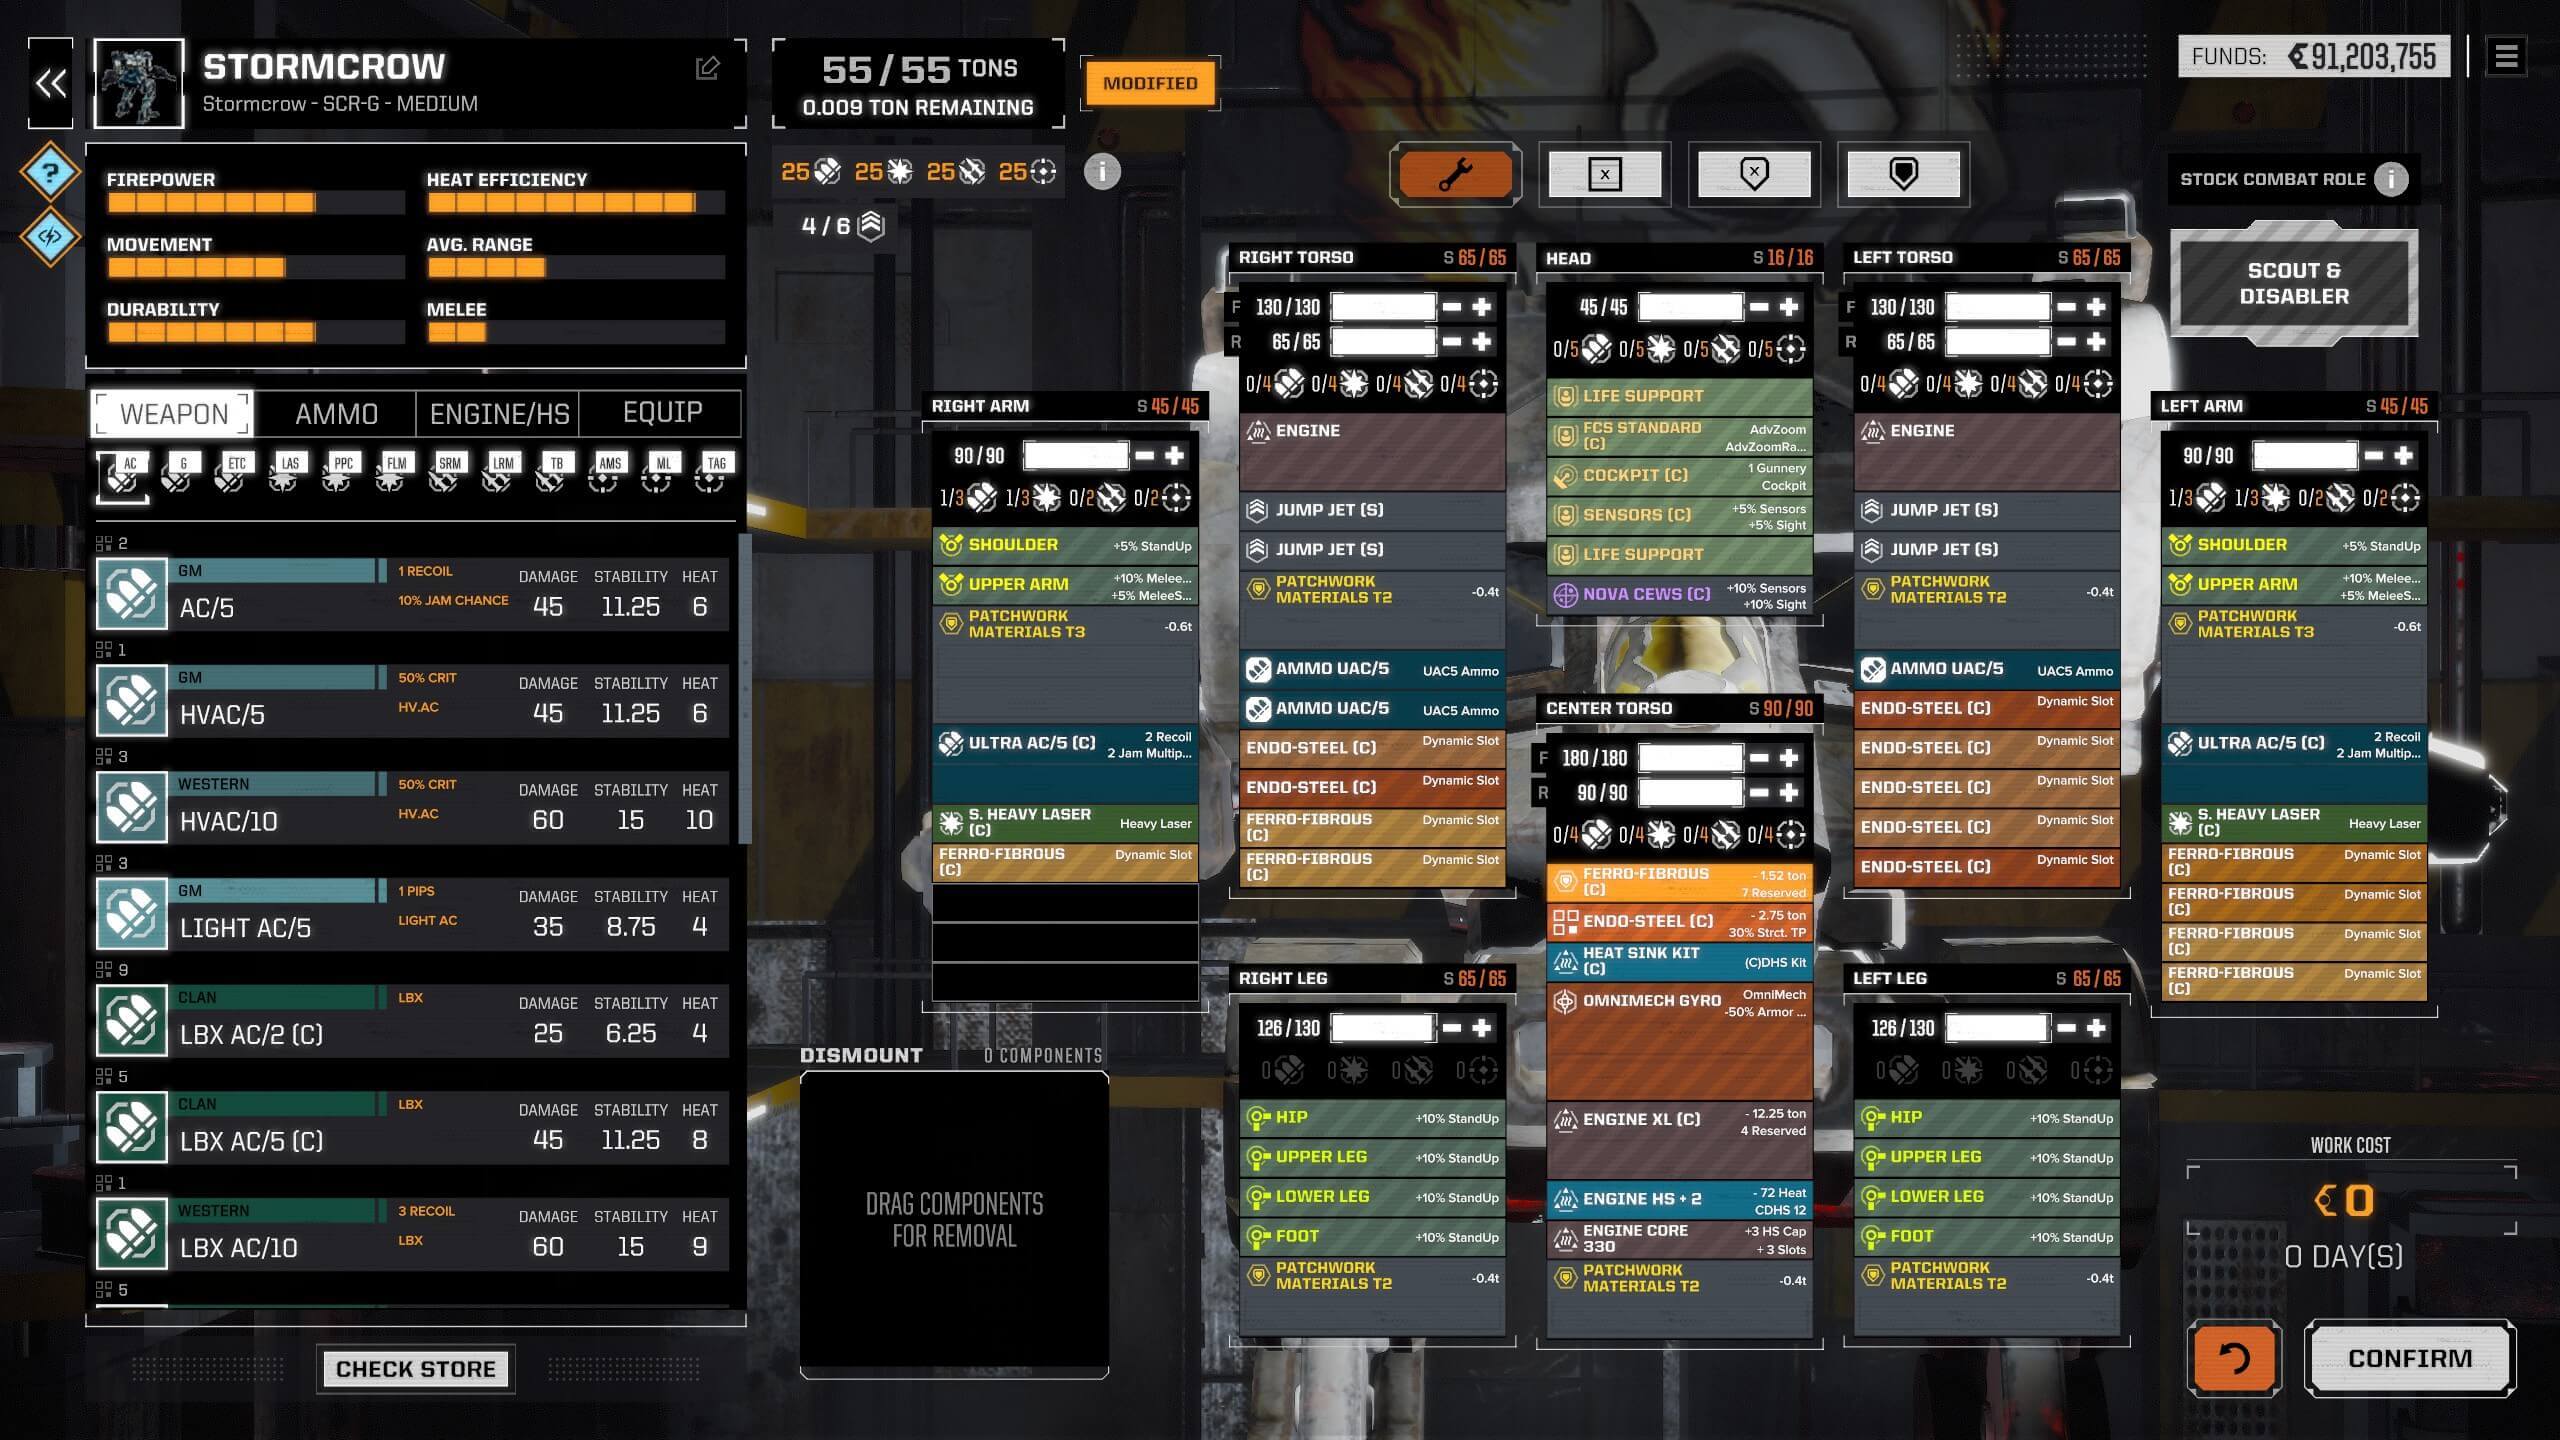
Storm Crow(SCR-G) Medium Flanker.

Medium mech flanker build

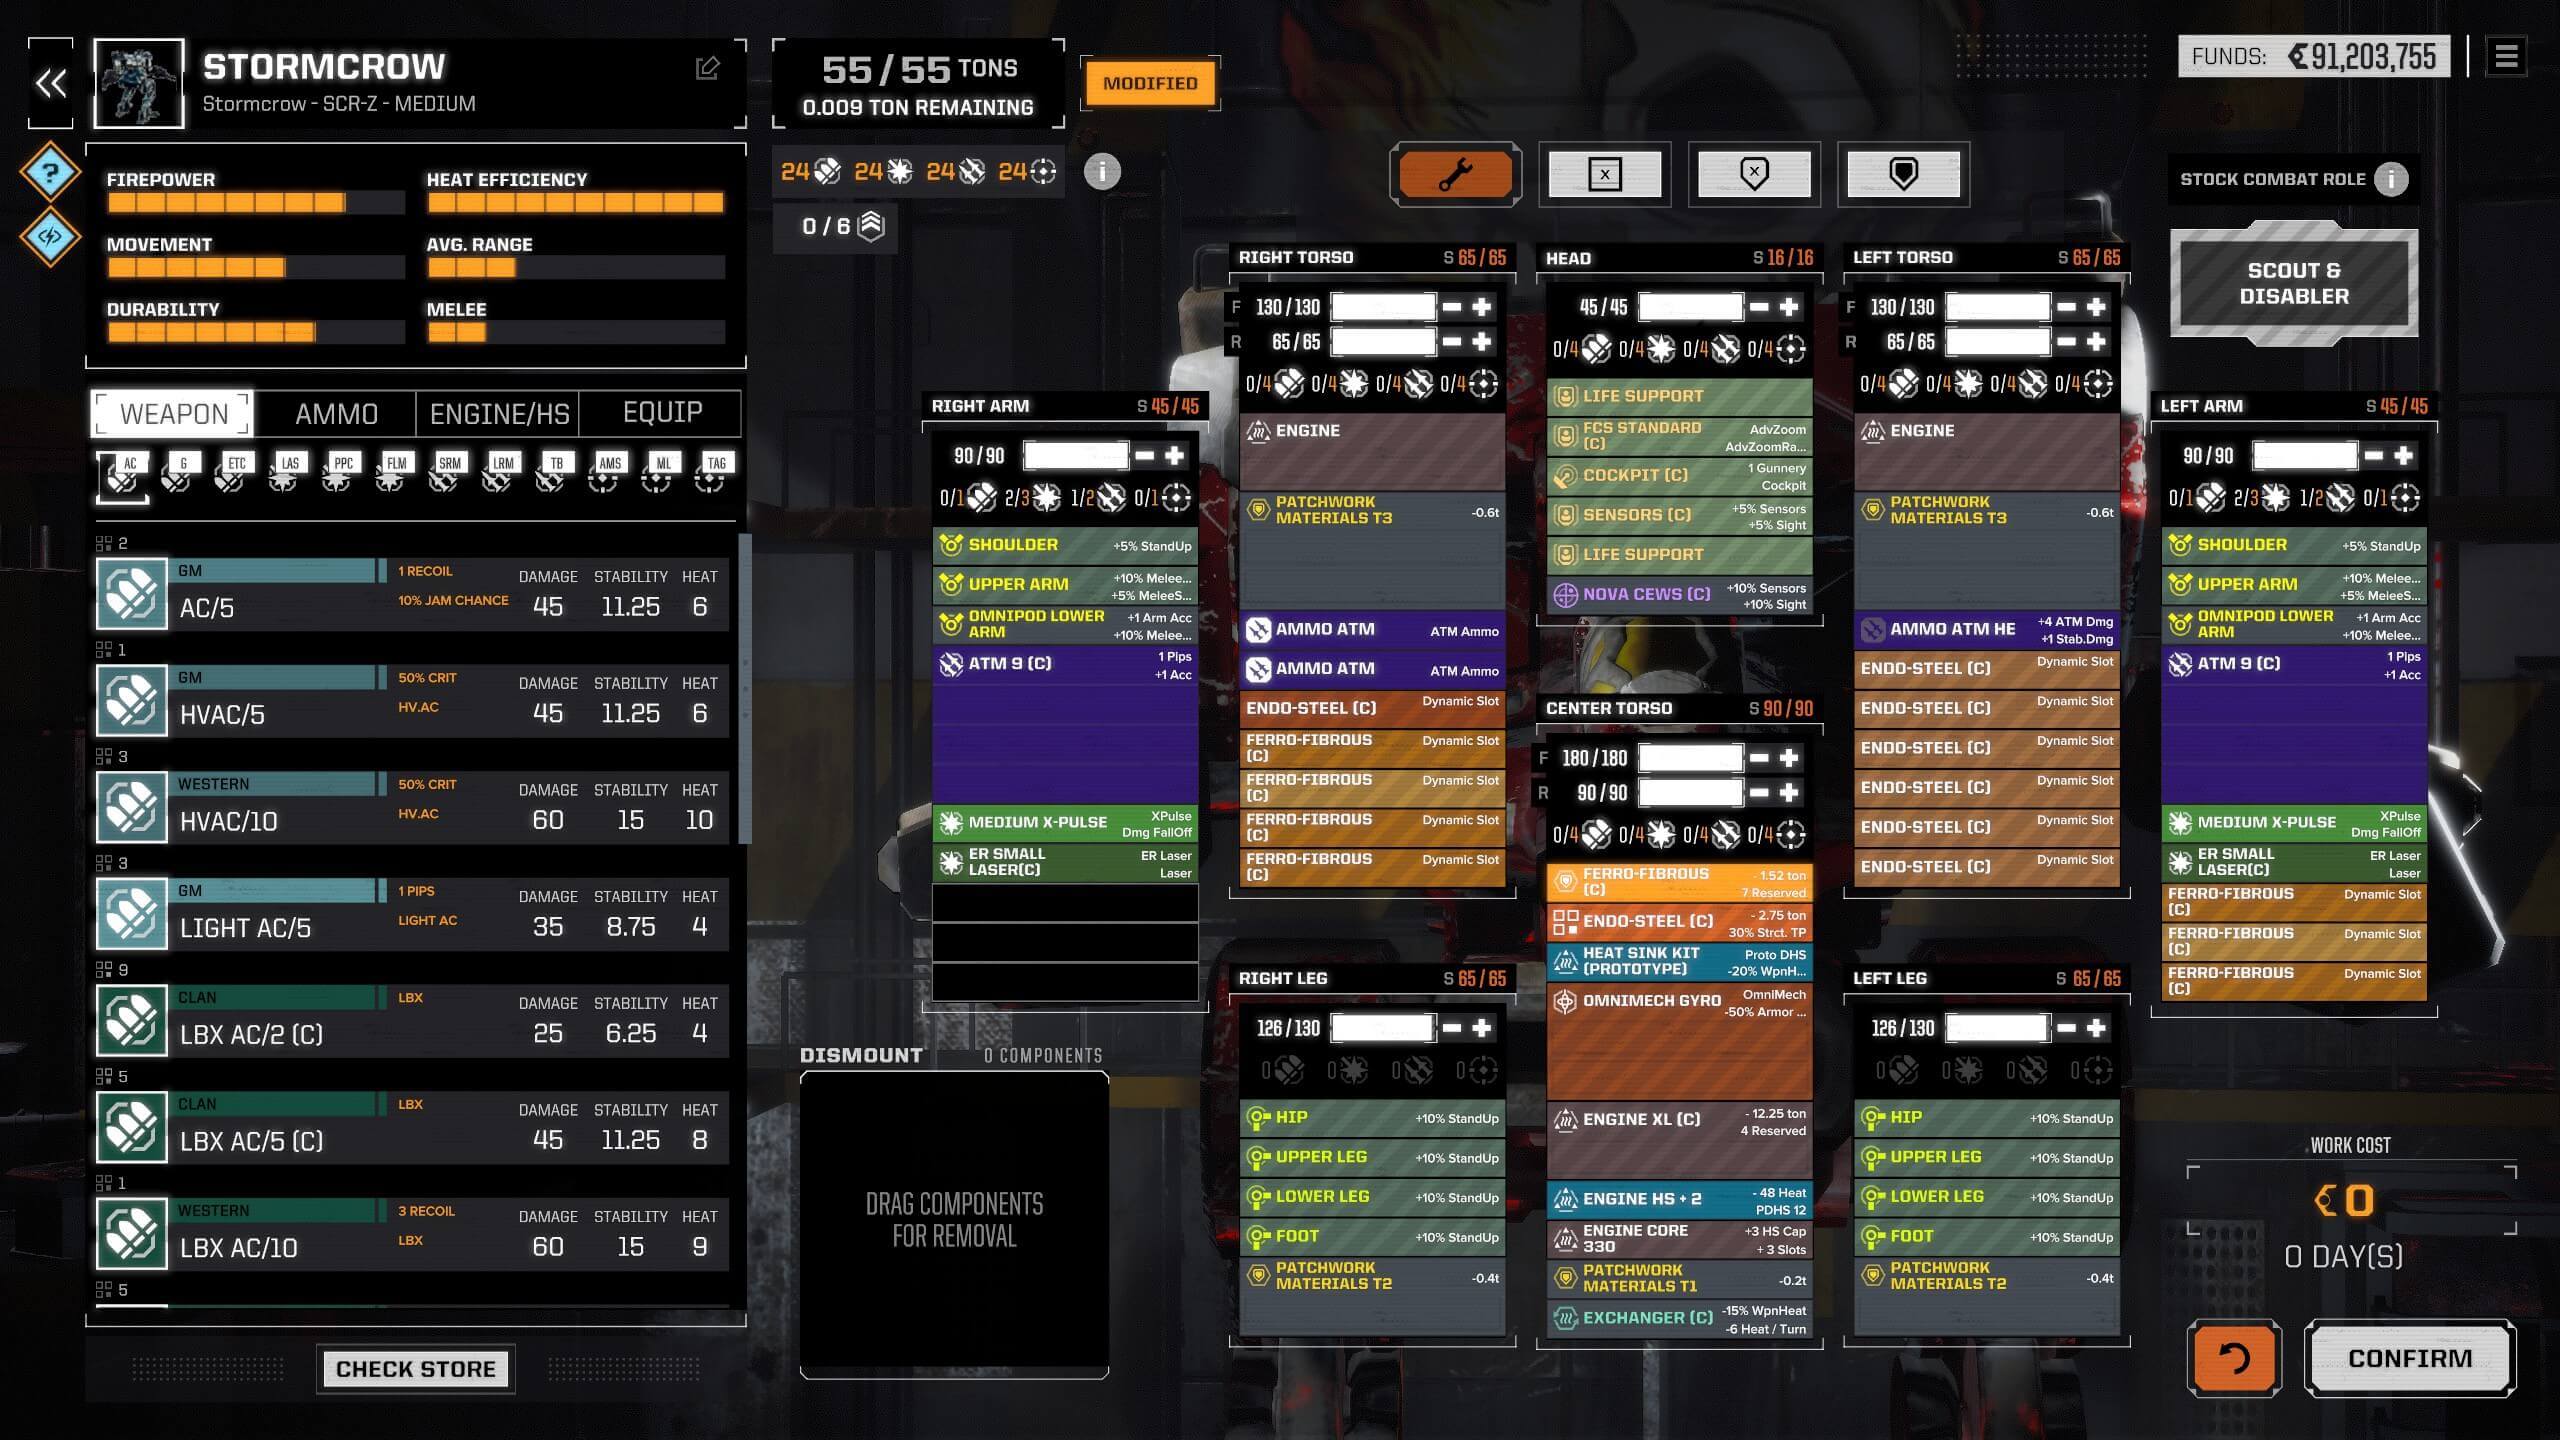
Storm Crow(SCR-Z) Medium Damage.

Medium mech damage build

These three medium mech builds are all centred around dealing damage either moving in together directly or flanking. And they are then disengaging to pick off the next isolated target. The Guerilla is a rare variant of the Bushwacker with lostech and is stealthy to unload it full payload from almost point-blank range doing over 300 damage. It also fits some cluster mine munition to make short work of light mechs and their limbs. The ultra-rare RISC R/AC2 and Heavy MRM20 deal an immense amount of damage but only in close range. The ultra-rare RISC MML5 launcher fire both L.R.M. and S.R.M. munitions are giving you the option for variable range D.P.S. Both Storm Crows are built around D.P.S. while the G Variant is built around flanking with Ulta AC5's and jump jets. The Z Variant is built around A.T.M. launchers. Both Storm Crows use E.C.M. and Sensors with C3 networking through the Nova C.E.W.S. (S).

Happy hunting!
 
The Witcher 3 cover

User Rating: 5 / 5

Star ActiveStar ActiveStar ActiveStar ActiveStar Active

This guide is for the mini-game Gwent that can be found in Witcher 3 The Wild Hunt. The goal of this guide is to provide insight into various strategies you can use to win games from the early start of the game and the "High Stakes" tournament and complete your achievement "Collect them all". There are 5 different decks in The Witcher 3 mini-game Gwent but each will offer a different approach and within each deck, you can have various play styles. The 5th deck was added with the "Blood and Win" Expansion called the "Skellige Deck" and the other 4 decks represent the Nothern Realms, Scoia'teal, Nilfgaardian, and monsters. Of all the decks the Nothern Realms deck is the easiest, to begin with since the other decks require some farming to get the right cards and quantity of those cards. Also, each faction has it's leader cards that offer special buffs to specialize in your strategy. There are also neutral cards that impact the lanes of the Gwent games in the form of weather, Hero's, side characters, decoys, buffs among others. And finally, I will link to some interesting articles that helped me get started and collect all the cards in Witcher 3 The Wild Hunt to further expand your bits of knowledge on Gwent.

Overarching strategies.

At the start of the game, you will receive a starter deck of Gwent cards and the best way to receive more cards is by playing vendors and buying them of vendors these vendors will also play Gwent so you can also win some cards. It is best to travel around first and buy as many cards as you can and then double back to the vendors and play them for their card as each vendor will only drop one card after that you get random items. And then try some of the quests like "Gwent Playing Innkeeps" that drop cards by playing vs various characters who have in general better decks. The best deck for this early phase is the "Northern Realms Gwent deck" since most cards will be from that deck as well as most of the vendors selling cards, also you need a minimum of 22 cards in each deck and 10 neutral cards the latter is however not required. So, in the beginning, you won't be able to use the other faction decks due to the fact you do not meet the required minimum amount of cards in your deck even if so they might be too low in unit strength to win Gwent games and the 5th faction is from the Blood and Wine expansion you will unlock later on.

Start Mastering Gwent:

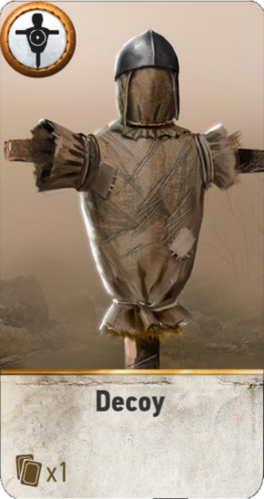
  • Decoy cards: Remove a friendly card from the playing field so it can be played again. Great to retrieve opponent spy cards so you can play them your self or after your opponent uses a decoy card to retrieve your spy card and then plays it so you can retrieve again you can do this as long as you have decoy cards. It also works for the Medic cards so that you may play the Medic card and retrieve it and play it again to retrieve more units that were destroyed or used in a previous round.
Decoy
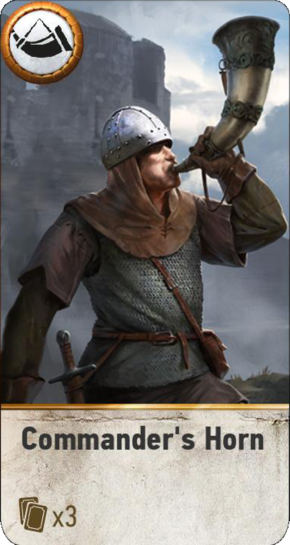
  • Commanders Horn: Limited to one per row and doubles all units in that row, excluding Hero cards. Good synergy with Medic cards who can retrieve discarded cards.
Commanders Horn
  • Spy cards: Place a card on the opposite side to receive 2 random cards from your deck, however, this will count towards your opponent total points. Great synergy with the Decoy card to buff your hand with more cards from your reserve can include any card so Hero cards also can appear.
Spy Card
  • Scorch cards: Kills the strongest cards including friendly cards. Great vs Monsters and Scoia'tael decks who rely heavily on Muster cards. But be aware is will kill all the strongest card so when you play it for instance vs a play of Muster cards with a strength of 4 and you have a card with a strength of 4 those will also be discarded and when you have a higher unit strength card it will only kill that card and not opponent card with a lower value.
Scorch Card
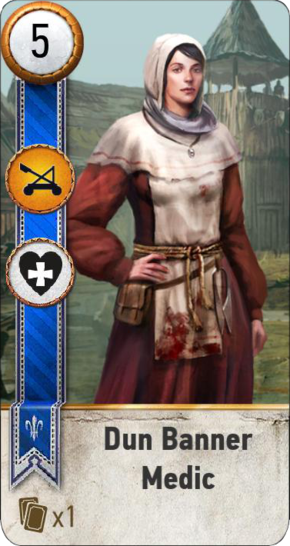
  • Medic cards: Revives one card and plays it instantly no hero(Witcher, Yennefer, etc) or special cards(Scorch, Decoy, etc) and weather(Biting Frost, etc) cards allowed. Great synergy with all regular unit cards combined with the Decoy card you can keep retrieving cards as long as you have decoy cards to retrieve the medic card.
Medic Card
  • Tight Bond cards: Doubles the strength of all cards with the same name. One downside is that you need at least 2 cards of this type for the bonus to count on the field if you only have one make sure to reroll it at the start of each game.
Tight Bond Card
  • Muster: Place one card on the field and it will pull all cards with the same name from the deck even if they're not in your current hand. Great synergy with Commanders Horn card since you only need to play 1 Muster card to field ALL of the same name cards. However, be sure to only have 1 in your deck at the start of the game if you have more than reroll that card for maximum effect. Retrieving the card with the Medic card also does not play the entire set from a previous round or discarded card from Scorch.
Muster Card
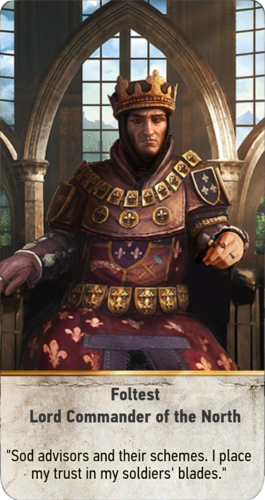
  • Leader card: Foltest: Lord Commander of the North, clears all weather effects allowing you to drop the Clear Wheather cards freeing up space for Decoy cards, Scorch cards as well as one type of weather card best suited for your current deck composition.
Leader Card

Hero cards: You will have none at the start but some might randomly drop from won Gwent games but most have to be won in special quests that tend to be harder to win. And is not affected by any positive(Commanders Horn, Decoy, Medic) or negative effect(weather cards, scorch) from any friendly or opponent card. This works great with Biting Frost if you have a strong front line Hero card line up so you can play the Biting Frost card without a negative effect but in return, the Commanders Horn will not work nor does any other buff.

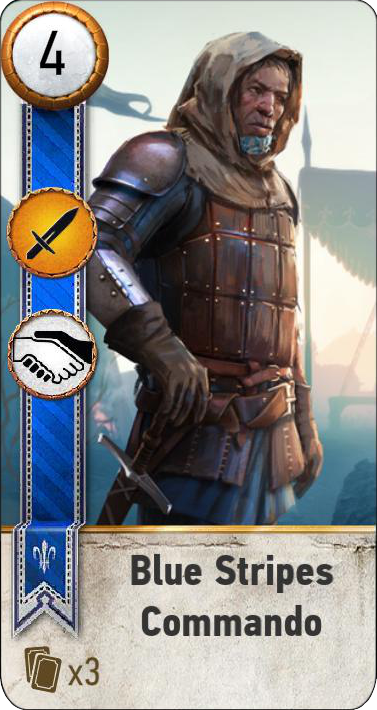
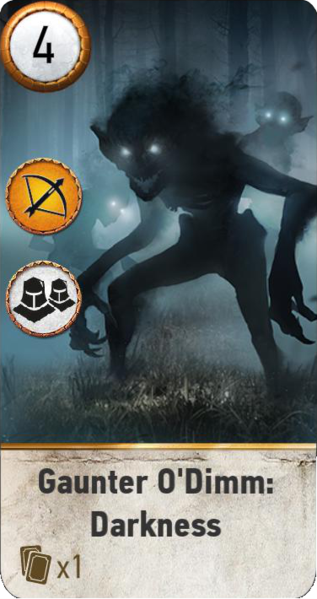
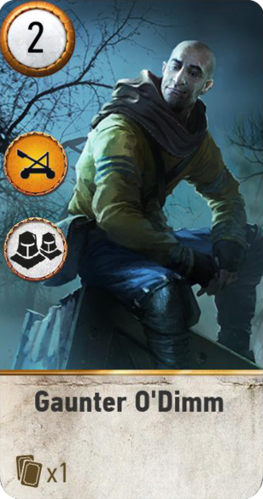
Even with the other factions special cards such as Decoys, Spy's and Scorch synergizes well however it will require a different play style something that will be covered later on in this Gwent guide for The Witcher 3 Wild Hunt. This setup is for mainly for the begin of the game but it can be used later on as well with more powerful cards. And remember to only have 22 cards and ensure those cards have the highest possible unit strength. Excluding special cards like Muster and Tight Bond make sure to count their total play value, for instance, Blue Striped Commando's have 3 cards(3 duplicates) times 4 unit strength giving a combined strength of 36 and can be doubled with the Commanders Horn too 72. And the Muster cards such as Gaunter O 'Dimm Darkness has a set of 2 duplicates with a unit strength of 4 each but have a total value of 8.

Making combinations, the basics.

This deck composition is for the very beginning of the game and will contain cards you get in the base deck and then you will need to travel around to buy fro various vendors if you a are low Crones you can farm some world events marked with a ? for some loot and seel those at a vendor and then buy the cards he or she sells. And then a selection of cards you can win/find in the early game to buff up your Gwent deck strength. And a basic rundown of some strategy's you can use in the early game to win more cards after you exhausted the vendors by buying their cards.

Base Deck, 22 Unit Cards, 10 Special Cards combined unit strength 111.


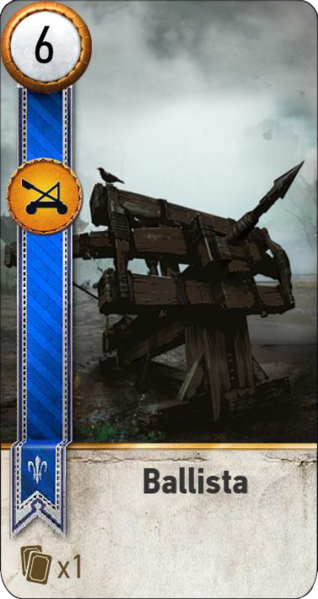
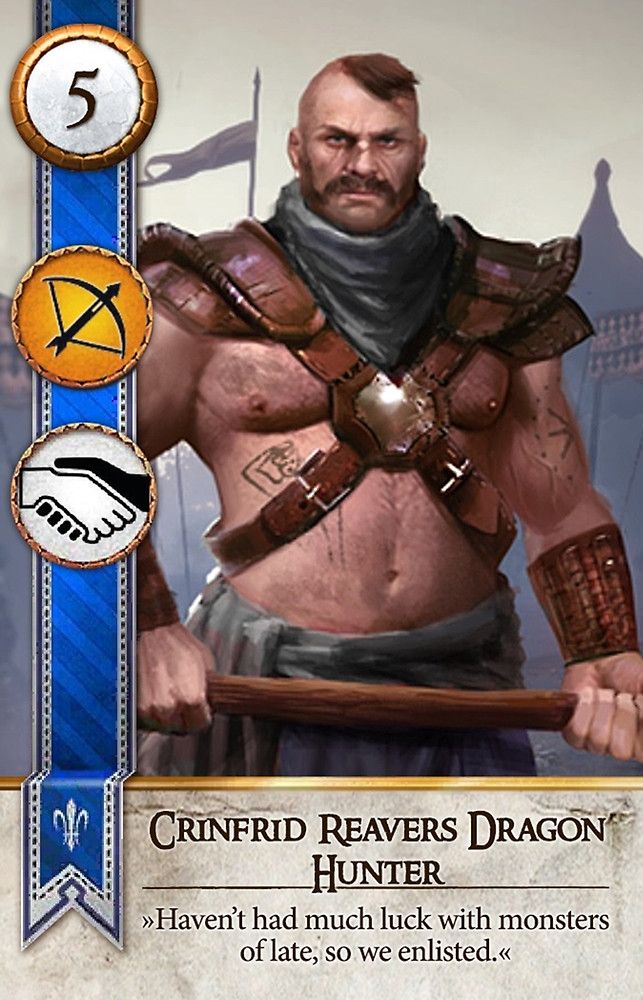
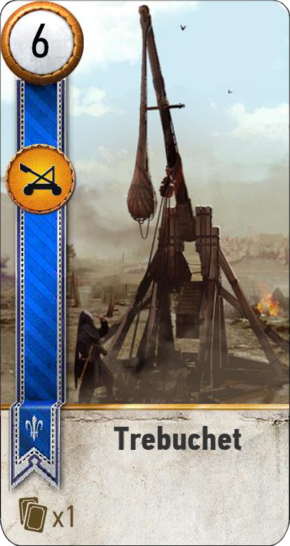
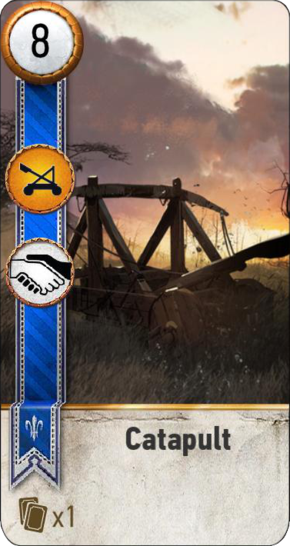
The deck furthermore contains duplicates of the following: Blue Strip Commando's x 3, Gaunter O'Dimm Darkness, Crinfrid Reavers Dragon Hunter x 2, Catapult x 2, Trebuchet x 2, Ballista x 2,  any Wheather cards(I prefer biting frost) x 2, Decoy X 3, Commanders Horn x 3, Scorch x 2. My version of the game is bugged so I am missing 1 x Cinfrid Reavers Gradon hunter. 

With this deck is it very important to use your leader card ability for the most part in the 2nd or 3rd round. With the weather card to be used as well in the 2nd or 3rd round trying to force your opponent to play their weather cards or clear weather card(s) in the case without option, you can play any of your weather cards to wait out your opponent. Scorch card is especially harmed full for your Muster and Tight bond unit so either wait with playing those or play a higher card to block Scorch from hitting your Muster and Tight bond cards as well as trying to have higher card to match the unit strength number of your opponent making it less likely to play the Scorch card but this works both ways so use with care. Since your starter deck does not hold much Spy or Medic cards you can also use them to pull a card from the playing field to wait out a turn but watch out that this does not expose any of your other cards to the Scorch card on the playing field. Or use the decoy's to replay the opponent spy cards, the opponent will use decoy on your Spy cards so you can retrieve a spy card using decoy again and play it again and again as long as you have Decoy cards. If you do not have any Spy cards in play you can use it on the Medic card in the 2nd or 3rd round to retrieve other cards, simply use the Decoy card to retrieve the Medic cards and play them again. Also, a nice way to gain the upper hand is using the Scorch card to remove an opponent Spy from your side of the playing field and retrieve it the next round using the Medic card so it will automatically play to the opposite side and you get 2 more cards. Weather cards can also be nice to hide your Muster and Tight Bond cards from an opponent Scorch card by lowering their value and hide them behind an opponent or friendly cards. The Commanders Horn cards are great to boost unit strength numbers but only do this at the end of a round and wait out the opponent moves so that you can not be hit with a Scorch card since doubling the unit strength will make them stand out and vulnerable to Scorch cards. But remember to use your Leader card skill to clear the weather to get the full combined unit strength of that row. Also important to here is to note that winning a round grants you one random card from your reserve deck but this only goes for 1 round per game.


Northern Realms Gwent Deck.

 In the final stage of the game trying to complete quests such as High Stakes can be a challenge and should only be done after collection of all the Hero Gwent cards that can be obtained by various quests during linked above. By now you should have gained substantial playtime with the Northern Realms deck and for many probably your go-to deck when playing more challenging Gwent quests. Not much will change over the above described overarching strategy you will do pretty much the same but with a more powerful deck more tailored to that overarching strategy. Some key features listed below.

  • Minimalistic deck: Only bring the bare minimum of cards, that of 22 unit cards and 10 Special cards.
  • Spy playstyle: Using Spy cards(4 in total) to gain the advantage by simply overwhelming your opponents with more cards.
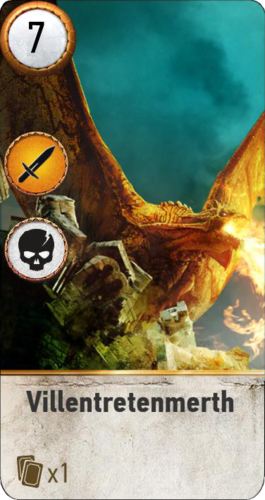
  • Biting Frost: With a full frontline of hero's that are not affected by Biting Frost except for your Spy cards and the Villentretenmerth card.
  • Scorch tactics: Using the special Scorch cards and the Villentretenmerth card to remove the opponent's cards.
  • Swarm Tactics: Using 2 sets of Muster cards to gain a high probability of getting at least one Muster card to play one card to gain 3 to 4 cards that can be buffed with the Commanders Horn.
  • Leader card makes it almost impossible to be affected by opponents Weather cards.

 Deck Composition: 22 Unit cards, of which are 8 Hero cards, 10 special cards, with the total strength of 144.

Front Line:


Ranged Units:(3 x Gaunter O'Dimm Darkness)


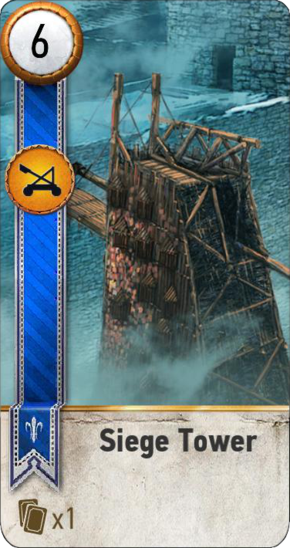
Siege Unit cards:(2 x Catapult)


Weather cards: (2 x biting Frost)


Special cards: ( 3 x Decoy, 3 x Commanders Horn, 2 x Scorch)


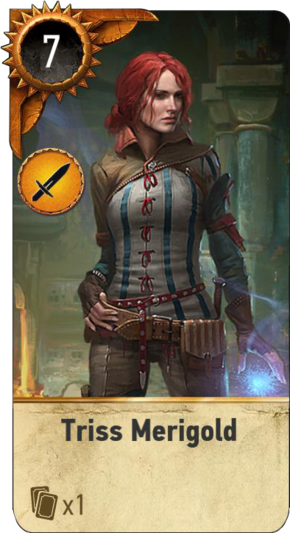
Very strong deck setup with a bit of luck getting to play all your Spy cards multiple times and soaking up some opponent spy cards combined with the Decoy cards. If you are do not have Decoy cards left you can opt to use the Medic cards to play more Spy cards in the next round(s). All in all, you can play 4 spy cards from your initial deck, then recover 3 more Spy cards with your Decoy's and play 2 Medic cards to regain 2 more Spy cards for a whopping total of 28 cards. Of course, this will be rare but it shows what potential this deck has with just using this tactic. Your Close Combat cards being mostly comprised of Hero's will make it impossible to be vulnerable to Scorch or Biting Frost. But be aware this will not block Scorch type cards from hitting your other none Hero cards. If you have Decoy cards leftover you could opt to use them on the Dun Banner Medic cards to recover cards from a previous round or Scorched cards. As well as using Decoy cards on the Villentretenmerth card. Another nice feature here is the Gaunter O'Dimm Muster cards but remember only Gaunter O'Dimm(Siege card) will play the Gaunter O'Dimm Darkness cards and not the other way around. The Commanders Horn cards will do nicely on your Siege cards especially if you can draw both Catapult cards. But be aware that boosting none Hero cards will make them vulnerable to Scorch cards so it would be wise to play the Commanders Horn when an opponent has passed around or has no cards left to play. Also, make sure that if you are affected by an opponent weather cards to remove the debuff before playing Biting Forst cards or you will remove your own Biting Frost. There is one card I did not manage to get and that is the Phillippa Eilhart Hero card you could opt to replace Triss Merigold if you do have it since it has a strength of 10 over the strength of 7.


Nilfgaardian Empire Gwent Deck.

-Coming Soon-


Scoia'tael Gwent Deck.

 -Coming Soon-


Monsters Gwent Deck.

 -Coming Soon-


Skellige Gwent Deck.

 -Coming Soon-


Strategy's Case Study.

This section is dedicated to a case by case study where there is a video of a hand of Gwent and a short description of pro's and con's for each round and diving deeper into the strategy playing with various faction decks versus various faction decks. While no hand of Gwent is the same in the Witcher 3 there is an overlaying strategy and the videos are there to show you an application of various strategies to offer insight as well as a briefing.

-Coming Soon-


Star InactiveStar InactiveStar InactiveStar InactiveStar Inactive

Operation PitchFork Strategic Battle-plan.


Introduction:
My own initiative to ponder on the options based on current data taking into account assets as described on the Operation PitchFork website.
The plan will cover the generic formation of units, recon and intel gathering planning and planning for ship boarding and large-scale troops deployment on planets to secure portions or the entire planet.
Operation PitchFork states it wishes to deploy around 100.000 players in the entire operation, might be more or less but a large volume of players will be present.
Furthermore, there will be no grand armada, it will be more a loose formation of countless players.

Besides this white paper, I am also working on a study on analyzing SC ships.
This white paper is up on the Operation PitchFork Forum and my own website.
It will be a continuous project and I will be adding new chapters as I go along.
Everything is subject to change, SC is still early Alpha anything and everything can change.

I draw experience in advising Armed Forces worldwide, but I specialize in small unit and guerilla tactics.
Some of my "work" has been taken into account fighting ISIS and forming the NATO rapid response Brigade in Europe.
My rework of Headquarter Command units has been employed both in NATO members countries and none NATO member countries.


I. Enemy Intel, species case study.
II. Battle Formations.
III. Recon and Intel, the gathering and processing of intel into a fleet-wide format.
IV. Staging and Supplies.
V. Phase 1, Getting into Vanduul Space.
VI. Phase 2. Forming Beach Head(s).
VII. Phase 3. Securing Systems and Planetary Assault(s)
VIII. Phase 4 Consolidating and Reforming.
IX. Phase 5. Retrieval of enemy assets, harvesting technology.
X. Phase 6. Withdrawal to UEE space, Securing a System(s) to be incorporated in UEE space.
XI. Phase 7. Retrieving and dislodging of friendly assets.
XII. Standing down.


Chapter I:

Lore on the Vanduul is fairly limited and mostly subject to change.
This chapter will probably be the last chapter finalized when more is known/released.
Under normal circumstances, this is where any planning begins, behavior and physiology study.


Chapter II:

In the SC verse, the main force would consist of a Navy with Marines and Army forming the ground forces.
Note there is a difference in terms make sure you know what term you are using to prevent confusion.
A Navy Squadron differs from an Air Force Squadron, a Regiment while listed separately is about the same as a Battalion but due to heritage or branch, these might be different in size.
However, they are usually fielded in a Brigade structure.
An easy and well-written piece is found on Wikipedia here: https://en.wikipedia.org/wiki/Military_organization#Formation

Chapter III:

The gathering of intel by reconnaissance or a more traditional intelligence agency type.
However, Recon and Intel are usually boring and take patience forget about the colorful hot/cold recon type of language.
That is a myth, Recon is the absence of combat when combat occurs this means you have been compromised resulting in a partial failure of your mission., complete failure if captured or killed.
In order to properly study your prey, you need to observe them undisturbed.
Then and only then will you be able to learn patterns, what then leads to finding valuable secrets.
You will only find secret bases, command posts by carefully tracking and monitoring.
If you are spotted they might and usually relocate those valuable assets.

The terms Force Recon does not mean per say combat, it means you bring considerable firepower.
This serves the purpose of deterring the enemy engaging your positions, quickly smashing through weakly defended area's, mostly used directly at the front line to scout ahead of the main body.
But prolonged engagements are usually avoided this is a mission for combat units.
Force Recon is also employed screening and scouting out flanks of independent formations.
Furthermore, this means while being able to field considerable firepower mobility and speed are key.

In short forget about glorious battles, if there is one it will be for your life.
Recon is boring and takes a lot of patience but is invaluable to any military operation.

But then you are half way all the knowledge in the world counts for nothing if it is not processed and archived so it can be used appropriately.
Also important is to double check and follow up on information deemed valuable.
Ensure that educated guessing and gut feelings are refined into real data, the assumption is the mother of all fuck-ups.
Ensure all data is tagged and assigned to a sector/planet but that is may overlap since convoys might cross several sectors and birth several planets/stations.
Also why it would be wise to have 1 single body handling this vital task to ensure 1. information is shared at all times, 2. no mistakes are made, no information is faulty, 3. No competition over resources.
What other teams might do is up to them but you must ensure that the foundation of the operation is sound.

Now let's look how you apply these somewhat generic rules of thumb to SC.
How would you use a ship of a given type for recon and intelligence gathering?

Exploration Ships.
The main staple of the prolonged process of gathering information and mapping Vanduul space.
Have units/cells of 4 to 8 that can take shifts for long duration, carefully mapping the area then deploy to a planet's surface.
Furthermore, you will need to find new jump points in order to access Vanduul space.
Any known entries will be guarded, you want to sneak in and hide in an Asteroid belt.

Ships you will be fielding are Carrack. 600I, Constellation Aquila, Misc Freelancer Dur.
You will also need ground vehicles to explore planets and perform scans, those come with the above-mentioned ships.
Smaller ships can be used for short duration and reinforcing current operations.
Also, continuous monitoring of explored systems will be required this will be very useful to have on hand a large pool of small jump capable ships that can monitor systems.

Stealth Ships:
Stealth armor will only be used for force recon operations screening the main body.
They do not possess the electronics for long range scanning or long endurance.

Other ships:
While you will not use these, for the most part, there might be times operations require a larger formation of ground vehicles.
Flying in some Dragonfly's in a Caterpillar, think along those lines.
Also, something to consider is the possibility to have limited strike missions to distract, extract.

The Herald:
This ship will be important, I can see the use of such a ship on an alt to relay information on long distances.
This is not a set 24/7 job but a quick login to send and receive data from deep space.
In time other ships that offer the same capabilities might be added to the verse, the Carrack or other exploration ships also offer a strong antenna array
With upcoming modules/blades/chips, these ships can also relay information.

>>>More to Come<<<<

 
Star InactiveStar InactiveStar InactiveStar InactiveStar Inactive

Star Citizen: Tactical Military Analysis of in-game ships, Part XV My Wishlist.

This list is a compilation of ships I consider missing, they might well be in the pipeline or will be conceived later on.
Here I reflect on some missing components ships and accompanying mechanics and ships that would offer greater synergy.
It is called my wishlist since I find that these ships are missing and would offer interesting or even critical gameplay options.
What ship manufacturer actually should produce them would be of no concern as any would do.
This list is entirely from a military point of view and not so much from a gameplay aspect but can still offer gameplay value to Star Citizen.


Ship/Planetary Assault Ship.


Yes I am aware there are several ships that are somewhat in this category but they are built from a gameplay point of view.
A ship designed to insert/extract troops put emphasis on protecting the passengers, weapons, turrets are for the sake of gameplay.
Troops would prefer to have a faster more protected ship and rely on friendly fighters to deal with enemy fighters.
Putting guns on a forward firing arc to provide an initial punch to a landing zone, however, this would not be a priority.
Having greater forward speed over being nimble, shorter travel time from and to landing zones.
Where you negate the chance of getting hit by spending less time over/in hostile areas.
A clear example would a Vietnam era Huey that was used in a troop transport role and a modified variant was used as a gunship.
But never did you see a ship performing both roles, weight restrictions, of course, played a role in the early version of the helicopter.

Concept.

Either redesign a ship like the Hoplite or design a ship from the ground up with features as followed.
1. Robust defense in terms of shielding and armor but without having to sacrifice to must speed or none at all.
2. Drop the manned turret for a PDS system for defense purposes only.
3. When multi-crew ensure the 2nd player is the crew chief and runs all the systems from a station, including the ramp/docking collar.
4. Being able to traverse very fast in a straight line but does not require it to be nimble.
5. Room for up to 10 fully armored players and weapon racks that allow for modding of kits and store extra ammo.
6. Possibility for modular design so it can be modded for MEDEVAC/Gunship but fitting modules will feature trade-offs.
7. Docking collar that has a low yield emp device that can short door locks for rapid boarding actions.
8. Atmospheric flight, retain some of the above it not all for planetary assault.

In short terms have a dedicated transport that excels only at that with the possibility of some support roles such as MEDEVAC.
Other ships should support it and the only focus should be on getting troops on or off the battlefield.
Also, it should be cheap and easy to produce in terms of Star Citizen lore so it would be good for mass-production and be readably available.


LSAD, Light Special Assault Deck.


A concept ship for special forces operations without the need for a land base but with coastal access.
Modified for the Star Citizen Universe to perform long endurance operations from orbit.
This can either be a direct assault to take the planet or to perform a quick tactical raid with the need for large-scale support.
With the release of the Tumbril Nova the logistics for dropping large vehicles in an orderly fashion comes in to play.
Furthermore, it also adds the dimension of large-scale assaults that require dedicated support in terms of storage, repairs, and deployment.
A dedicated ship that allows for the housing of marines their equipment and vehicles with medical and repair facilities to support their deployment.
All space is dedicated to such a role and will only allow for a modest PDS and turret defense and should at all times be escorted by a capital ship.

This ship should have most of its internal space dedicated to storage if several Tumbril Nova's, various Rovers and bikes.
Paired with the above-mentioned Assault ship that could be fitted with a module to sling load a Tumbril Nova or several rovers/bikes.
Having docking space for several Assault Ships that can be docked and either load vehicles or have marines embark the ship.
Then disembark the Assault ships for a combined assault on the planet/moon or celestial body.
Room for repair and a modest medical bay to provide critical battlefield healthcare to wounded Marines, at least room for 1 operating room.
Then a recovery ward with a staff of nurses to provide after-care and recovery for wounded Marines.

Concept.

1. Robust workhorse, size wise a large corvette or a small frigate.
2. Medical and Repair facilities.
3. Large bunk space to house 20 to 30 Marines and all the support staff and ship crew.
4. Command and Control bridge for ground operations and perhaps small drones/satellites for optical recon.
5. Room to store at least two Tumbril Nova's, several Rover variants and bikes for ground operations.
6. Room for storing and deploying at least 2 planetary assault ships.
7. Preference for orbital assault but with the possibility to land and deploy/recover Marines and vehicles.
8. Does not need to be fast or nimble but able to keep up with other caps ships of its size.
9. Sturdy shielding and armor to withstand some sustained fire, at least long enough to deploy ground troops and relocate.

As it stands there isn's a ship that fills to role or gap in Star Citizen gameplay, logistics-wise it is a much-needed addition.
Possible to modify the ship to aid in disaster relief planetside like a hospital ship does, could even be retooled with mods to a hospital ship.
But as it stands it will be some what of a niche ship that will be suited for medium to large sized Orgs to conduct planetary operations.

Coming Soon.


User Rating: 5 / 5

Star ActiveStar ActiveStar ActiveStar ActiveStar Active

Star Citizen: Tactical Military Analysis
of in-game ships, Part I.

Recently I took the plunge and got involved in Star Citizen a large scale MMO that entails space and ground on an almost realistic scale.
While by no means this game is new it is groundbreaking in almost every aspect due to the scale and comprehensive team play involved.
All systems/modules had to build be build from the ground up, taking inspiration from older and newer games but the tech behind it is a custom build.
You can get involved in Star Citizen the open world MMO or its single-player campaign called Squadron 42 by buying a game package.
If you want and you have disposable income you could opt to buy more or larger ships but by no means is this required as all ships will be obtainable.
Obtainable as in you can grind/build each ship depending on the size it will take x amount of time and resources to build or buy each ship.

Career-wise you can go multiple ways and if you want with the multiple accounts, by no means are you forced to take on a combat role.
To support these careers options mechanics will be released in modules that will allow you to do anything your heart desires, well almost.
A current list of Careers: Military, PMC, Mechanic, Scientist, Trader, Hauler/Freight, Passenger/VIP Transport, Salvager, and Entertainer.
Within those careers, you can try to position yourself as a leader of an Org or a member, basically, do whatever you want to practice.
For those who are new to Star Citizen/Squadron 42, an Org stands for Organisation what acts as your typical clan/guild as with any MMO.
When picking a none combat role you can hire players to fight for you, so if you do not want to fight you have simply had others do it for you.
Or join an Org that offers you protection from any combat so you can focus on your profession as you wish.


Opening Words.

For this article, I will be covering the military application of the current selection of ships in Star Citizen and Squadron 42.
Their roles on the websites are by no means set in stone and you could fit out a ship to do multiple or roles or swap role if you wish.
If you desire a different career this article can help you find out what role you could fulfill in an org supporting their efforts in Star Citizen.
Writing this article I take my experience as a Tactician/Strategist and apply this to the ships and mechanics of Star Citizen.
As you would deploy assets to the theatre and/or battlefield this article is for the application of each ship in a military capacity that does not per say involve combat.

If you want to take a closer look at Star Citizen or Squadron 42 please visit the main website it also has the store where you can buy your start package.
A small request however if you want to register an account consider using my referral code, you will get 5000 UEC and I get some recruitment points.
Or find a plural of content on YouTube, more specifically I frequent these channels myself to keep up to date; BoredGamer, MinionSoldier, TheNoobifier.


How to analyze.

While I will do this in this article you the end user will have to analyze your specific situation and how this article applies to your own situation.
This will be an open world there for you have no restrictions other than the actual in-game mechanics, every ship can be applied multiple ways as you wish.
As more mechanics and ships are added the context of this application will change to some degree, in most cases will open new avenues of game-play.
Stick with your strong points but defiantly look to venture out with different game-play style(s), this will offer you the most insight.
This article will be made up of 1 page per manufacturer covering each ship and updating those page(s) when new ships are released.
If stats of a ship change or mechanics are updated those will also be updated in this article, I will try to keep it as up to date as possible.
Also, remember that this is a simulation and that there is no real space combat in the real world there for everything is theory crafting from a military perspective.
Todays tested and trailed military doctrines are applied to the Star Citizen Universe, or new doctrines are created from scratch and then applied to Star Citizen.
This also means you could theory craft your own doctrine and most likely some people will have their own doctrine.

Key Parameters.

These are the in-game mechanics that you are bound by, and will form the foundation for this analysis for each ship.
Be aware that mechanics might change if that does happen I will update the below listing of those key mechanics and their application and impact.

Travel Time:
Since moving from point A to Point B will take time, and this time will have a considerable impact due to the fact of duration.
Because there is a travel time that increases with the distance you will have to take into account hauling supply's, bringing in reinforcements take time.
You will also have to calculate fuel consumption with spare fuel in the case you have to divert.

Jump Points:
The method of inter-solar travel in the Star Citizen universe, what will impact gameplay as followed.
Jump points will have sizes this means the larger your ships the fewer jump points for travel, Capital ships and Fleets with Capital Ships be aware!
Jump Points will be choke points that will dictate control over a solar system unless you can find an alternate route.
Jump Points could be randomly generated in later versions, this means choke points can be bypassed.


Ship Manufactures:

From here on links to dedicated pages for each manufacturer in Star Citizen and Squadron 42.
Bare with me this is a large-scale project to undertake and requires some study, research and pondering.


Manufacturer, Aegis Dynamics. 
Aegis Dynamics

Manufacturer, Anvil Aerospace

Anvil Aerospace 

Manufacturer, Argo Astronautics
Argo Astronautics

Manufacturer, Banu
-

Manufacturer, Consolidated Outlands
Consolidated Outlands

Manufacturer, Crusader Industries
Crusader Industries

Manufacturer, Drake Interplanetary
Drake Interplanetary

Manufacturer, Esperia
Esperia


Manufacturer, Kruger Intergalactic
Kruger Intergalactic

Manufacturer, MISC
Musachi Industrial and Starflight Concern

Manufacturer, Origin
Origin Jumpworks

Manufacturer, RSI
Roberts Space Industries

Manufacturer, Vanduul
-

- Paul "HisEvilness" Ripmeester.

 
AMD Ryzen 3700X overclocking guide intro banner

Ryzen 7 overclocking the 3700X

AMD Ryzen 7 3700X overclocking guide. This is an easy to use and comprehensive overclocking guide for the AMD Ryzen 7 3700X with a wide
Intel i5 100600K overclocking guide banner

Intel i5 overclocking the 10600K.

Intel i5 overclocking the 10600K on a Z490 Motherboard. This is easy and illustrated overclocking guide for the i5 10600K using a mid-range MSI Z490
AMD Ryzen 2600 overclocking guide intro banner

Ryzen 5 overclocking the 2600.

AMD Ryzen 5 2600 overclocking guide. This is a comprehensive and easy to use guide with illustrations to overclock the Ryzen 5 2600 CPU from
DDR RAM Overclocking Banner

DDR RAM Overclocking Terminology FAQ

DDR RAM Overclocking Terminology FAQ This Terminology FAQ covers overclocking for DDR RAM for both Intel and AMD platform and adds a reference material for various
ROCCAT-Logo_x400.png
Intel_logo_x400.png