- Tech, OC'ing, SEO and more
- Hits: 125181
Article Index
VDDCR CPU Voltages & GFX Core Voltages.
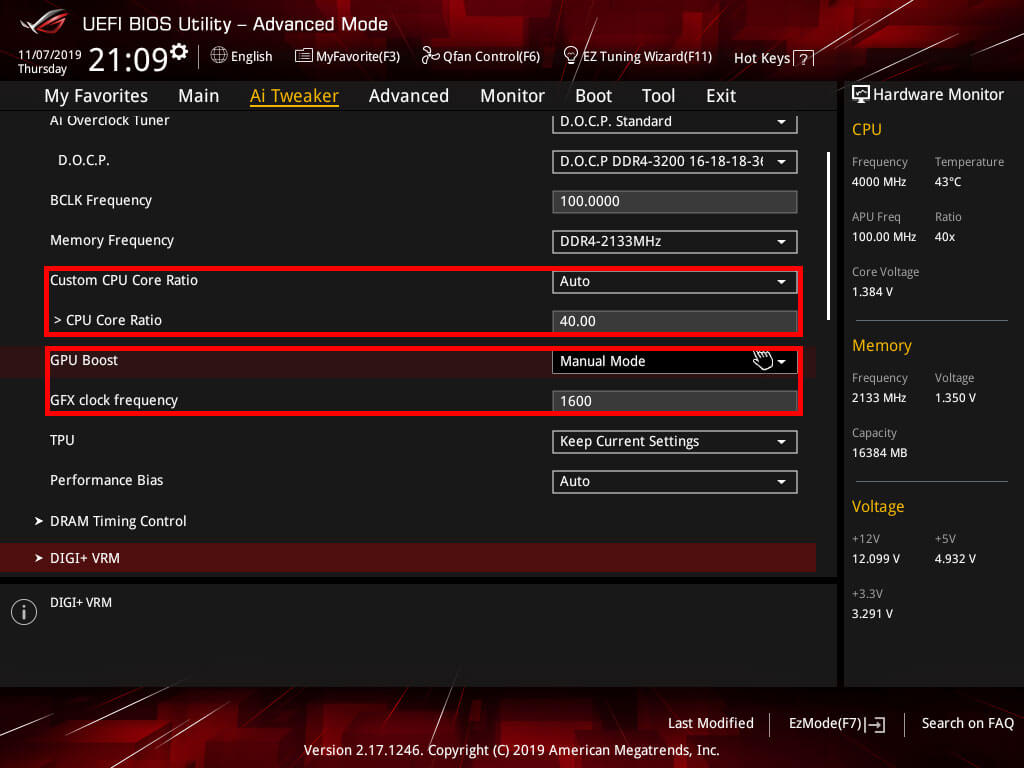
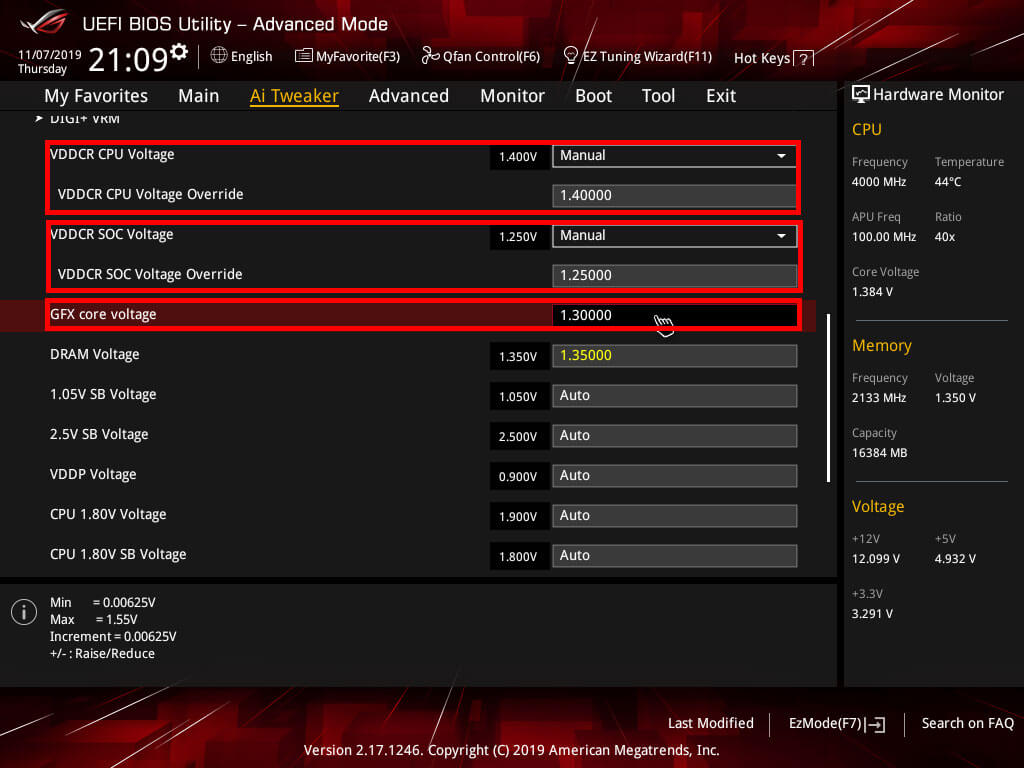
This final step will be to adjust the CPU Core Ratio, GFX clock frequency, VDDCR CPU Voltage, and GFX core voltage. You want to start however with the CPU overclocking and stress test if the overclock is stable and then adjust the GFX settings and test them with the CPU overclock combined this will make it easier to find out if there is any instability in your overclock.
VDDCR CPU Voltages.
- AMD Recommended Voltage: 1.350 to 1.375 volts.
- Community Recommended Voltage: 1.400 to1,450 volts.
- Absolute max and not recommended: 1.500 to 1550 volts.
GFX core voltages.
- AMD Recommended Voltage: 1.1 to 1.2 volts.
- Community Recommended Voltage: 1.3 to 1.4 volts.
- Absolute max and not recommended: +1.4 volts and above.
Start with entering a Core Ratio of 39.00 and adjust the VDDCR CPU Voltage to 1.4 most Ryzen APU's will boot and pass a stress test do a quick Cinebench run and see if it is stable at all if that passes run a Cinebench and a 10 minute Prime 95 Small FFT's stress test. If this fails you want to go back into the BIOS and set a Core Ratio of 38.50 and repeat the above-named process. If it passes you can keep the Core Ratio as it is but lower the VDDCR CPU Voltage to 1.3750 and do Cinebench run and validate that with a Prime 95 Small FFT's stress test 10 minutes. When that passes keep lowering the voltage and repeat the Cinebench and Prime 95 Small FFT's stress tests until it fails. Now save these settings in a BIOS profile and try to run a Core Ration of 40.00 with a VDDCR CPU voltage of 1.4 and do another Cinebench and Prime 95 Small FFT's stress test. When it passes lower the VDDCR CPU voltage by 0.25 and repeat the Cinebench and Prime 95 Small FFT's stress tests until it crashes. When you are satisfied with your Core Ratio and VDDCR CPU Voltage save those settings as well and do at least a 30 minute Prime 95 Small FFT's stress test.
When your CPU overclock is stable than its time to overclock the internal Vega GPU start by adjusting the GFX core frequency to 1600, VDDCR SoC Voltage to 1.25, and GFX core voltage to 1.3 save those settings and boot into windows. Now do a quick Heaven Benchmark of 10 minutes and check your monitor for stuttering or artifacting. When it passes you can go back into the BIOS and adjust the GFX core frequency to 1650 and stress test with Heaven benchmark, Or lower the GFX core frequency when it fails. Rinse and repeat adjusting GFX core frequency, GFX core voltage, and VDDCR SoC Voltage. Once you are satisfied with your Vega GPU overclock do a stress test with Heaven benchmark for about 30 minutes.
The final step would be setting your DDR4 kit to the advertised speed and making sure that is also stable with doing one final burn-in test, just select the D.O.C.P./XMP profile and it should set all the settings for you.
