- Tech, OC'ing, SEO and more
- Hits: 143913
User Rating: 3 / 5


Article Index
Intel i5 overclocking the 10600K on a Z490 Motherboard.
This is easy and illustrated overclocking guide for the i5 10600K using a mid-range MSI Z490 motherboard. The CPU overclock as well as the Ringbus is covered here with all the BIOS settings and AVX offsets as well as a range of stats and validations and stress testing methods. Right off the bat, the i5 10600k is an excellent gaming CPU even though AMD made a compelling price point with their 3600 and 3600X that would be better if you want to combine gaming and productivity.
My Rig:
- CPU: i5 10600K
- Cooling: Corsair H150i Pro AIO.
- Motherboard: MSI MPG Z490 Gaming Plus.
- G.Skill TridentZ 16GB 3600 @ 4000C15.
- GPU: MSI GTX 770(for display).
- PSU: Corsair RM 850 Watt.
- SSD: Kingston, 120GB.
- Testbench: Lian Li PitStop T60
This is just a testbench setup for overclocking nothing really fancy. Both the CPU and RAM were overclocked but tested separately and then stress tested with all overclocks applied. Several validations can be found below under the 10600K Curve section. Take into consideration that most 10600K will run 5.0Ghz with normal voltages. Using the Silicone Lottery stats the early released chips of the i5 have a hard time hitting 5.0Ghz. But as the manufacturing process matures more 10600Ks will hit 5.0 or higher more easily. The earlier version had a binn of 23% of hitting 5.0Ghz -1 AVX with 1.30vcore. In this guide, the highest overclock is 5.2Ghz with -1 AVX @ 1.345vcore. Paired with an F4-3600C15D-GTZ memory kit overclocked to 4000C15.
Getting started with the 10600k overclocking.
The usual make sure the motherboard BIOS has the latest version this usually helps with the stability of CPU and RAM overclocking. And ensure you have the latest Intel chipset drivers(Z490) installed as well. Windows should be updated or paused to prevent updates from happening while booting back and forth into the BIOS while overclocking. Below is a list of programs that can be used to monitor and stress test CPU and DRAM overclocking. For the purpose of this guide, only the CPU overclocking is covered.
- HWiNFO64: HWiNFO64 download section
- Prime 95: Prime95 download section
- Linpack Extreme: Linpack Xtreme download section
- CinebenchR20: CinebenchR20 download section
Thermal paste is Thermal Grizzly Cryonaut for the best results, other pastes, unless they are really bad in thermal performance, may give different results. Pre-applied and out of the box with the cooler thermal paste should work fine from most vendors but I highly recommend Thermal Grizzly Cryonaut for the best results.
BIOS Settings.
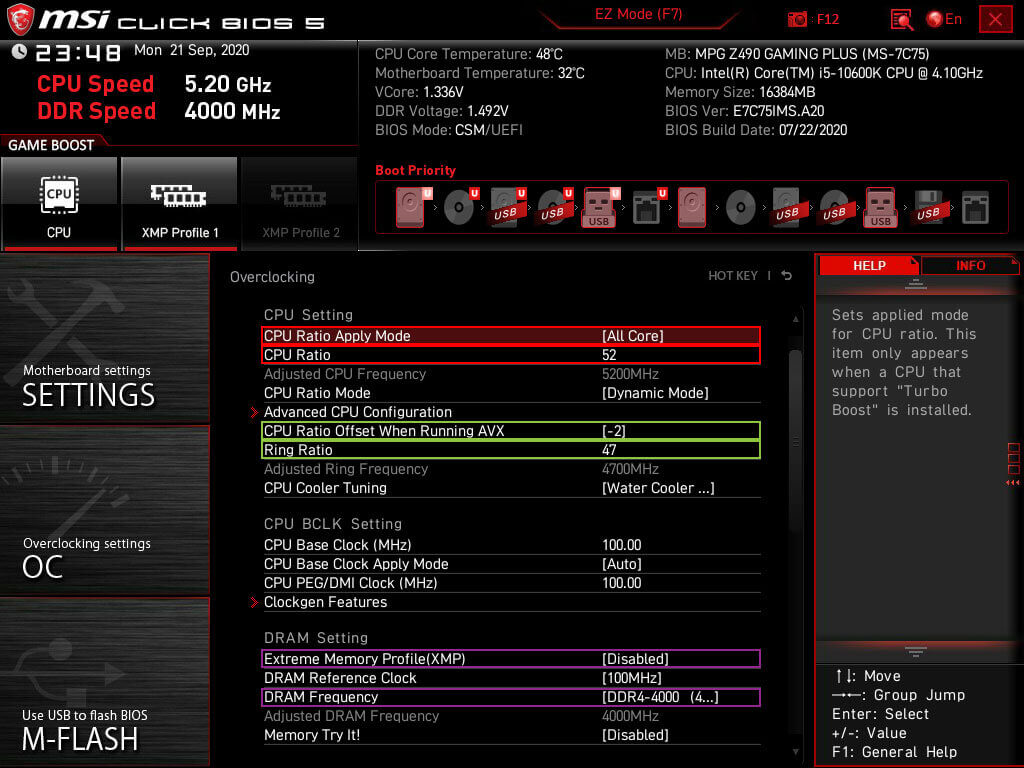
To get started with overclocking your i5 10600k first some settings needs to be adjusted in the BIOS to ensure you maintain a stable overclock. As well as setting some of the power delivery options for the CPU and VRM settings. The MSI Click BIOS has several LLC options, and they are displayed in a graphic in the corresponding menu. Here it was noticed that the LLC displayed does not entirely hold true and when trying to maintain a stable voltage to the CPU LLC4 was the best option. LLC4, in this case, has only a slight overshoot when using AVX and none AVX loads.
Advanced CPU Configuration:
- Intel C-State: Disabled
- Enhanced Turbo: Disabled
- Intel SpeedShift Technology: Disabled.
Under the same menu, some power delivery options must be adjusted to ensure power delivery constraints and time-limited is removed. These are outlined in green in the image below.
- Long Duration Power Limit(W): Set to 4096
- Long Duration Maintained(s): Set to 128
- Short Duration Power Limit(W): Set to 4096
- CPU Current Limit(A): Set to 256

Head back to the main overclocking menu by click OC and scroll down to the section where you can enter various voltages and select the DigitALL Power. Here you can adjust multiple VRM settings for this particular motherboard there were only two options.
- CPU Loadline Calibration Control: Select Mode 4 this can be adjusted later
- CPU Over Current Protection: Set to enhanced
- CPU Switching Frequency: Set to 500

Overclock Settings: CPU Core Ratio, voltages, Ringbus, and misc voltages.
Now to start with some actual overclocking, you might want to make a reference score in your favourite benchmark before starting for comparisons. Make sure that all your settings are set to default like not having a memory overclock unless you are 100% sure this is stable.
AVX Offset.
Offset is useful for getting a higher clock speed normal loads like gaming vs rendering/encoding with AVX. But it is really brutal on the CPU and requires more voltage to remain stable. Good CPU's can usually do with -1 AVX, consider -2 on bad CPU or using really small form factor builds.
- AVX offset for normal to bad chips should be 2 or 3.
- AVX offset for golden chips can be 1 or 0.
Starting with the CPU frequency marked in red in the image below make sure CPU Ratio Apply Mode is set to All Core and that the CPU ration is set to 49. Then Scroll down and select the CPU AVX offset to -1 or -2. Ring Ratio can be left on Auto and can be changed once the CPU overclock a 100% stable. Then marked in Purple is the DRAM settings unless you have a stable DDR4 overclock you want to turn XMP off and set the DRAM Frequency to the base speed of 2133 or 2400.
Scroll down, and now it is time to adjust the voltages. Since the 10600K is still on the 14nm node like the previous generation, the same voltage restrictions apply. Marked in red is the voltage settings for the CPU first unlock the voltage control but setting CPU Core Voltage Mode to Override Mode. This then allows the set that CPU Core Voltage. Take into account the table below as well as the binning information when setting your initial voltage. As an example below in red is the voltage for a golden chip reaching 5.2Ghz with 1.345Vcore. Marked in green are the voltages for DRAM overclocking you can leave these on Auto unless you have a 100% stable memory overclock.
- Save Voltages for light overclocking, 1.2 ~ 1.3 Vcore is the range where 5.0Ghz/4.9Ghz on golden chips.
- Save Voltages for medium overclocking, 1.3 ~ 1.4 Vcore is the range for 5.0Ghz.
- Above 1.4Vcore your a reaching the limit of 14nm as well as thermal issue's.
Change the voltage to 1.25Vcore and daily in 49 in the CPU Core Ration marked in red in the above image. Press F10 to save and reboot the PC. Now you can run a quick CinebenchR20 to gauge if it stable at all if so follow up with five runs in Linpack Xtreme using 8GB of memory or more. If it crashes on either booting into windows or running a stress test, you will most likely end up in the 5.0Ghz to 5.1Ghz range. Important to note here that is also ties into the LLC level you selected for this overclock. Something you can also change and then try to run a short stress test.

When 1.25Vcore crashed at 4.9Ghz, then you can increase the voltage or lower the multiplier. The preference here is just increasing the voltage since you are far from the max allowed voltage for the 10600K. Enter a voltage of 1.275Vcore and reboot the PC and run a CinebenchR20 if that is stable run Linpack Xtreme stress test on 8GB of memory with five runs. To find the right multiplier with 1.275Vcore keep chancing the multiplier until it is stable. 1.275Vcore also does not generate a lot of heat, so should work with most CPU coolers and will provide you with a good indication of how high your 10600K can overclock.
The 10600K used for this guide ran 5.0Ghz on 1.245Vcore with a 46 multiplier on the Ringbus. Important to note here that when you change the Ringbus only do so after getting a stable overclock on the CPU. As well as this 10600K was unstable with a Ringbus multiplier of 47 but was stable with a Ringbus multiplier of 46. To illustrate how important it is to only change the Ringbus after your done overclocking the CPU. Validation with CPU-Z: CPU-Z 10600K @ 5.0Ghz and a CinebenchR20 score of 3861 so you have an idea how a stable 5.0Ghz overclock looks like.
To do an initial confirmation of a stable overclock run Linpack Xtreme with the same settings as before but this time around do it ten times and use HWiNFO64 to keep an eye on the temperatures and CVID(Vcore). Then you can go for a higher CPU overclock and try 5.0Ghz and 5.1Ghz but make sure to not thermal throttle the CPU, so you are limited by your cooling solution. As well as exceeding 1.4Vcore what would degrade your CPU and most of the time thermal throttle your CPU. Make sure you keep your AVX offset to -1 and -2 for chips that overclock really bad most of the times you won't need AVX instructions unless your rendering content for instance.
Some other tips are that IF you are not stable with 1.275Vcore and do not want to drop the CPU frequency you can increase the CPU voltage and reach a higher CPU overclock. The only limiting factors are your cooling capacity to prevent thermal throttling and staying below 1.40Vcore. Try 1.30Vcore for instance with your preferred frequency. To point out that 1.275Vcore is a starting point, not the end.
- Increase the voltage 0.025 per attempt, so from 1.250Vcore to 1.275Vcore to 1.300Vcore until stable with the preferred CPU frequency.
- When thermal throttling lower the voltage and keep thermals in the 85C ~ 90C.
- Add 0.020Vcore ~ 0.025Vcore per 100mhz increase on the CPU.
Ringbus.
Once you have established the CPU overclock is stable, you can set a higher Ringbus. Most overclocks will end up with a Ringbus multiplier of 47 or 46. Ideally, you want the Ringbus to run 500mhz or less from the CPU Mhz. Taking this 10600K as an example, a Ringbus of 4700Mhz was stable with 5.1Ghz and 5.2Ghz but was unstable with 5.0Ghz. But you will have to stress test any changes in the Ringbus separately and including any CPU or RAM overclocks. Ringbus impact DRAM overclocking the most as well as reducing latency it can be left on Auto if neither is a concern.
Stability Testing.
To make sure your overclock is stable with acceptable thermals, you want to run a long stress test. As you want to test the AVX and none AVX stability of your CPU. Doing 20 runs of Linpack Xtreme and then a 1 hour run in Prime95 should be a confirmation your overclock is stable. Also, make sure the temperatures do not exceed 90C, aim for an 85C~90C thermals.
Prime95 you have two options simply run Small FFT's, but this will be a very heavy unrealistic load unless you render. You can also run Custom 8k FFTs so represent a more realistic gaming load. But make sure you do no exceed 90C in HWiNFO64.
Linpack Xtreme is excellent for really pushing your CPU and finding instabilities early on. Long Linpack Xtreme runs to confirm the overclock stable for long durations.
CinebenchR20, this is great to gauge your stability with a single click as well as using the scores to see if you get a better score. Scoring lower usually means that the overclock is or is becoming unstable.
For this particular i5 10600K, the max achievable overclock is 5.2Ghz with safe voltages and no thermal throttling. The Ringbus was set to 4700mhz with a 4000C15 memory overclock. Giving a CinebenchR20 score of 4015. The 5.1Ghz overlock is also linked with validation and has the same Ringbus and memory overclock. All overclocks included in this guide were extensively tested using Prime95, Linpack Xtreme, MemTest2, Aida64, MaxxMEM2 and CPU-Z.
- CPU-Z Validation 10600k @ 5.1Ghz: https://valid.x86.fr/equucw
- CPU-Z Validation 10600k @ 5.2Ghz: https://valid.x86.fr/0rlf3e
10600k Vcore Curve.
Some quick stats for this overclocking guide for those just looking to get some of the numbers. These numbers are for this particular i5 10600K from Intel and mileage may vary based on your hardware and the silicone lottery.
10600k @ 4.9Ghz.
- 49 Core Ratio.
- Vcore @ 1.225
- AVX -1
- LLC 4
- Ringbus @ 46
- Validation with P95 Small FFT's, Custom 8K FFT's and Linpack Xtreme.
10600k @ 5.0Ghz.
- 50 Core Ratio.
- Vcore @ 1.240
- AVX -1
- LLC 4
- Ringbus @ 46
- Validation with P95 Small FFT's, Custom 8K FFT's and Linpack Xtreme.
10600k @ 5.1Ghz.
- 51 Core Ratio.
- Vcore @ 1.270
- AVX -1
- LLC 4
- Ringbus @ 47
- Validation with P95 Small FFT's, Custom 8K FFT's and Linpack Xtreme.
10600k @ 5.2Ghz.
- 52 Core Ratio.
- Vcore @ 1.350
- AVX -1
- LLC 4
- Ringbus @ 47
- Validation with P95 Small FFT's, Custom 8K FFT's and Linpack Xtreme.

- Paul "HisEvilness" Ripmeester.