- Tech, OC'ing, SEO and more
- Hits: 269387
Article Index
Overclocking.
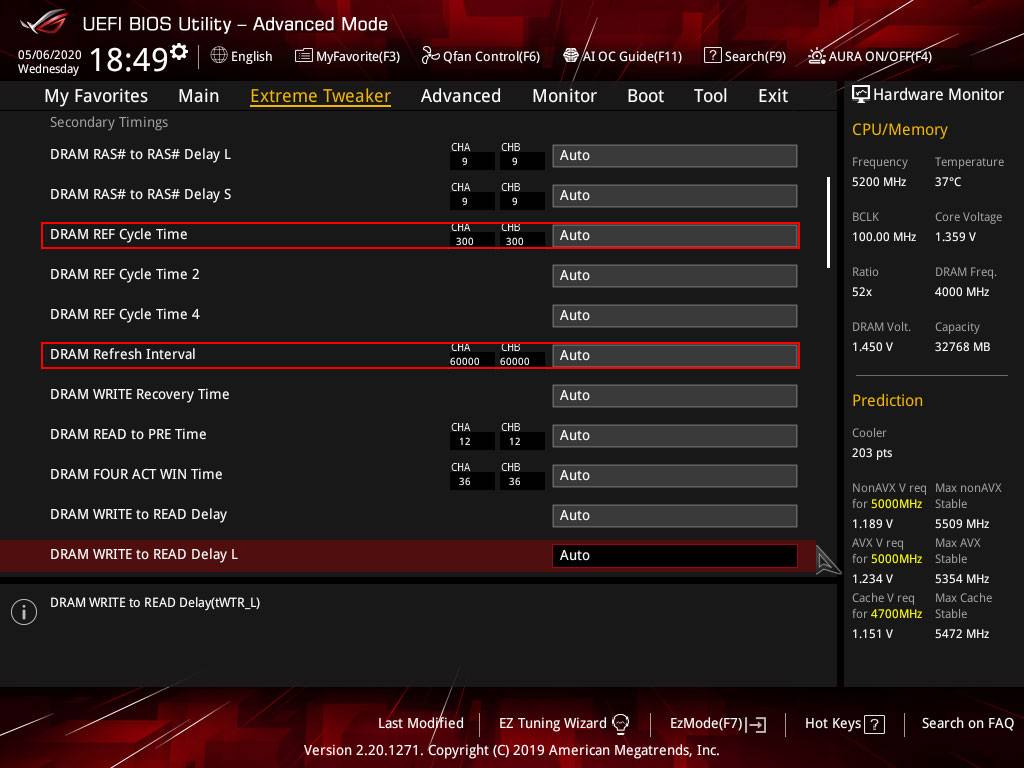
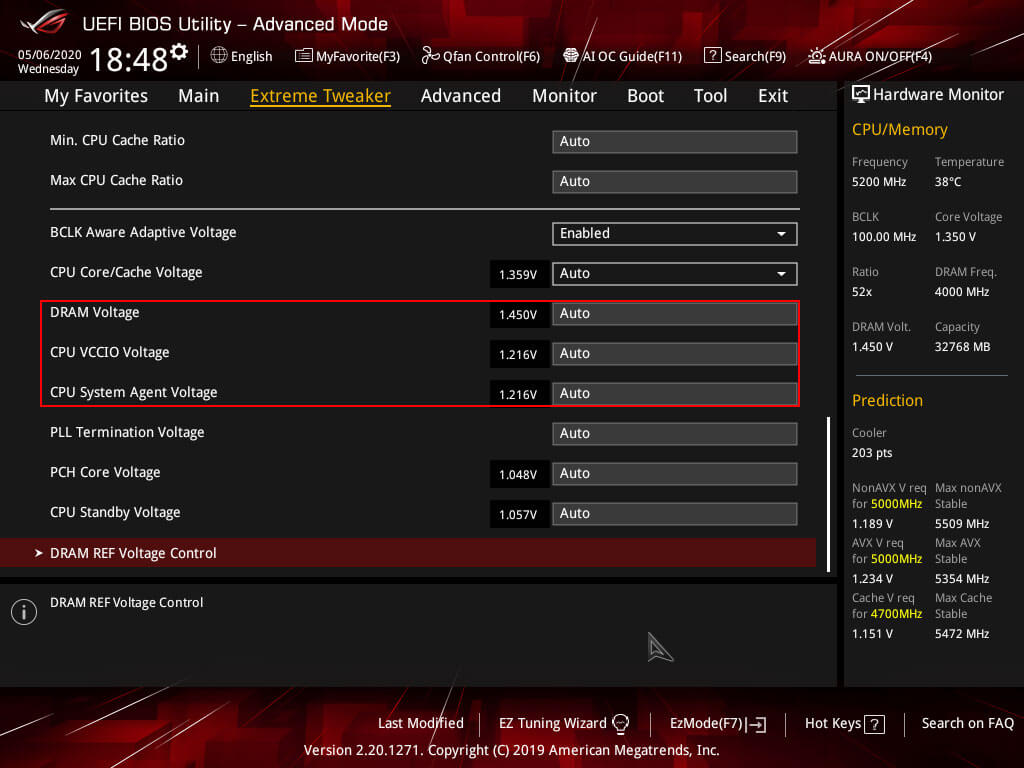
You are starting to overclock by simply booting into your BIOS and look for the DRAM, VCCIO, VCSSA and SoC(AMD) voltages. Make sure no XMP profile is selected and set the RAM profile manual. Also, check if MRC Fast Boot is turned off in the Timings section of your BIOS. Can be found in some high-end motherboard—Example BIOS from an ASUS Maximus Hero XI.
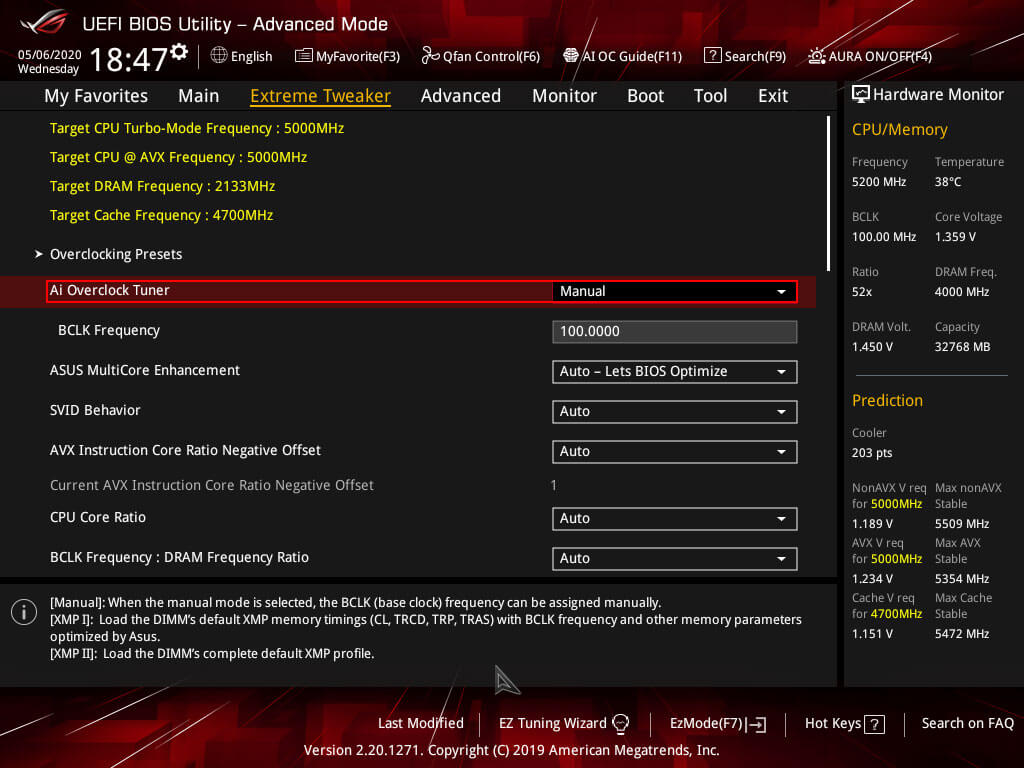
To start overclocking your DRAM you want to adjust your DRAM voltage to 1.45v for Samsung B-die and 1.40v for other dies like CJR, Intel VCCIO and VCCSA voltages to 1.15v or AMD SoC voltage to 1.10v. The following steps are in numerical order for overclocking gain.
Intel.
- Increase DRAM voltage.
- Increase VCCIO & VCCSA voltages. Both can be equal unless going for a low frequency but tighter timings then only VCCSA should be increased; otherwise, instabilities might occur.
- Increasing DRAM VTT voltage(not mistaken for CPU VTT) & VPPDDR voltage. Works best with stabilizing extreme overclocks that are over 4000Mhz.
AMD.
- Increase DRAM voltage.
- Increase SoC voltage. Ryzen 3000 series when adjusting frequency stay in the 0.95 ~ 1.15v range, Ryzen 5000 series SoC is very sensitive it is better left on Auto as changing the SoC value mostly has a negative impact on stability.
- Adjust ProcODT within the ohm range. Can be left on Auto most of the time.
- Set FCLK in sync, 1:1 Ratio. Should be on Auto by default.
- Gear Down mode disabled with single rank sticks, leave Gear Down mode enabled or on Auto with dual-rank sticks(IC's on both sides of the PCB)
Leaving all the timings to Auto you just want to increase the memory frequency with the voltages entered and see how fast your RAM kit can run. Depending on your XMP profile you want to start higher so with a 3200mhz XMP kit you want to start with 3600Mhz. If your RAM kit XMP profile is rated higher, you want to start 400Mhz higher than the base XMP profile. Make sure all the timings are set to Auto, which includes the Primary Timings, Secondary Timings etc. Just want to get the highest possible memory frequency and then work on the timings. With AMD Ryzen you want to set the FCLK half of your memory speed, so when using, for example, 3600mhz then set the FCLK to 1800mhz.
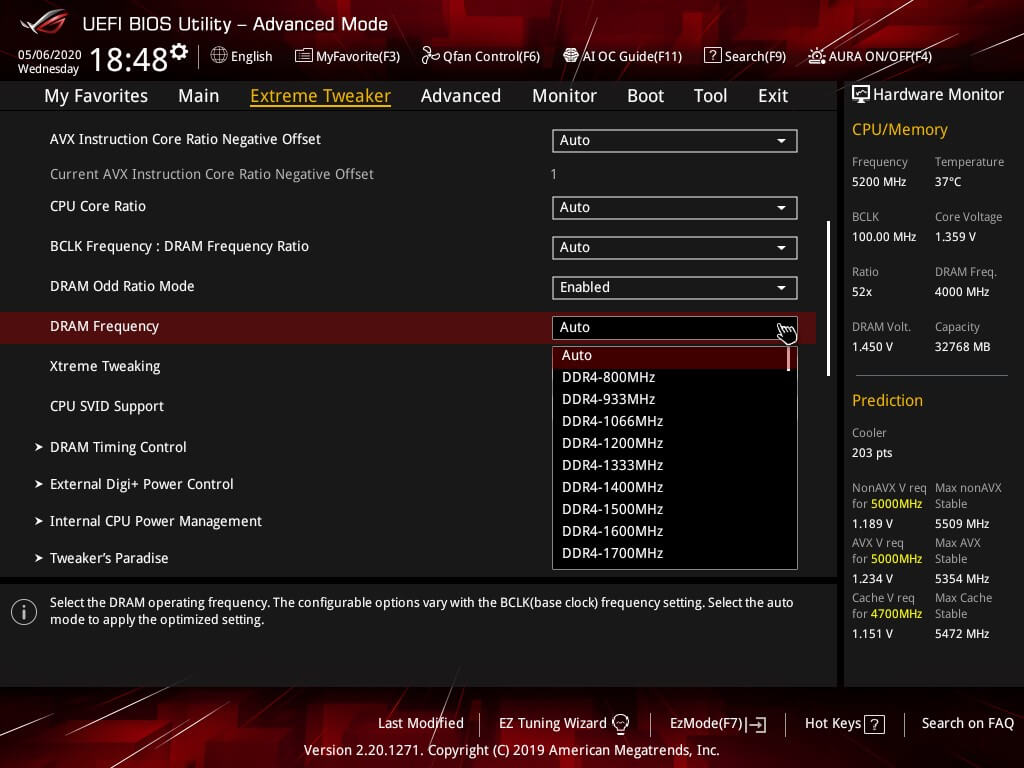
After selecting a frequency then save these settings in the BIOS and reboot. Your PC might reboot a couple of times adjusting the timings since you changed the frequency. If your RAM kit can run the speed, it will boot right into Windows. If it fails, it will show a failure to post a message. In the case of a failure, you can increase DRAM voltage for Samsung B-die to 1.50v and 1.45v for other dies. And adjust some of the settings listed below.
- VCCIO and VCCSA voltages for Intel from 1.15v to 1.2v or 1.25v.
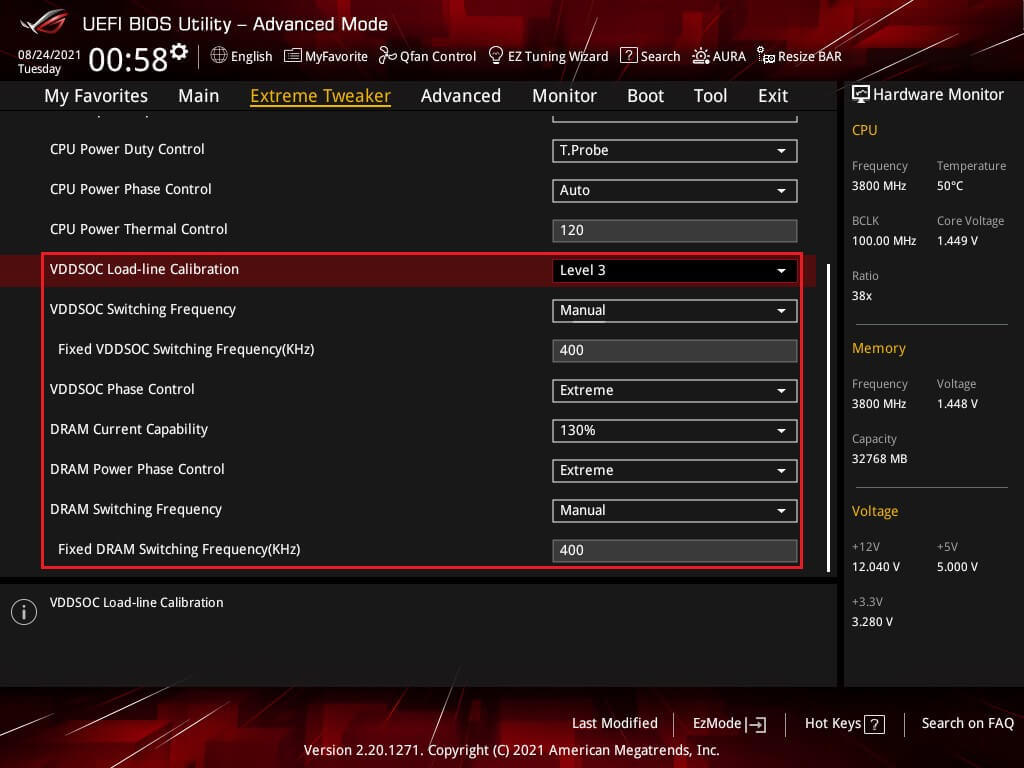
- SoC voltage for AMD from 1.10v to 1.20v or 1.25v. The exception is the Ryzen 3000 series SoC voltage has very little effect above 1.15v when it comes to frequency. With the AMD 5000 series, SoC voltage is better left on Auto and apply LLC 3 to the SoC and adjust the transient response of the DRAM and SoC by changing the Switching Frequency to 400Mhz if the motherboard allows it.
- Ensure ProcODT for AMD is within the frequency range if so go 1 step up or down to the closest frequency range.
- For AMD as well, check if Gear Down Mode is enabled to help stability but remember you won't be able to set uneven tCL.
- Or dial back the memory frequency 1 step from the previously selected memory frequency while keeping the same voltages.
When it does boot into windows use Aida64 Cache & Memory Benchmark or MaxxMEM2 to gauge if your overclock is stable by checking the Read, Write, Copy and Latency. For Intel, you want a Latency between 55ns and 60ns without changing the timings and for AMD timings between 75ns to 80ns. And always an increase in Read/Write/Copy speeds. The first indication of instability is the memory having to correct for errors that will lower Read/Write/Copy speeds. You might also be able to boot into Windows, but when running a benchmark, your PC could shut down or BSOD which also is an unstable memory overclock. When using a Ryzen CPU, make sure you keep adjusting your FCLK to half the memory frequency. With booting or stability problems on Ryzen adjusting ProcODT and CLDO VDDP voltage will help stabilize memory overclocks. Important to note that CLDO VDDP is very sensitive, a 10mv range can be the difference between booting/unstable/stable.
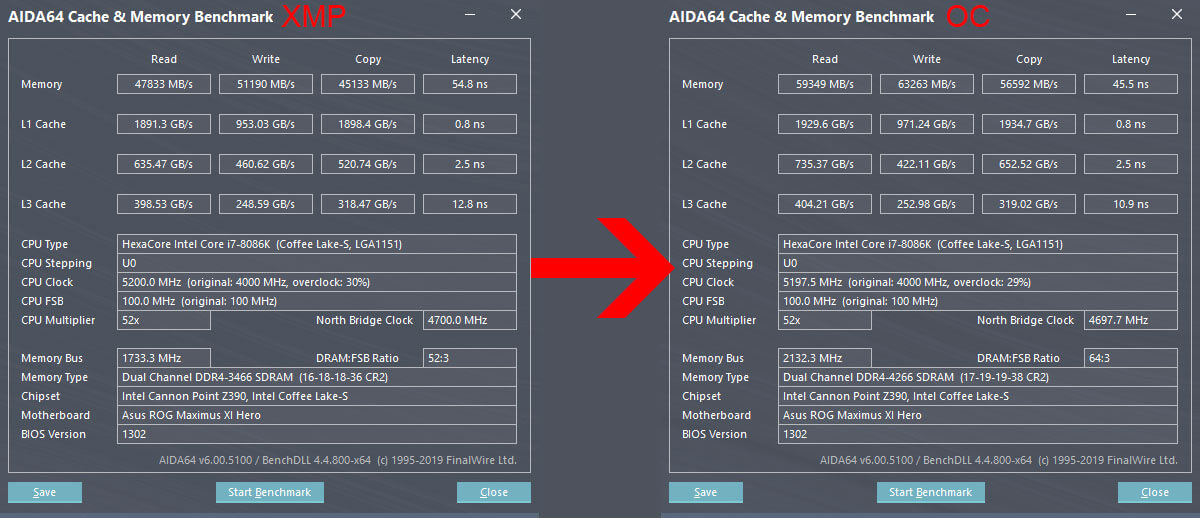
Repeat this process to get the highest possible frequency on your RAM kit. Stop increasing the frequency as soon as it fails to boot into Windows or when you see a decrease in Read/Write/Copy speeds. Then you want to increase the DRAM voltage to 1.50v only for B-die or 1.45v for other dies if not already done so.
- VCCIO and VCCSA voltages for Intel from 1.15v to 1.2v or 1.25v.
- DRAM VTT voltage for Intel can be increased around 0.700v ~ 0.750v when stabilizing overclocks exceeding 4000mhz.
- SoC voltage for AMD from 1.10v to 1.20v or 1.25v. With Ryzen 3000 make sure not to exceed 1.15v when only adjusting the frequency.
- Adjusting CLDO VDDP voltage but only in the final stage of overclocking as it can be very sensitive.
- Here you can opt to loosen the timings.
If you have not done so already. Also, something to look for the timings that are automatically set by your PC and make sure that those do not get overly loose. When you get a high frequency but your timings are so loose in the range of 25-25-25-50 or more you might want to consider running a lower frequency. With higher VCCIO, VCCSA or AMD SoC voltages you can try to keep the frequency that failed to post or did not return a better benchmark. But in general DRAM voltage gives a bigger boost and VCCIO, VCCSA and SoC help to stabilize overclocks that boot but won't pass a stress test. Below is a table of expected VCCIO and VCCSA voltages for AMD they are mainly tied to SoC voltage.
| Memory Frequency | - | VCCIO/VCCSA* |
| 3000 - 3466 Mhz | 1.10v - 1.15v | |
| 3466 - 3800 Mhz | 1.15 - 1.20v | |
| 3800 - 4200 Mhz | 1.20v - 1.25v | |
| 4200 Mhz and higher | 1.25v - 1.30v |
* Combining VCCIO and VCCSA works best for higher frequencies and their timings, for running 3200mhz with 14-14-14-32 as an example it is wise to drop VCCIO to 1.15v as it might introduce instability. For AMD SoC voltage a bit of similar advice when it comes to the Ryzen 3000 series. SoC voltage should not exceed 1.15v when only adjusting the frequency but can exceed 1.15v SoC to 1.20v ~ 1.25v SoC when tightening the timings of your DDR4 overclock.
| Memory Frequency | - | FCLK Frequency* | - | SoC Voltage |
| 3000 - 3200 Mhz | 1500 - 1600 Mhz | 1.10v - 1.15v | ||
| 3466 - 3800 Mhz | 1733 - 1900 Mhz | 1.15v - 1.20v | ||
| 3800 Mhz and higher | 1900 Mhz - and higher | 1.20v - 1.25v | ||
| Ryzen 3000 series | Any FCLK Mhz | 0.95v ~ 1.20v |
* FCLK should be synced with the memory frequency, and in all of the BIOS versions, I've seen this was done automatically. De-Syncing FCLK from MCLK could increase Latency and lower Read/Write/Copy speeds.
When you have established the highest possible memory frequency, it is time to tighten the timing. Here you start with the Primary Timings. To consider is that the best RAM kits run timings of 14-14-14-32 @ 3200mhz or 16-16-16-38 @ 3600mhz with 1.35v. This gives you a good indication of whatever max memory frequency you have for what memory timings you want to aim for and what is possible. Make sure the Command Rate is set to CR1/T1/N1 unless you are using a memory kit of 4 sticks then use CR2/T2/N2. If your timings on Auto went to CR2 regardless of the number of sticks keep these settings since using CR2 is slightly less demanding to overclock. You can consider using CR1/T1/N1 but expect less Mhz and loosen timings only really well-binned ICs do well on CR1.
For AMD Gear Down Mode can be enabled as well as adjusting ProcODT and CLDO VDDP voltage for AMD CPUs to help with stability, CLDO VDDG voltage can also be manually adjusted but make sure that SoC voltage is 40mv or more above CLDO VDDG voltage. As mentioned in the above paragraph regarding adjusting the frequency on the AMD 3000 series SoC should not exceed 1.15v when ONLY adjusting the frequency. However, when adjusting the timings tighter you can exceed the 1.15v for SoC as it will help stabilize your overclock in the 1.20v ~ 1.25v range for SoC this mostly applies to the AMD 3000 series. As SoC voltage has a wider impact on frequency and timings on the AMD 1000 and 2000 series as a whole. With the AMD 3000 series the impact has become far less but it could benefit from a slight boost in SoC voltage. As an example, an XMP kit of 3600C15 did run fine on 1.15v SoC using the XMP profile but when tightening the timings to 3466C14-14-14-28 SoC voltage had to be increased to 1.20v on the SoC or it would be unstable. With the AMD 5000 series, SoC has become very sensitive and changing it leads to instability very quickly. And with the 5000 series as an example with the 5800X, the SoC voltage is left on Auto and sits around 1.088 volts and changing the Switching Frequency and LLC in the VRM options yields great results for higher overlocks.
You can consider a wider range of overclocked profiles and pick your daily driver from there, but it will take considerable more time to test and stress testing each profile for 100% stability. And it must be said that stress testing is vital even if done for hours with Linpack, Prime95 at times you might find instabilities down the road, rare but it can still happen. In that case, some minor voltage tweaks could work but consider you might have to loosen or lower the frequency when it does happen.
Some important notes on adjusting the timings you want to make sure the 1st timing is only 1 or 2 steps away from the 2nd and 3rd timings. Only B-Die can run the same timings on the first three timings, for example, 16-16-16 for the first set. Other IC's you want to keep the first timings as low as possible but only loosen the 2nd and 3rd timing, as an example 16-18-18 for the first set. The 4th timing you want to double the 3rd timing and if needed to loosen + 4 steps ideally. Examples included in this guide are the most common used timings used for most IC's. It is, however, possible to run different sets like 14-15-14-31. However, this does not always work with a wide range of motherboards and DDR4 RAM kits. For this purpose, examples like 14-14-14-32, 19-19-19-38 and 17-19-19-38 are used since these always work on their respective DDR4 kits and all motherboards. Below are some more primary timings to consider as an example.
Example B-die Timings.
- 14-14-14-32
- 15-15-15-34
- 17-17-17-34
- 19-19-19-38
Example RAM Timings.
- 14-15-15-32
- 14-16-16-32
- 16-18-18-36
- 17-19-19-38
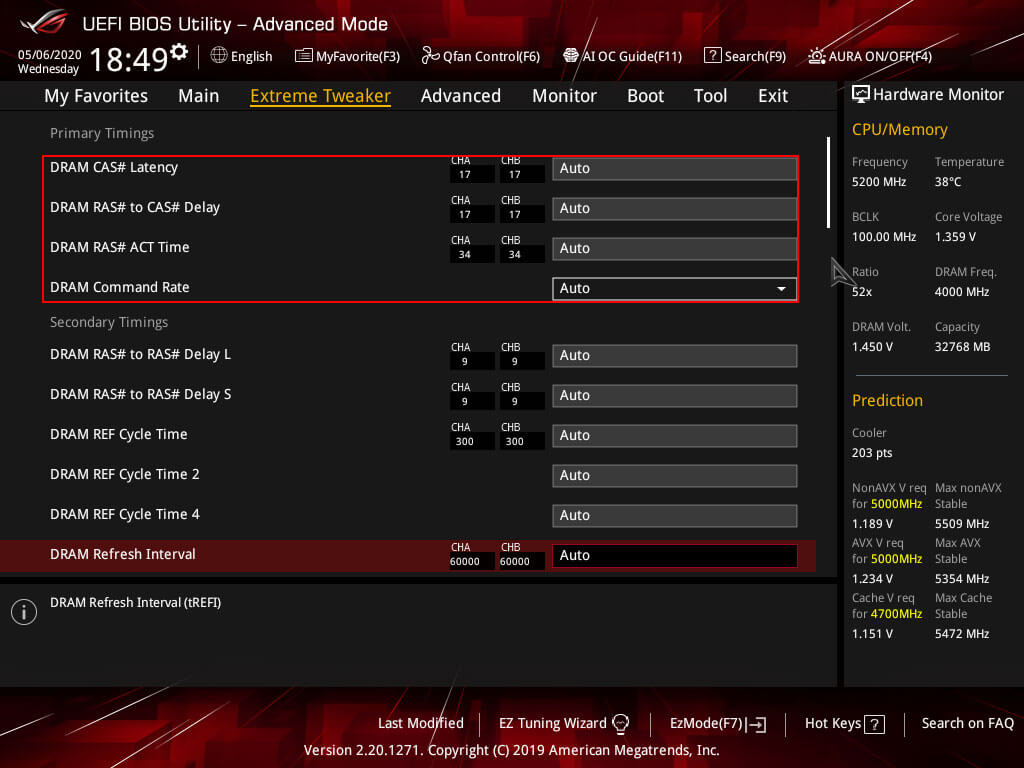
You want to keep making the timings tighter until the PC fails to boot or you start seeing a drop in Read/Write/Copy speeds in Aida64 or MaxxMen2. Adjusting Primary Timings will also lower the Latency, so there should also see a drop in Latency. The Latency of about 45ns is good, but you can get the Latency to drop below 40ns. In short, you want the Primary Timings as tight as you possibly can. If you want to make sure that these timings are stable you can run a demanding benchmark like Fire Strike Ultra in 3DMark. And do a 2 hours custom 512FFT to 4096FFT stress test before working on Secondary and Tertiary Timings.
The final timings you want to adjust are tREFI and tRFC these works best if adjust as a pair be can be done separately. The tRFC timing you want to lower as much as you can a tRFC of 300 or lower is very good, but this will also depend on the motherboard and RAM kit quality. Starting with a tRFC of 450 is a safe starting point and work the tRFC down as low as you can. tREFI is the opposite of all timings, and you want this value as high as you possibly can, some overclocks have a tREFI of 65000 or higher, but those are on the high-end motherboards like the Maximus Hero XI Extreme. And an easy tREFI to have stable is 25000. Adjusting tRFC and tREFI just like the Primary Timings by adjusting them until Windows fails to boot and/or the Aida64 or MaxxMem2 benchmarks show a drop in Latency but not an increase in Read/Write/Copy speeds.
